|
HAPPY HALLOWEEN


Thanks Evalynda for the invitation to translate your tutorials

This tutorial was written with PSPX8 and translated with PSPX7 and PSPX3, but it can also be made using other versions of PSP.
Since version PSP X4, Image>Mirror was replaced with Image>Flip Horizontal,
and Image>Flip with Image>Flip Vertical, there are some variables.
In versions X5 and X6, the functions have been improved by making available the Objects menu.
In the latest version X7 command Image>Mirror and Image>Flip returned, but with new differences.
See my schedule here
 italian translation here italian translation here
 Your versions Your versions
For this tutorial, you will need:
Material here
Thanks for the tubes Colybrix and ValyScrapPassion.
(The links of the tubemakers here).
Plugins:
consult, if necessary, my filter section here
Filters Unlimited 2.0 here
Filter Factory Galler G - Fractal Magic 4 here
Graphics Plus - Cross Shadow here
AAA Frames - Foto Frame here
Filters Graphics Plus can be used alone or imported into Filters Unlimited.
(How do, you see here)
If a plugin supplied appears with this icon  it must necessarily be imported into Unlimited it must necessarily be imported into Unlimited

You can change Blend Modes according to your colors.
(Don't forget to erase the watermarks)
Set your foreground color to #00a3d7,
and your background color to #ff6a00.

1. Open Calque Alpha Happy Halloween
Window>Duplicate or, on the keyboard, shift+D to make a copy.

Close the original.
The copy, that will be the basis of your work, is not empty,
but contains one selection saved on the alpha channel.
Flood Fill  the transparent image with your foreground color. the transparent image with your foreground color.
2. Open the landscape tube and go to Edit>Copy.
Go back to your work and go to Edit>Paste as new layer.
Effects>Image Effects>Seamless Tiling.

3. Layers>Duplicate.
Image>Mirror.
Reduce the opacity of this layer to 50%.
Layers>Merge>Merge visible.
4. Layers>Duplicate.
Effects>Geometric Effects>Spherize

Effects>Edge Effects>Enhance.
5. Selections>Load/Save Selection>Load Selection from Alpha Channel.
The selection is immediately available. You just have to click Load.

Selections>Invert.
Press CANC on the keyboard 
Selections>Select None.
6. Activate the bottom layer.
Effects>Plugins>Filters Unlimited 2.0 - Filter Factory Gallery G - Fractal Magic 4,
default settings

Adjust>Hue and Saturation>Colorize
with the codes of you foreground color

7. Activate your top layer.
Activate your Magic Wand Tool  with these settings with these settings

Click on the transparent part to select it.
Selections>Invert.
Selections>Modify>Select Selection Borders

Flood Fill  the selection with your background color. the selection with your background color.
Effects>3D Effects>Inner Bevel.

8. Click again in the transparent part with your Magic Wand Tool 
if, at step 7, you setted your Magic Wand Tool on Replace, you don't need to deselect.
Selections>Invert.
Selections>Modify>Contract - 10 pixels.
Effects>3D Effects>Inner Bevel, same settings.
Keep selected.
9. Edit>Paste into Selection (your landscape is still in memory).
Selections>Select None.
10. Open the tube Foudre and go to Edit>Copy.
Go back to your work and go to Edit>Paste as new layer.
Objects>Align>Left.
Objects>Align>Top
If you are working with a previous version that that does not make the Objects menu available,
activate your Pick Tool  (K key on the keyboard) (K key on the keyboard)
and set Position X and Y on 0,00.

11. Layers>Merge>Merge visible.
Edit>Copy.
12. Image>Add borders, 5 pixels, symmetric, background color.
Image>Add borders, 5 pixels, symmetric, foreground color.
Selections>Select All.
13. Image>Add borders, 30 pixels, symmetric, color white.
Selections>Invert.
Edit>Paste into Selection
Adjust>Blur>Gaussian Blur - radius 20.

14. Effects>Plugins>Graphics Plus - Cross Shadow.

Effects>Plugins>AAA Frames - Foto Frame.
Select Transparent Orange and after set width with 10

Selections>Select None.
15. Open the tube of the pumpkin and go to Edit>Copy.
Go back to your work and go to Edit>Paste as new layer.
Image>Resize, to 60%, resize all layers not checked.
For the moment, don't move it.
16. Open the tube of the frog and go to Edit>Copy.
Go back to your work and go to Edit>Paste as new layer.
Image>Resize, to 40%, resize all layers not checked.
Adjust>Sharpness>Sharpen.
Place  the frog on the pumpkin the frog on the pumpkin
(enlarge the image, if it is necessary).

Layers>Merge>Merge Down.
17. Activate your Pick Tool 
and set Position X: 20,00 and Position Y: 410,00

Effects>3D Effects>Drop Shadow, color black.

18. Open the tube texte and go to Edit>Copy.
Go back to your work and go to Edit>Paste as new layer.
Pick Tool 
and set Position X: 475,00 and Position Y: 40,00

Layers>Merge>Merge visible.
19. Effects>Image Effects>Page Curl, foreground color.

Add images at your choice (spiders, mouses ecc.)
Layers>Merge>Merge visible (don't flatten, if you want keep the transparence of your background).
20. Image>Resize, 900 pixels width, resize all layers checked.
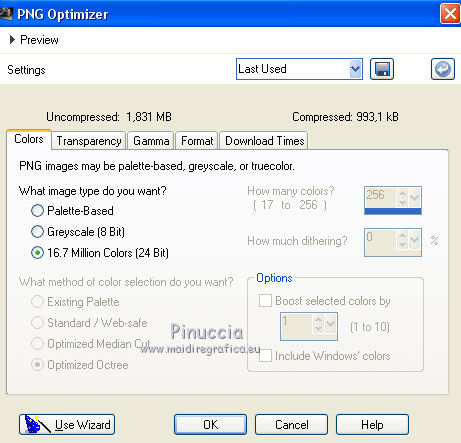
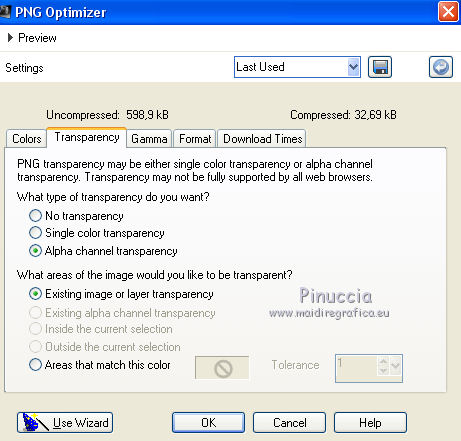
Sign your work and save as png:
File>Export>PNG Optimizer
 
Version with a tube by Coly; the other tubes are not signed

 Your versionsThanks Your versionsThanks

Gloria

If you have problems or doubts, or you find a not worked link,
or only for tell me that you enjoyed this tutorial, write to me.
23 October 2020
|


