This tutorial is created using PSP X but it can also be made with other PSP version.
I have written also a french version here
The original italian version here
Material here
For the tube, thanks Gabry.
Filtres:
if you have a doubt about plugins, see my section plugins here
DSB Flux qui
Xero - Fritillary qui
Alien Skin Eye Candy 5 Impact - Perspective Shadow qui
FM Tile Tools - Blend Emboss qui
Optional: Animation Shop qui

Copy the selection file in Selections folder.
Copy the mask file in Masks folder.
1. Set your Foreground color to #9c8394,
and set your Background color to #83af9b.

Set your Foreground color to Gradient, Linear.

2. Open a new transparent image of 800 x 600 pixels.
Flood fill  the transparent image with gradient.
3. Layers>New Raster Layer.
Selections>Select All.
Open the Gabry tube, and go to Edit>Copy.
non chiuderlo perchè ti servirà ancora
Back to your tag and go to Edit>Paste into Selection.
Selections>Select None.
4. Effects>Plugins>DBS Flux - Center Mirror.

5. Adjust>Blur>Radial blur.

6. Effects>Artistics Effects>Contours - color #a35845.

Effects>Edges Effects>Enhance.
7. Effects>Artistics Effects>Topography - color #d2429f.

Again Effects>Effects artistici>Topografia - color #89784a.

8. Layers>New Raster Layer.
Selections>Load/Save Selection>Load Selection from Disk.
Load "selezionetango".

Fill with background color.
Selections>Select None.
9. Effects>Image Effects>Seamless Tiling, standard.

10. Effects>Plugins>DSB Flux - Gears.

11. Layers>Duplicate.
Image>Mirror (Flip Horizontal).
Layers>Merge>Merge down.
12. Effects>Image Effects>Seamless Tiling, standard.
13. Layers>Duplicate.
Effects>Artistic Effects>Enamel - color #7f4053.

Layers>Merge>Merge down.
14. Effects>Image Effects>Seamless Tiling.

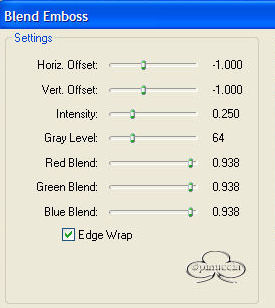
15. Effects>Plugins>FM Tile Tools - Blend Emboss, standard - 2 times.
16. Layers>New Raster Layer.
Fill with background color.
17. Layers>Load/Save Mask>Load Mask from Disk.
Load the mask ©hummel-jutta-mask70.2.

Layers>Merge>Merge Group.
Effects>3D Effects>Drop Shadow.

18. Open the tube by Gabry and go to Edit>Copy.
minimize the tube because you'll need it again
On this tube:
Effects>Art Média Effects>Charcoal,
Take note of the number of this image and minimize it.

19. Back to your tag.
Layers>New Raster Layer.
.
Fill the layer with you gradient.
Layers>New Mask Layer>From Image.
Open the menu under Source window and you'll see the list of open files.

Select the image that will have the serial number of your images open in PSP.

Effects>Edge Effects>Enhance.
Layers>Merge>Merge Group.
Effects>3D Effects 3D>Drop Shadow.

Blend Mode to Soft Light.
20. Again activate Gabry's tube and go to Edit>Copy.
Back to you tag and go to Edit>Past as New Layer.
Image>Resize, to 85%, resize all layers unchecked.
Move  the tube to the bottom right corner.
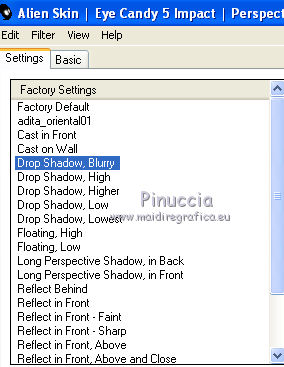
21. Effects>Plugins>Alien Skin Eye Candy 5 Impact - Perspective Shadow.
Select the preset preset Drop Shadow Blurry and ok.
22. Layers>Duplicate.
Image>Mirror (Flip Horizontal).
Image>Resize, 85%, Resize all layer not checked.
Move to the top left corner.
Set opacity of this layer to 30%.
23. Layer>Merge>Merge all.
Window>Duplicate (or shift+D) to make a copy and work on the copy.
Effects>Image Effects>Seamless Tiling, standard.
Set opacity of this layer to 50%.
Layers>Merge>Merge all.
Minimize this image.
Minimizza l'immagine.
24. Set color background to Pattern,
select the image you minimized under Category "Open Images".
also in this case the image will be the progressif number of open images in your PSP

with this settings

Change settages of the Gradient.


25. Back to your work.
Image>Add Borders - symmetric - 1 pixel, color black.
clicking with right touch on the color palette, you can see the table of recent colors.
On the bottom left you'll see you materials.
The last two colors of the tabel are always black and white.
You can set your color, clicking on the correspondent palette

Image>Add Borders, symmetric, 30 pixels, foreground color.
Select this border with magic wand 
and fill with the gradient.
Selections>Invert.
26. Effects>3D Effects 3D>Drop Shadow.

Repeat Drop Shadow with vertical and horizontal -5.
27. Again Selections>Invert.
Layers>New Raster Layer.
.
Fill with background pattern.
Effects>Arts Media Effects>Brush Strokes - #c2ad51.

Keep selected.
Layers>Duplicate.
if you want to animate, rename this layer "Fritillary" and follow the cursive steps
If you don't want to animate the borders, proceed
Effects>Plugins>Xero - Fritillary.

Adjust>Sharpness>Sharpen.
Blend mode to Multiply.
28. Set background color to green color.
Selections>Select all.
Layers>New Raster Layer.
.
Fill with background color.
Selections>Modify>Contract - 2 pixels.
Delete 
Selections>Invert.
Effects>3D Effects 3D>Inner bevel - color #9d9601.

*****
For animation, after renaming the layer "Fritillary".
Set blend mode in Multiply (you'll see the result after applicating of the filter).
Layers>Duplicate - 2 times.
On the level of second copy:
Effects>Plugins>Xero - Fritillary.

Adjust>Sharpness>Sharpen.
Close this layer and activate the layer of first copy.
Effects>Plugins>Xero - Fritillary.

Adjust>Sharpness>Sharpen.
Close this layer and activate the layer "fritillary".
Effects>Plugins>Xero - Fritillary.
Adjust>Sharpness>Sharpen.
Keep the layer visible.
Selectons>Select None.
Activate the top layer and follow step 28.
*****
29. Sign your tag.
Layers>Merge>Merge all and save as jpg.
30. For the animation, don't merge the layers.
Edit>Copy>Copy Merged.
Open Animation Shop and go to Edit>Paste>Paste as new animation.
Go back to Psp.
Close the layer "fritillary" and open the copy 1 layer.
Edit>Copy Merged.
Go back to Animaton Shop and go to Edit>Paste>Paste after current frame.
Again in PSP.
Close the layer of first copy and open the level of second copy.
Edit>Copy Merged.
Go back to Animaton Shop and go to Edit>Paste>Paste after current frame.
Edit>Selected all.
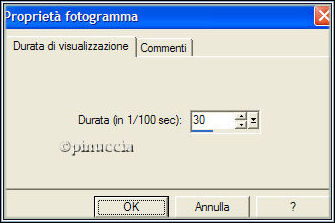
Animation>Frame Properties - 30.
Check the result clicking Preview  and save as gif.

If you have problems or doubt, or you find a not worked link, or only for tell me that you enjoyed this tutorial, write to me.
6 Maggio 2013