|
FEATHERS THAT ENCHANT  
 The feathers dance softly in the wind, as if carrying the secrets of nature.
Each one, with its unique texture, shines under the sunlight, reflecting a rainbow of soft colors. They are more than mere adornments: they are symbols of freedom and mystery. The softness of their fibers seems to invite a touch, while their light and graceful flight enchants the eyes of those who watch. In the silence of the air, the feathers become poetry, whispering stories of a world where beauty and magic intertwine in every detail.
This tutorial was written with Psp2022 and translated with PspX2020, but it can also be made using other versions of PSP.
For this tutorial, you will need:  For the tube thanks PqnaAlice. (The links of the tubemakers here).  consult, if necessary, my filter section here Filters Unlimited 2.0 here <Bkg Designer sf10I> - 4Way Average, Cruncher (to import in Unlimited) here <Bkg Designer sf10II> - NEO Vasarely Mosaics (to import in Unlimited) here Mehdi - Sorting Tiles here Mura's Meister - Pole Transform here Alien Skin Eye Candy 5 Impact - Glass, Bevel here  You can change Blend Modes according to your colors. Copy the presets  in the folders of the plugin Alien Skin Eye Candy 5 Impact>Settings>Glass, Bevel. in the folders of the plugin Alien Skin Eye Candy 5 Impact>Settings>Glass, Bevel.One or two clic on the file (it depends by your settings), automatically the preset will be copied in the right folder. why one or two clic see here  Copy the Selections in the Selections Folder. Open the mask in PSP and minimize it with the rest of the material. Set your foreground color to #768e81, and your background color to #e9bca7. Color 3: #ded1c0  2. Open a new transparent image 900 x 500 pixels. Flood Fill  the transparent image with your background color. the transparent image with your background color.Selections>Select All. Open the misted 063PaisagemByPqnaAlice  Erase the watermark and go to Edit>Copy. Go back to your work and go to Edit>Paste into Selection. Selections>Select None. 3. Effects>Image Effects>Seamless Tiling, default settings.  Adjust>Blur>Radial Blur.  4. Effects>Edge Effects>Enhance. Effects>Plugins>Mehdi>Sorting Tiles.  5. Layers>Duplicate. Effects>Plugins>Filters Unlimited 2.0 - Deformation - Circulator.  6. Activate the layer Raster 1.  Effects>Plugins>Filters Unlimited 2.0 - &<Bkg Designer sf10I> - 4 Way Average.  7. Adjust>Add/Remove Noise>Add Noise.  8. Layers>New Raster Layer. Selections>Select All. The misted 063PaisagemByPqnaAlice is still in memory: Edit Paste Into Selection. Selections>Select None. 9. Effects>Art Media Effects>Brush Strokes.  10. Effects>Image Effects>Seamless Tiling, default settings. Activate the layer Copy of Raster 1.  11. Effects>Texture Effects>Weave weave color: background color gap color: foreground color  Layers>Properties>General>Blend Mode: Screen. Opacity: 75%. 12. Layers>Merge>Merge Visible. Selections>Load/Save Selections>Load Selection From Disk. Look for and load the selection Feathers_Xiki1  Selections>Promote Selection to Layer. Effects>Plugins>Filters Unlimited 2.0 - &<Bkg Designer sf10II> - NEO Vasarely Mosaics.  13. Selections>Select None. Effects>Edge Effects>Enhance. Effects>3D Effects>Drop Shadow, color black #000000.  Layers>Properties>General>Blend Mode: Multiply. 14. Layers>Duplicate. Image>Mirror>Mirror Horizontal. Layers>Merge>Merge Down. 15. Layers>Duplicate. Activate the layer below, Promote Selection. Effects>Plugins>Muras Meister - Pole Transform.  16. Effects>Reflection Effects>Rotating Mirror.  17. Selections>Load/Save Selections>Load Selection From Disk. Look for and load the selection Feathers_Xiki2  Press CANC on the keyboard  Effects>3DEffects>Drop Shadow, color black #000000.  18. Set your foreground color to the color 3 #ded1co.  Layers>New Raster Layer. Flood Fill the layer with the color 3.Selections>Modify>Contract - 10 pixels. Press CANC on the keyboard 19. Layers>New Raster Layer. Your misted 063PaisagemByPqnaAlice is still in memory: Edit>Paste into Selection. Adjust>Sharpness>Sharpen. 20. Layers>New Raster Layer. Effects>Plugins>Alien Skin Eye Candy 5 Impact - Glass select the preset GlassXikiFeathers  21. Selections>Select None. You should have this  22. Activate the layer Raster 1. Adjust>Add/Remove Noise>Add Noise, last settings. 23. Effects>Plugins>Alien Skin Eye Candy 5 Impact - Bevel. Select the preset BevelFeathers_Xiki  Adjsut>Sharpness>Sharpen. 24. Activate your top layer Copy of Promoted Selection. Selections>Load/Save Selections>Load Selection From Disk Look for and load the selection Feathers_Xiki3  Edit>Cut. Selections>Select None. 25. Open DecorFeathers_Xiki  Erase the watermark and go to Edit>Copy. Go back to your work and go to Edit>Paste as New Layer. Pick Tool  Position X: 86,00 - Position Y: 0,00.  26. Open TituloFeathers_Xiki  Erase the watermark and go to Edit>Copy. Go back to your work and go to Edit>Paste as New Layer. Pick Tool Position X: 589,00 - Position Y: 16,00.  27. For the borders, set again your foreground color to #768e81, and your background color to color 3 #ded1c0.  Image>Add Borders, 1 pixel, symmetric, foreground color. Image>Add borders, 3 pixels, symmetric, color 3. Image>Add Borders, 1 pixel, symmetric, foreground color. Edit>Copy 28. Selections>Select All. Image>Add Borders, 40 pixels, symmetric, whatever color. Selections>Invert. Edit>Paste Into Selection 29. Adjust>Blur>Gaussian Blur - radius 15  Effects>PluginsFilters Unlimited 2.0 - &<Bkg Designers sf10I> - Cruncher.  30. Effects>Edge Effects>Enhance. Selections>Invert. Effects>3D Effects>Drop Shadow, color black #000000. 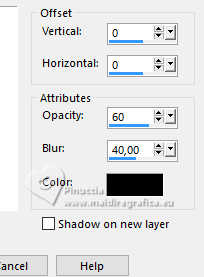 Selections>Select None. 31. Image>Add Borders, 1 pixel, symmetric, foreground color. Image>Add borders, 3 pixels, symmetric, color 3. Image>Add Borders, 1 pixel, symmetric, foreground color. Selections>Select All. 32. Image>Add Borders, 15 pixels, symmetric, whatever color. Selections>Invert. Edit>Paste Into Selection - the image copied at the step 27 is still in memory. Adjust>Blur>Gaussian Blur - radius 5 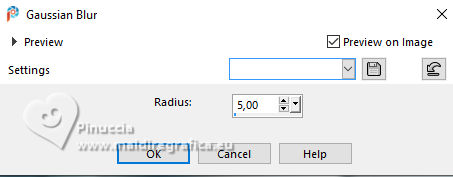 33. Effects>Art Media Effects>Brush Strokes, last settings. Selections>Select None. 34. Image>Add Borders, 1 pixel, symmetric, foreground color. 35. If you want resize your work. Sign your work and save as jpg. For the tube of this version thanks PqnaAlice   Your versions. Thanks  Aria  Baby  Baby  Louise  Marion  If you have problems or doubts, or you find a not worked link, or only for tell me that you enjoyed this tutorial, write to me. 11 March 2025 |


