|
TAG PRIMAVERA 2025


This tutorial was translated with PSP09 but it can also be made using other versions of PSP.
Since version PSP X4, Image>Mirror was replaced with Image>Flip Horizontal,
and Image>Flip with Image>Flip Vertical, there are some variables.
In versions X5 and X6, the functions have been improved by making available the Objects menu.
In the latest version X7 command Image>Mirror and Image>Flip returned, but with new differences.
See my schedule here
 French translation here French translation here
 Your versions here Your versions here
For this tutorial, you will need:

For the tubes thanks Virginia and Ina.
(you find here the links to the material authors' sites)

consult, if necessary, my filter section here
VanDerLee - Unplugged-X here
AAA Frames - Foto Frame here

You can change Blend Modes according to your colors.
In the newest versions of PSP, you don't find the foreground/background gradient (Corel_06_029).
You can use the gradients of the older versions.
The Gradient of CorelX here

Copy the texture 29-cmv in the Textures Folder.
Open the pattern Patron Hojas and minimize it with the rest of the material.
1. Open a new transparent image 900 x 600 pixels.
2. Set your foreground color to #ddca55,
and your background color to #224119.

Set your foreground color to a Foreground/Background Gradient, style Sunburst.

Flood Fill  the transparent image with your Gradient. the transparent image with your Gradient.
3. Selections>Select All.
Open Ina_mais_14-03-205 
Erase the watermark and go to Edit>Copy.
Minimize the tube.
Go back to your work and go to Edit>Paste into Selection.
Selections>Select None.
4. Adjust>Blur>Gaussian Blur - radius 20.

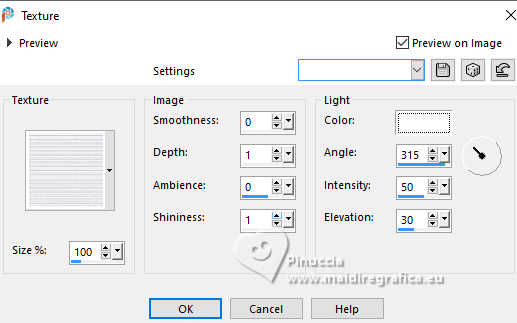
5. Effects>Texture Effects>Texture - select the texture 29-cmv
Color #ffffff

6. Effects>Plugins>VanDerLee - Unplugged-X - Copystar

7. Effects>Edge Effects>Enhance.
8. Layers>Duplicate.
Effects>Plugins>AAA Frames - Foto Frame.

9. Selection Tool 
(no matter the type of selection, because with the custom selection your always get a rectangle)
clic on the Custom Selection 
and set the following settings.

10. Layers>New Raster Layer.
Open CV_1403_019 
Erase the watermark and go to Edit>Copy.
Go back to your work and go to Edit>Paste into Selection.
Selections>Select None.
11. Activate again the tube Ina_mais_14-03-205 and go to Edit>Copy.
Go back to your work and go to Edit>Paste as new layer.
you can close the tube, without save the modifications
Image>Resize, 1 time to 70% and 1 time to 80%, resize all layers not checked.
Move  the tube at the bottom left. the tube at the bottom left.

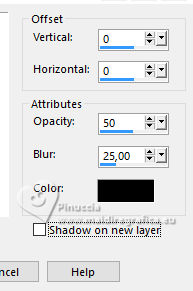
12. Effects>3D Effects>Drop Shadow, color #000000.

13. Close your background layer, Raster 1.
14. Layers>Merge>Merge visible.
15. Image>Resize, to 80%, resize all layers not checked.
16. Effects>3D Effects>Drop Shadow, color #000000.

17. Open your background layer, and stay on the top layer.
18. Open the tube Adorno_1_primavera.nines 
Edit>Copy.
Go back to your work and go to Edit>Paste as new layer.
Don't move it.
19. Open Adorno_2_primavera.nines 
Edit>Copy.
Go back to your work and go to Edit>Paste as new layer.
Don't move it.
20. Open the tube CV_1403_001 
Erase the watermark and go to Edit>Copy.
Go back to your work and go to Edit>Paste as new layer.
Image>Resize, 2 times to 80%, resize all layers not checked.
21. Effects>3D Effects>Drop Shadow, color #000000.

22. Layers>Merge>Merge All.
23. Image>Add Borders, 2 pixels, symmetric, background color #224119.
Image>Add Borders, 10 pixels, symmetric, foreground color #ddca55.
24. Activate your Magic Wand Tool 
and click in the last border to select it.
25. Effects>Texture Effects>Texture - texture 29-cmv, last settings.

26. Effects>3D Effects>Inner Bevel - color #ffffff.

Selections>Select None.
27. Image>Add borders, 30 pixels, symmetric, color #ffffff.
Select this border with your Magic Wand Tool 
28. Set your foreground color to Pattern and select the pattern Patron Hoja

Flood Fill  the selection with your foreground pattern. the selection with your foreground pattern.
29. Selections>Invert.
Effects>3D Effects>Drop Shadow, color #000000.

Selections>Select None.
30. Image>Add Borders, 2 pixels, symmetric, background color #224119.
31. Sign your work.
Add the author's watermark without forgetting the translator's.
32. Layers>Merge>Merge All and save as jpg.
For the tube of this version thanks Virginia


If you have problems or doubts, or you find a not worked link, or only for tell me that you enjoyed this tutorial, write to me.
23 March 2025


|


