|
TUTORIAL COBRE


Thanks Luz Cristina for your invitation to translate your tutorials into english

This tutorial, created with PSP9, was translated with PspX9 and PSP2020, but it can also be made using other versions of PSP.
Since version PSP X4, Image>Mirror was replaced with Image>Flip Horizontal,
and Image>Flip with Image>Flip Vertical, there are some variables.
In versions X5 and X6, the functions have been improved by making available the Objects menu.
In the latest version X7 command Image>Mirror and Image>Flip returned, but with new differences.
See my schedule here
 French Translation here French Translation here
 Your versions here Your versions here

For this tutorial, you will need:

Tube by Luz Cristina
(you find here the links to the material authors' sites)

consult, if necessary, my filter section here
Filters Unlimited 2.0 here
Neology - Digital Weaver here
Mehdi 2 - Flat Median here
VM Distortion - Kaleidoscope here
FM Tile Tools - Saturation Emboss here
Mura's Meister - Perspective Tiling, Pole Transform here
Alien Skin Xenofex 2 - Mosaic Classic here
Alien Skin Eye Candy 5 Impact - Extrude here
Filters Neology and VM Distortion can be used alone or imported into Filters Unlimited.
(How do, you see here)
If a plugin supplied appears with this icon  it must necessarily be imported into Unlimited it must necessarily be imported into Unlimited

You can change Blend Modes according to your colors.
In the newest versions of PSP, you don't find the foreground/background gradient (Corel_06_029).
You can use the gradients of the older versions.
The Gradient of CorelX here

1. Open a new transparent image 1000 x 900 pixels.
Set your foreground color to #000000,
and your background color to #dfbe66.

Set your foreground color to a Foreground/Background Gradient, style Linear.
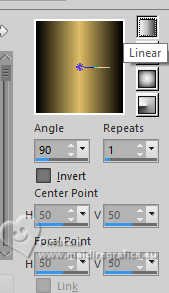
Flood Fill  the transparent image with your Gradient. the transparent image with your Gradient.
3. Effects>Plugins>Neology - Digital Weaver, default settings

4. Effects>Plugins>Mehdi 2 - Flat Median

5. Effects>Plugins>FM Tile Tools - Saturation Emboss, default settings.

6. Layers>Duplicate.
7. Effects>Plugins>Mura's Meister - Perspective Tiling.
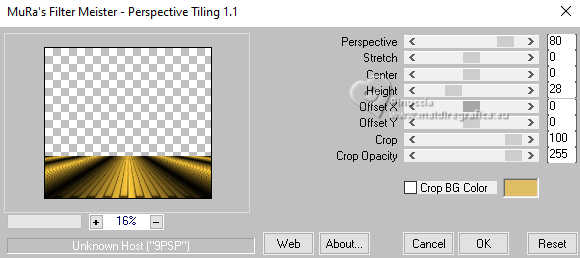
8. Effects>Plugins>Alien Skin Eye Candy 5 Impact - Extrude
Solid color: blanc
note de Luz Cristina: Don't add black.
This tutorial seems to be haunted. When I designed it, I had no problems.
Now that I'm writing this, I can't add the halftone effect.
But there are a thousand ways to skin a cat, so I figured it out.

9. Activate your Magic Wand Tool  , tolerance 5, , tolerance 5,

Click on the light line to select it.

Set your foreground color to Color.
Flood Fill  the selection with your black foreground color. the selection with your black foreground color.
10. Effects>Plugins>Alien Skin Xenofex 2 - Classic Mosaic
Grout color: background color

11. Note de Luz Cristina: Now I'm crossing my fingers for the next step, which is...
Effects>Artistic Effects>Halftone
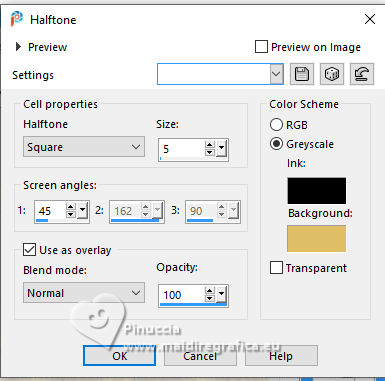
Luz Cristina: I did it, yay! yay!!!

Selections>Select None.
12. Effects>Plugins>Alien Skin Eye Candy 5 Impact - Extrude.

13. Effects>Image Effects>Offset.
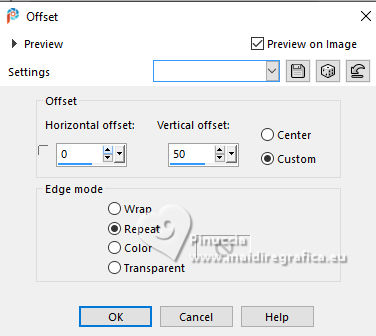
14. Layers>Duplicate.
15. Effects>Plugins>Mura's Meister - Pole Transform.

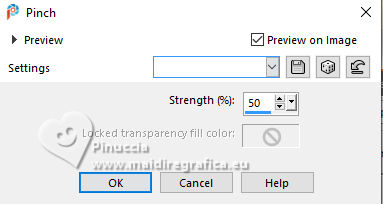
16. Effects>Distortion Effects>Pinch.
17. Effects>3D Effects>Drop Shadow, color black.

18. Open the jpg image Imágen JPG 
Edit>Copy.
Go back to your work and go to Edit>Paste as new layer.
19. Effects>Plugins>VM Distortion - Kaleidoscope

Change the Blend Mode of this layer to Luminance (legacy).
20. Image>Resize, to 80%, resize all layers not checked.
Move  the image up in the center. the image up in the center.
21. Effects>Plugins>FM Tile Tools - Saturation Emboss, default settings.

22. Effects>3D Effects>Drop Shadow, same settings.
23. Layers>Arrange>Move Down.
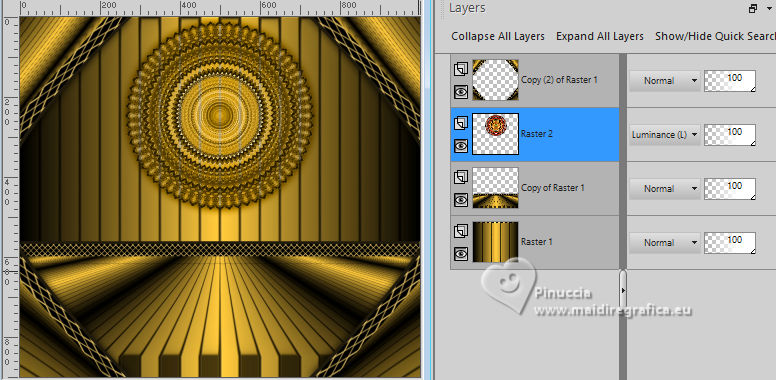
Stay on this layer.
24. Open the woman's tube Tube-LuzCristina 
Edit>Copy.
Go back to your work and go to Edit>Paste as new layer.
Move  the tube at the bottom left. the tube at the bottom left.

Effects>3D Effects>Drop Shadow, same settings.
25. Open the tube Jarrón 
Edit>Copy.
Go back to your work and go to Edit>Paste as new layer.
Move  the tube at the bottom right. the tube at the bottom right.
Effects>3D Effects>Drop Shadow, same settings.
26. Open the texte Texto 
Edit>Copy.
Go back to your work and go to Edit>Paste as new layer.
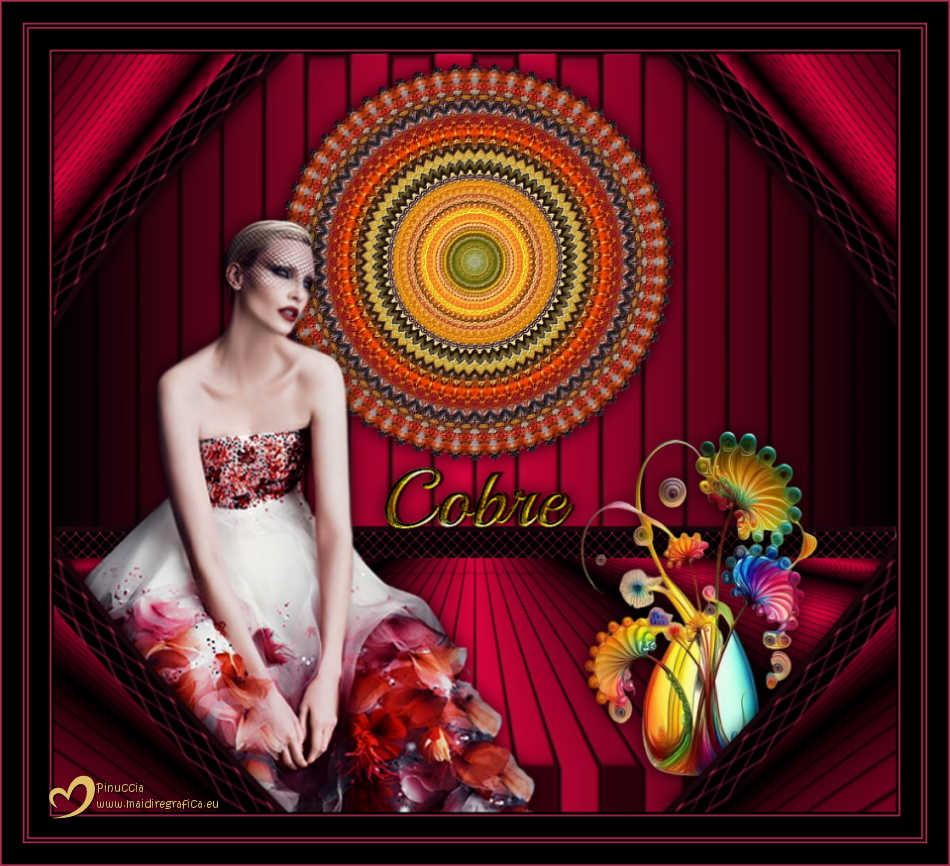
Move  the text to your liking, or see my example. the text to your liking, or see my example.

Effects>3D Effects>Drop Shadow, same settings.
27. Image>Add Borders, 3 pixels, symmetric, dark color.
Image>Add Borders, 2 pixels, symmetric, light color.
Image>Add Borders, 25 pixels, symmetric, dark color.
Image>Add Borders, 2 pixels, symmetric, light color.
Image>Add Borders, 3 pixels, symmetric, dark color.
Image>Add Borders, 2 pixels, symmetric, light color.
Image>Add Borders, 25 pixels, symmetric, dark color.
Image>Add Borders, 2 pixels, symmetric, light color.
28. Image>Resize, to 85%, resize all layers checked.
Sign your work and save as jpg.
For the tubes of these versions thanks Luz Cristina



If you have problems or doubts, or you find a not worked link,
or only for tell me that you enjoyed this tutorial, write to me.
20 March 2025

|


