|
VANIA LÚCIA


Thanks Estela for your invitation to translate your tutorials into english

This tutorial, created with PSP2022, was translated with PspX7, but it can also be made using other versions of PSP.
Since version PSP X4, Image>Mirror was replaced with Image>Flip Horizontal,
and Image>Flip with Image>Flip Vertical, there are some variables.
In versions X5 and X6, the functions have been improved by making available the Objects menu.
In the latest version X7 command Image>Mirror and Image>Flip returned, but with new differences.
See my schedule here
 French Translation here French Translation here
 Your versions here Your versions here

For this tutorial, you will need:

Thanks for the tube and the mask Luz Cristina and Narah.
The rest of the material is by Estela Fonseca.
(The links of the tubemakers here).
*It is forbidden to remove the watermark from the supplied tubes, distribute or modify them,
in order to respect the work of the authors

consult, if necessary, my filter section here
Filters Unlimited 2.0 here
Mehdi - Wavy Lab here
Mura's Seamless - Tiling Part here
Graphics Plus - Cross Shadow here
Mura's Meister - Copies here
Toadies - What are you here
Alien Skin Eye Candy 5 Impact - Glass here
Filters Mura's Seamless, Graphics Plus and Toadies can be used alone or imported into Filters Unlimited.
(How do, you see here)
If a plugin supplied appears with this icon  it must necessarily be imported into Unlimited it must necessarily be imported into Unlimited

You can change Blend Modes according to your colors.

Open the mask in PSP and minimize it with the rest of the material.
Colors

1. Open a new transparent image 900 x 650 pixels.
Set your foreground color to color 1 #4e6076
and your background color to color 2 #b0c1d2.

color 3 #b98480
color 4 #60072c
2. Effects>Plugins>Mehdi - Wavy Lab
This filter creates gradients with the colors of your Materials palette.
The first is your background color, the second is your foreground color.
Change the last color created by the filtre with the color 4 #60072c

3. Adjust>Blur>Gaussian Blur - radius 30.

4. Effects>Plugins>Mura's Seamless - Tiling Part, default settings

5. Effects>Plugins>Toadies - What are you, default settings

Effects>Edge Effects>Enhance.
6. Layers>Brightness and Contrast>Fill Light/Clarity - 2 times.
Note: Apply only if the result of your color is too dark

7. Layers>Duplicate.
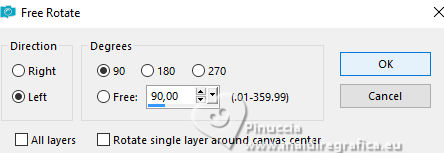
Image>Free Rotate - 90 degrees to left.

8. Effects>Distortion Effects>Pinch.

9. Effects>Plugins>Toadies - What are you, default settings

Effects>Edge Effects>Enhance.
10. Selection Tool 
(no matter the type of selection, because with the custom selection your always get a rectangle)
clic on the Custom Selection 
and set the following settings.

Selections>Promote Selection to Layer.
11. Effects>Texture Effects>Weave - both colors #ffffff

12. Selections>Modify>Contract - 20 pixels.
Adjust>Blur>Gaussian Blur - radius 30.

13. Effects>Plugins>Graphics Plus - Cross Shadow, default settings.

Selections>Modify>Contract - 1 pixel.
14. Effects>Texture Effects>Fur.

Keep selected.
15. Open the tube 3938-luzcristina 
Edit>Copy.
Go back to your work and go to Edit>Paste as new layer.
Selections>Invert.
Press CANC on the keyboard 
Selections>Select None.
Layers>Merge>Merge Down.
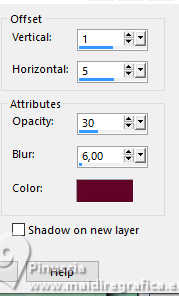
16. Effects>3D Effects>Drop Shadow, color #000000.

17. Activate your background color.
Effects>Texture Effects>Weave - both color: color 3 #b98480.

18. Layers>New Raster Layer.
Flood Fill  the layer with your background color. the layer with your background color.
Layers>New Mask layer>From image
Open the menu under the source window and you'll see all the files open.
Select the mask Narahs_Masks_1779.

Layers>Merge>Merge Group.
19. Effects>Reflection Effects>Rotating Mirror, default settings.

Change the Blend Mode of this layer to Overlay.
20. Activate your top layer.
Layers>New Raster Layer.
Custom Selection 

Set your foreground color to color 4 #60072c 
Flood Fill  the selection with your foreground color. the selection with your foreground color.
21. Effects>Plugins>Alien Skin Eye Candy 5 Impact - Glass.
Glass Color: your foreground color, in this case color 4 #60072c

Selections>Select None.
22. Effects>Plugins>Mura's Meister - Copies

Layers>Duplicate.
Image>Mirror>Mirror Horizontal.
Layers>Merge>Merge Down.
Adjust>One Step Photo Fix.
23. Image>Add Borders, 45 pixels, symmetric, color white.
24. Open EF-Vania_Lúcia_Deco_1 
Edit>Copy.
Go back to your work and go to Edit>Paste as new layer.
Note: if you work with other colors, you can colorize with your color 1
25. Open EF-Vania_Lúcia_Texto 
Edit>Copy.
Go back to your work and go to Edit>Paste as new layer.
Move  the text down. the text down.

26. Effects>3D Effects>Drop Shadow, color 4 #60072c (now is your foreground color).

27. Image>Add Borders, 10 pixels, symmetric, foreground color (color 4 #60072c)
Sign your work on a new layer.
Layers>Merge>Merge All and save as jpg.
For the tube of this version thanks Estela Fonseca


If you have problems or doubts, or you find a not worked link,
or only for tell me that you enjoyed this tutorial, write to me.
22 March 2025

|


