|
ROJO Y NEGRO


Thanks Yedralina for your invitation to translate your tutorials into english

This tutorial was written with PSP2020 and translated with PSPX9 and PSP2020, but it can also be made using other versions of PSP.
Since version PSP X4, Image>Mirror was replaced with Image>Flip Horizontal,
and Image>Flip with Image>Flip Vertical, there are some variables.
In versions X5 and X6, the functions have been improved by making available the Objects menu.
In the latest version X7 command Image>Mirror and Image>Flip returned, but with new differences.
See my schedule here
 italian translation here italian translation here
 french translation here french translation here
 your versions here your versions here

For this tutorial, you will need:

Thanks for the tube Cat and for a mask Cre@nnie
(The links of the tubemakers here).

consult, if necessary, my filter section here
Mura's Meister - Cloud here

You can change Blend Modes according to your colors.
In the newest versions of PSP, you don't find the foreground/background gradient (Corel_06_029).
You can use the gradients of the older versions.
The Gradient of CorelX here

Copy the preset Emboss 5 in the Presets Folder.
Copy the masks in PSP in the Masks Folder.
Set your foreground color to color black #000000,
and your background color to color #cb170e.

Set your foreground color to a Foreground/Background Gradient, style Sunburst.

1. Open a new transparent image 950 x 650 pixels.
Flood Fill  the transparent image with your Gradient. the transparent image with your Gradient.
2. Calques>Nouveau calque raster.
Effets>Modules Externes>Mura's Meister - Cloud, default settings.

Remember that this filter works with the colors of your material palette,
but it keeps in memory the first setting used after the the opening of Psp.
So, if you have already used the plugin, press Reset to be sure to have your colors.
The result of this effects is random, so it won't be the same as mine.
If you want to change the appearance of the clouds, click on the preview window,
until you'll see the result you like better.
Note. Furthermore, clouds may give different results when applying masks.
See the final versions of the italian and french translations.
3. Layers>Duplicate.
Layers>Load/Save Mask>Load Mask from Disk.
Look for and load the mask 20-20.

Layers>Duplicate.
Layers>Merge>Merge Group.
You can't see the result of the mask,
because it is covered by the lower layers.

Activate the layer below, Raster 2.
4. Layers>Load/Save Mask>Load Mask from Disk.
Look for and load the mask 114noe

Layers>Merge>Merge Group.
Layers>Arrange>Move Up.
Adjust>Sharpness>Sharpen.
Dont' worry if you don't see the result of the mask
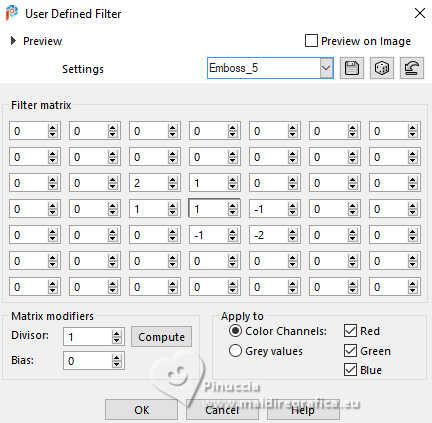
5. Effects>User Defined Filter - select the preset Emboss 5

6. Activate your bottom layer.
Layers>Duplicate.
Layers>Arrange>Bring to Top.
7. K key to activate your Pick Tool 
pull the top central node down to approximately 355 pixels.


8. Layers>Load/Save Mask>Load Mask from Disk.
Look for and load the mask cre@nnie-46

Layers>Merge>Merge Group.
Adjust>Sharpness>Sharpen.
9. Effects>User Defined Filter - Emboss 5

10. Open Deco00342©Yedralina 
Edit>Copy.
Go back to your work and go to Edit>Paste as new layer.
Don't move it.
Change the Blend Mode of this layer to Overlay.
11. Now you have 2 options:
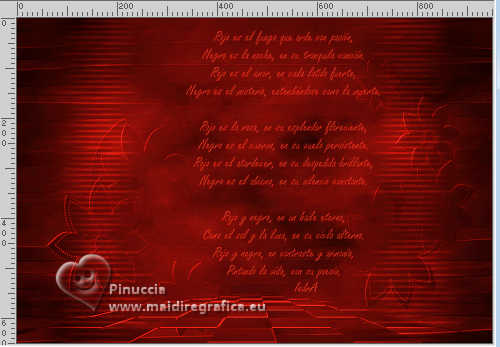
a.Copy/Paste as new layer the poem Poema ROJO Y NEGRO.png 
b.Copy the text of the poem Poema ROJO Y NEGRO.txt 
and write it in your language, width the color red
and the font Freestyle Script, size 30

adapt the size according to your PSP version
In the screenshot below the difference with the same size in the latest versions of PSP.

For my english translation I used PSP 2020

in the material I added my translation of the poem into english

12. In both cases, end with:
Effects>User Defined Filter - Emboss 5

Reduce the opacity of this layer to 65%.
Move  the text a little higher and to the right. the text a little higher and to the right.
13. Open your main tube 2024 06 02 Cat N1 
Erase the watermark and go to Edit>Copy.
Go back to your work and go to Edit>Paste as new layer.
Image>Resize, to 80%, resize all layers not checked.
Move  the tube to the left side. the tube to the left side.

Effects>3D Effects>Drop Shadow, at your choice.
14. Layers>Duplicate.
Adjust>Blur>Gaussian Blur - radius 30.

Change the Blend Mode of this layer to Multiply.
Layers>Arrange>Move Down.
15. Image>Add borders, 1 pixel, symmetric, background color.
Selections>Select All.
Image>Add borders, 10 pixels, symmetric, black foreground color.
Selections>Invert.
16. Change the settings of your gradient, style Linear.
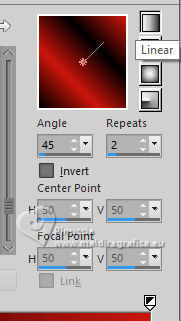
Flood Fill  the selection with your Gradient. the selection with your Gradient.
Selections>Select None.
17. Image>Add borders, 1 pixel, symmetric, background color.
Image>Add borders, 35 pixels, symmetric, black foreground color.
18. Image>Add borders, 1 pixel, symmetric, background color.
Selections>Select All.
Image>Add borders, 10 pixels, symmetric, black foreground color.
Selections>Invert.
19. Invert the colors of your Gradient.
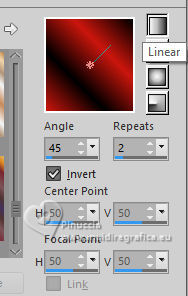
Flood Fill  the selection with your Gradient. the selection with your Gradient.
Selections>Select None.
20. Image>Add borders, 1 pixel, symmeric, background color.
21. Open Deco00343©Yedralina 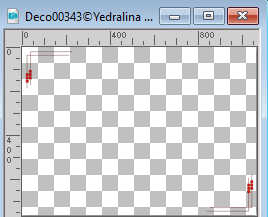
Edit>Copy.
Go back to your work and go to Edit>Paste as new layer.
It is in its place.
22. Effects>User Defined Filter - Emboss 5

23. Image>Resize, 1000 pixels width, resize all layers checked.
24. Sign your work on a new layer.
Layers>Merge>Merge All and save as jpg.
For this version I inverted the colors: foreground red/background black
For the tube thanks Kamil


If you have problems or doubts, or you find a not worked link, or only for tell me that you enjoyed this tutorial, write to me.
29 June 2024

|


