|
MOMENTOS MAGICOS


Thanks Yedralina for your invitation to translate your tutorials into english

This tutorial was written with CorelX19 and translated with CorelX17, but it can also be made using other versions of PSP.
Since version PSP X4, Image>Mirror was replaced with Image>Flip Horizontal,
and Image>Flip with Image>Flip Vertical, there are some variables.
In versions X5 and X6, the functions have been improved by making available the Objects menu.
In the latest version X7 command Image>Mirror and Image>Flip returned, but with new differences.
See my schedule here
 italian translation here italian translation here
 french translation here french translation here
 your versions here your versions here

For this tutorial, you will need:

For the tubes thanks Lana, SC, Riet and for the masks Silvie and Narah.
The rest of the material is by Yedralina.
(The links of the tubemakers here).

consult, if necessary, my filter section here
Filters Unlimited 2.0 here
Mehdi - Sorting Tiles here
Mura's Meister - Perspective Tiling here
Simple - Blintz here
AAA Frames - Foto Frame here
Filters Simple can be used alone or imported into Filters Unlimited.
(How do, you see here)
If a plugin supplied appears with this icon  it must necessarily be imported into Unlimited it must necessarily be imported into Unlimited

You can change Blend Modes according to your colors.
In the newest versions of PSP, you don't find the foreground/background gradient (Corel_06_029).
You can use the gradients of the older versions.
The Gradient of CorelX here

Copy the presets Double Vision and Emboss 4 in the Presets Folder.
Open the masks in PSP and minimized them with the rest of the material.
1. Set your foreground color to #2e6550,
and your background color to #dac294.

2. Set your Foreground color to a Foreground/Background Gradient, style Sunburst.

3. Open CanalAlpha_MOMENTOSM
Window>Duplicate or, on the keyboard, shift+D to make a copy.

Close the original.
The copy, that will be the basis of your work, is not empty,
but contains the selections saved to alpha channel.
4. Selections>Select All.
Open the misted SC_MistedBeach02_01-06.2232 
Edit>Copy.
Go back to your work and go to Edit>Paste into Selection.
Selections>Select None.
5. Effects>Image Effects>Seamless Tiling, default settings.

6. Adjust>Blur>Radial Blur.

7. Effects>Reflection Effects>Rotating Mirror.

8. Effects>Plugins>Mehdi - Sorting Tiles.

9. Effects>User Defined Filter - select the preset Double_Vision and ok.

Effects>Edge Effects>Enhance.
10. Effects>Plugins>Simple - Blintz - 2 times
this effect works without window: result

11. Effects>Reflection Effects>Rotating Mirror, same settings.

12. Layers>New Raster Layer.
Selections>Load/Save Selection>Load Selection from Alpha Channel.
The selection #1 is immediately available. You just have to click Load.

13. Flood Fill  the selection with your Gradient. the selection with your Gradient.
Edit>Paste into Selection (the misted is still in memory).
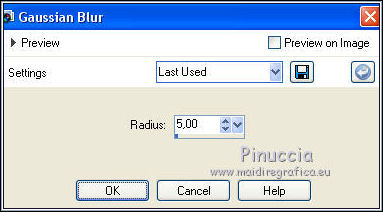
14. Adjust>Blur>Gaussian Blur - radius 5.

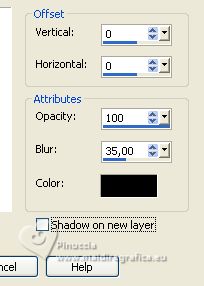
15. Effects>3D Effects>Drop Shadow, color black.

Selections>Select None.
16. Image>Mirror.
Activate your bottom layer.
17. Selections>Load/Save Selection>Load Selection from Alpha Channel.
Open the selections menu and load the selection #2

Selections>Promote Selection to Layer.
Selections>Select None.
18. Image>Mirror.
Effects>3D Effects>Drop Shadow, same settings.
19. Activate again your bottom layer.
Selections>Load/Save Selection>Load Selection from Alpha Channel.
Open the selections menu and load the selection #3

Selections>Promote Selection to Layer.
Layers>Arrange>Move Up.
20. Selections>Modify>Contract - 50 pixels.
Set your foreground color to white #ffffff.
Flood Fill  the selection with color white. the selection with color white.
21. Selections>Modify>Contract - 5 pixels.
Press CANC on the keyboard 
22. Edit>Paste into Selection (the misted is always in memory).
Selections>Select None.
Your tag and the layers

23. Activate again your background layer.
Layers>Duplicate.
24. Effects>Plugins>Mura's Meister - Perspective Tiling.

25. Layers>Arrange>Move up - 2 times.
26. Activate your Magic Wand Tool  , tolérance 0 and feather 50, , tolérance 0 and feather 50,

and click in the transparent zone to select it.

Press +/-10 time CANC on the keyboard.
Selections>Select None.
Layers>Duplicate.
don't forget to set again the feather of your Magic Wand Tool to 0
27. Layers>New Raster Layer.
Flood Fill  the layer with color white. the layer with color white.
28. Layers>New Mask layer>From image
Open the menu under the source window and you'll see all the files open.
Select the mask Silvie_Mask_Deco44HZ

Layers>Merge>Merge Group.
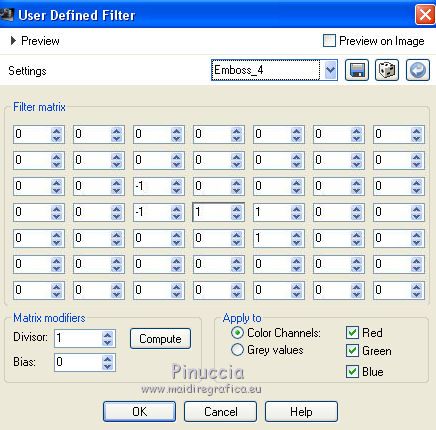
29. Effects>User Defined Filter - select the preset Emboss 4 and ok.

30. Change the Blend Mode of this layer to Luminance (legacy).
31. Activate your bottom layer.
Edit>Copy.
Edit>Paste as new image, and minimize this image.
32. Go back to your work.
Stay on the bottom layer.
Open the tube Deco00317©Yedralina 
Edit>Copy.
Go back to your work and go to Edit>Paste as new layer.
K key to activate your Pick Tool 
and set Position X: 125,00 and Position Y: 27,00

33. Layers>Arrange>Move Up.
34. Image>Add borders, 1 pixel, symmetric, color white.
Image>Add borders, 1 pixel, symmetric, with the first color #2e6550.
Image>Add borders, 1 pixel, symmetric, background color.
35. Selections>Select All.
Image>Add borders, 45 pixels, symmetric, whatever color.
Selections>Invert.
36. Activate the image minimized at step 31 and go to Edit>Copy.
Go back to your work and go to Edit>Paste into Selection.
37. Adjust>Blur>Gaussian Blur - radius 15.

38. Effects>Plugins>AAA Frames - Foto Frame.

Selections>Select None.
39. Layers>New Raster Layer.
Flood Fill  the layer with color white. the layer with color white.
40. Layers>New Mask layer>From image
Open the menu under the source window
and select the mask NarahsMasks_1590

Layers>Merge>Merge Group.
41. Effects>User Defined Filter - select the preset Emboss 4 and ok.

42. Open the tube LD-model-1327 
Erase the watermark and go to Edit>Copy.
Go back to your work and go to Edit>Paste as new layer.
Image>Mirror.
Image>Resize, if necessary, for me 85%, resize all layers not checked.
Move  the tube to the right. the tube to the right.
43. Effects>3D Effects>Drop Shadow, at your choice; for me

44. Open the wordart Riet Tekst Magic 543 040120 
Erase the watermark and go to Edit>Copy.
Go back to your work and go to Edit>Paste as new layer.
Image>Negative Image.
Change the Blend Mode of this layer to Luminance (legacy).
Move  the text at the upper left. the text at the upper left.
45. Image>Add borders, 1 pixel, symmetric, with the first color #2e6550.
46. Image>Resize, 1000 pixels width, resize all layers checked.
47. Sign your work on a new layer.
Layers>Merge>Merge All and save as jpg.
For the tubes of this version thanks Beatriz and SC


If you have problems or doubts, or you find a not worked link, or only for tell me that you enjoyed this tutorial, write to me.
10 August 2023

|


