|
ALMA


Thanks Yedralina for your invitation to translate your tutorials into english

This tutorial was written with CorelX19 and translated with CorelX17, but it can also be made using other versions of PSP.
Since version PSP X4, Image>Mirror was replaced with Image>Flip Horizontal,
and Image>Flip with Image>Flip Vertical, there are some variables.
In versions X5 and X6, the functions have been improved by making available the Objects menu.
In the latest version X7 command Image>Mirror and Image>Flip returned, but with new differences.
See my schedule here
italian translation here
french translation here
your versions here
For this tutorial, you will need:
Material qui
For the tubes thanks Nena Silva (vvs-woman1458), Yedralina (1990©Yedralina)
and Tine (objet_deco9_tine_07.2017).
For the mask thanks Ildiko (ildiko_create_0041free_mask)
(The links of the tubemakers here).
Plugins:
consult, if necessary, my filter section here
Filters Unlimited 2.0 here
Mehdi - Wavy Lab 1.1. here
VM Toolbox - Instant Tile here
AFS IMPORT - MIRRBEVL here
Mura's Seamless - Emboss at Alpha here
Alien Skin Eye Candy 5 Impact - Motion Trail here
Optional AAA Filters - Custom here
Filters VM Toolbox, Mura's Seamless and AFS IMPORT and Simple can be used alone or imported into Filters Unlimited.
(How do, you see here)
If a plugin supplied appears with this icon  it must necessarily be imported into Unlimited it must necessarily be imported into Unlimited

You can change Blend Modes according to your colors.
In the newest versions of PSP, you don't find the foreground/background gradient (Corel_06_029).
You can use the gradients of the older versions.
The Gradient of CorelX here
Copy the preset  in the folder of the plugin Alien Skin Eye Candy 5 Impact>Settings>Shadow. in the folder of the plugin Alien Skin Eye Candy 5 Impact>Settings>Shadow.
One or two clic on the file (it depends by your settings), automatically the preset will be copied in the right folder.
why one or two clic see here
Open the mask in PSP and minimize it with the rest of the material.
Set your foreground color to a6bab5,
and your background color to #3b6163.

Set your foreground color to a Foreground/Background Gradient, style Radial.

1. Open alma_Canal Alpha.
Window>Duplicate or, on the keyboard, shift+D to make a copy.

Close the original.
The copy, that will be the basis of your work, is not empty,
but contains the selections saved on the alpha channel.
Flood Fill  the transparent image with your Gradient. the transparent image with your Gradient.
Effects>Plugins>Filters Unlimited 2.0 - VM Toolbox - Instant Tile, default settings.

Effects>Plugins>Filters Unlimited 2.0 - [AFS IMPORT] - MIRRBEVL, default settings.

2. Layers>New Raster Layer.
Selections>Load/Save Selection>Load Selection from Alpha Channel.
The selection #1 is immediately available. You just have to click Load.

Open the landscape misted and go to Edit>Copy.
Go back to your work and go to Edit>Paste into Selection.
3. Selections>Load/Save Selection>Load Selection from Alpha Channel.
Open the Selections menu and load the selection #2.

Selections>Promote Selection to layer.
Selections>Select None.
4. Set your foreground color to white #ffffff.
Layers>New Raster Layer.
Flood Fill  the layer with color white. the layer with color white.
Layers>New Mask layer>From image
Open the menu under the source window and you'll see all the files open.
Select the mask ildiko_create_0041free_mask.

Layers>Merge>Merge Group.
Effects>Plugins>Mura's Seamless - Emboss at Alpha, default settings.

Layers>Arrange>Move Down.
Effects>3D Effects>Drop Shadow, color black.
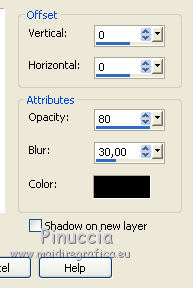
Change the Blend Mode of this layer to Soft Light.
5. Open the tube Deco00261©Yedralina and go to Edit>Copy.
Go back to your work and go to Edit>Paste as new layer.
Change the Blend Mode of this layer to Hard Light.
6. Activate your bottom layer, Raster 1.
Selections>Load/Save Selection>Load Selection from Alpha Channel.
Open the Selections menu and load the selection #3.

Selections>Promote Selection to Layer.
Layers>Arrange>Move up - 3 times.
Effects>3D Effects>Drop Shadow, color black.
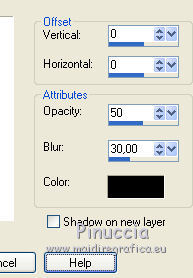
Selections>Select None.
Effects>Plugins>Alien Skin Eye Candy 5 Impact - Motion Trail
Select the preset EC5_MT02-©Yedralina and ok.

Effects>Reflection Effects>Rotating Mirror

Change the Blend Mode of this layer to Overlay.
7. Open the tube Deco00262©Yedralina and go to Edit>Copy.
Go back to your work and go to Edit>Paste as new layer.
Don't move it.
Open the tube Deco00263©Yedralina and go to Edit>Copy.
Go back to your work and go to Edit>Paste as new layer.
Don't move it.
Effects>3D Effects>Drop Shadow, color black.

You can change the Blend Mode to Luminance (legacy),
or change color according to your work.
9. You should have this

10. Set your foreground color to the first color #a6bab5
and change the Gradient settings
 
Image>Add borders, 3 pixels, symmetric, background color.
Image>Add borders, 3 pixels, symmetric, foreground color.
Image>Add borders, 3 pixels, symmetric, background color.
Selections>Select All.
11. Image>Add borders, 30 pixels, symmetric, whatever color.
Selections>Invert.
Flood Fill  the selection with your Gradient. the selection with your Gradient.
Selections>Invert.
Effects>3D Effects>Drop Shadow, color black.

Selections>Select None.
12. Image>Add borders, 15 pixels, symmetric, color white #ffffff.
Selections>Select All.
Image>Add borders, 30 pixels, symmetric, whatever color.
Selections>Invert.
Flood Fill  the selection with your Gradient. the selection with your Gradient.
Effects>3D Effects>Drop Shadow.

Selections>Select None.
13. Open the tube Deco00249©Yedralina and go to Edit>Copy.
Go back to your work and go to Edit>Paste as new layer.
K key on the keyboard to activate your Pick Tool 
and set Position X: 102,00 and Position Y: 752,00

Adjust>Blur>Radial Blur.

Change the Blend Mode of this layer to Hard Light (if you want).
14. Open the woman tube and go to Edit>Copy.
Go back to your work and go to Edit>Paste as new layer.
Place  rightly the tube. rightly the tube.
Effects>3D Effects>Drop Shadow, at your choice.
Open the deco tube and go to Edit>Copy.
Go back to your work and go to Edit>Paste as new layer.
Move  the tube at the bottom right. the tube at the bottom right.
Effects>3D Effects>Drop Shadow, at your choice.
15. Image>Add borders, 1 pixel, symmetric, dark color.
Optional: Effects>Plugins>AAA FIlters - Custom - click on Landscape and ok.

16. Image>Resize, 1000 pixels width, resize all layers checked.
Sign your work on a new layer.
Layers>Merge>Merge All and save as jpg.
Version with tubes by Beatriz (3208-woman-LB TUBES),
LisaT (paysages_0066_lisat) and Nikita (12930422607_divers_nikita)


If you have problems or doubts, or you find a not worked link, or only for tell me that you enjoyed this tutorial, write to me.
7 Septembre 2020
|


