|
TRIPTICO

english version


This tutorial was written with CorelX19 and translated with CorelX17, but it can also be made using other versions of PSP.
Since version PSP X4, Image>Mirror was replaced with Image>Flip Horizontal,
and Image>Flip with Image>Flip Vertical, there are some variables.
In versions X5 and X6, the functions have been improved by making available the Objects menu.
In the latest version X7 command Image>Mirror and Image>Flip returned, but with new differences.
See my schedule here
italian translation here
french tanslation here
your versions here
For this tutorial, you will need:
Tubes of yours
The rest of the material here
For the tubes and a mask used and not supplied, thanks
Coly (femme455-coly), Jacotte (tube-jacotte-651) and Narah (Narah_Mask_1091).
The rest of the material is by Yedralina.
(The links of the tubemakers here).
Plugins:
consult, if necessary, my filter section here
AP Lines - Lines SilverLining here
Alien Skin Eye Candy 5 Impact - Glass here
Mura's Meister - Cloud here
AAA Frames - Foto Frame here

You can change Blend Modes according to your colors.
In the newest versions of PSP, you don't find the foreground/background gradient (Corel_06_029).
You can use the gradients of the older versions.
The Gradient of CorelX here
Copy the preset  in the folder of the plugins Alien Skin Eye Candy 5. in the folder of the plugins Alien Skin Eye Candy 5.
One or two clic on the file (it depends by your settings), automatically the preset will be copied in the right folder.
why one or two clic see here
Copy the preset Emboss 3 and 222-©Yedralina in the Presets Folder.
Copy the texture in the Textures Folder.
Open the masks in PSP and minimize them with the rest of your material.
1. Set your foreground color to the dark color #052647,
and your background color to the light color #cee6fc.
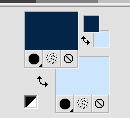
Set your foreground color to a Foreground/Background Gradient, style Linear

2. Open Alpha_Triptico-©Yedralina.
This image, that will be the basis of your work, is not empty,
but contains the selections saved on the alpha channel.
Flood Fill  the transparent image with your Gradient. the transparent image with your Gradient.
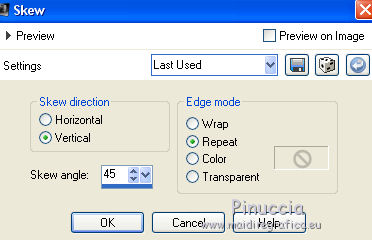
3. Effects>Geometric Effects>Skew.
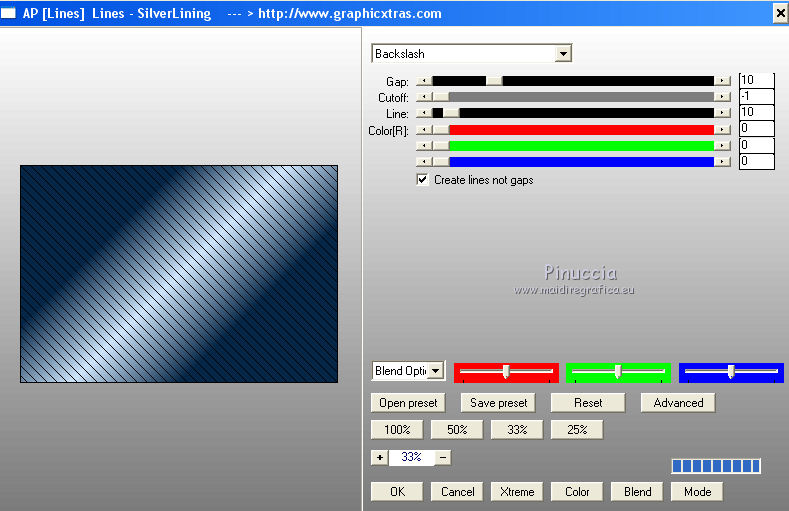
4. Effects>Plugins>AP Lines - Lines SilverLining.
5. Again Effects>Geometric Effects>Skew, same settings.
6. Layers>New Raster Layer.
Flood Fill  the layer with the gradient. the layer with the gradient.
7. Layers>New Mask layer>From image
Open the menu under the source window and you'll see all the files open.
Select the mask Masc032©Yedralina.

Layers>Merge>Merge Group.
Effects>Edge Effects>Enhance More.
8. Layers>New Raster Layer.
Selections>Load/Save Selection>Load Selection from Alpha Channel.
The selection #1 is immediately available.
You have only to click Load.

9. Change the settings of your Gradient

Flood Fill  the selection with the Gradient. the selection with the Gradient.
Effects>Edge Effects>Enhance More.
10. Effects>3D Effects>Drop Shadow, color black.

Keep selected.
11. Layers>New Raster Layer.
Selections>Modify>Contract - 30 pixels.
Set your foreground color to Color.
Flood Fill  the selection with your dark foreground color. the selection with your dark foreground color.
12. Effects>Texture Effects>Texture - select the texture M-006-Azalee.

Adjust>Sharpness>Sharpen More.
Selections>Select None.
13. Effects>3D Effects>Drop Shadow, same settings.

14. Layers>New Raster Layer.
Selections>Load/Save Selection>Load Selection from Alpha Channel.
Open the Selections menu and load the selection #2.

Flood Fill  the selection with your light background color. the selection with your light background color.
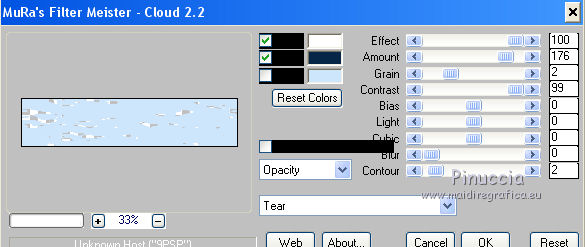
15. Effects>Plugins>Mura's Meister - Cloud.
16. Adjust>Blur>Gaussian Blur - radius 15.

17. Selections>Select None.
Effects>Edge Effects>Enhance.
18. Effects>3D Effects>Drop Shadow, color black.

19. Layers>New Raster Layer.
Flood Fill  with your dark foreground color. with your dark foreground color.
20. Layers>New Mask layer>From image
Open the menu under the source window and you'll see all the files open.
Select the mask Narah_Mask_1091.

Layers>Merge>Merge Group.
21. Press K on the keyboard to activate the Pick Tool 
open the presets menu and select the preset 222-©Yedralina

and you'll get this

M Key to deselect the Tool.
22. Selections>Load/Save Selection>Load Selection from Alpha Channel.
Open the Selections menu and load the selection #3.

Press CANC on the keyboard 
Selections>Select None.
23. Effecs>User Defined Effects - select the preset Emboss 3 and ok.

24. Layers>Duplicate.
Image>Mirror.
Image>Flip.
Layers>Merge>Merge Down.
25. Open the tube Deco00178©Yedralina.png and go to Edit>Copy.
Go back to your work and go to Edit>Paste as new layer.
Don't move it.
26. Layers>New Raster Layer.
Selections>Load/Save Selection>Load Selection from Alpha Channel.
Open the Selections menu and load the selection #4.

27. Change again the settings of your Gradient

Flood Fill  the selection with the Gradient. the selection with the Gradient.
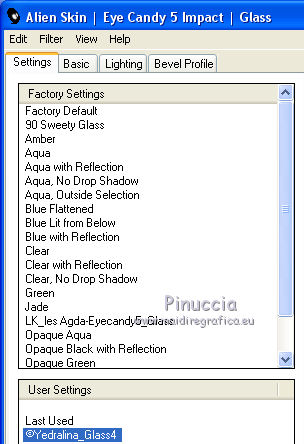
28. Effects>Plugins>Alien Skin Eye Candy 5 Impact - Glass.
select the preset ©Yedralina_Glass4 and ok.
Selections>Select None.
29. Effects>Reflection Effects>Rotating Mirror.

30. Layers>Duplicate.
Effects>Distortion Effects>Vent, from left, intensity 100.

31. Layers>Arrange>Move Down.
Activate again the top layer.
Layers>Merge>Merge down.
32. Activate the background layer, Trama 1.
Open the tube Deco00179©Yedralina.png and go to Edit>Copy.
Go back to your work and go to Edit>Paste as new layer.
33. Objects>Align>Bottom
if you are working with a previous version that has not available the menu Objects,
activate the Pick Tool 
and set as below

M key to deselect the Tool.
34. Change the Blend Mode of this layer to Luminance (legacy).
35. Image>Add borders, 1 pixel, symmetric, dark color.
Selezione>Seleziona tutto.
Image>Add borders, 10 pixels, symmetric, light color.
Image>Add borders, 2 pixels, symmetric, dark color.
Image>Add borders, 20 pixels, symmetric, light color.
Image>Add borders, 1 pixel, symmetric, dark color.
36. Selections>Invert.
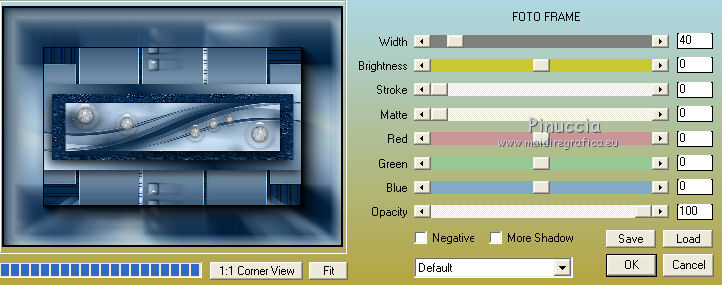
Effects>Plugins>AAA Frames - Foto Frame.
37. Selections>Select All.
Image>Add borders, 30 pixels, symmetric, whatever color.
Selections>Invert.
Flood Fill  with the first gradient. with the first gradient.

Effects>Edge Effects>Enhance More.
Selections>Select None.
38. Open your main tube and go to Edit>Copy.
Go back to your work and go to Edit>Paste as new layer.
Place  the tube where you like. the tube where you like.
Effects>3D Effects>Drop Shadow, color black.

39. Add, if you want, a deco tube.
Effects>3D Effects>Drop Shadow, same settings.
40. Image>Resize, 950 pixels width, resize all layer checked.
Sign your work on a new layer.
Layers>Merge>Merge All.
Adjust>Sharpness>Unsharp Mask.

Save as jpg.
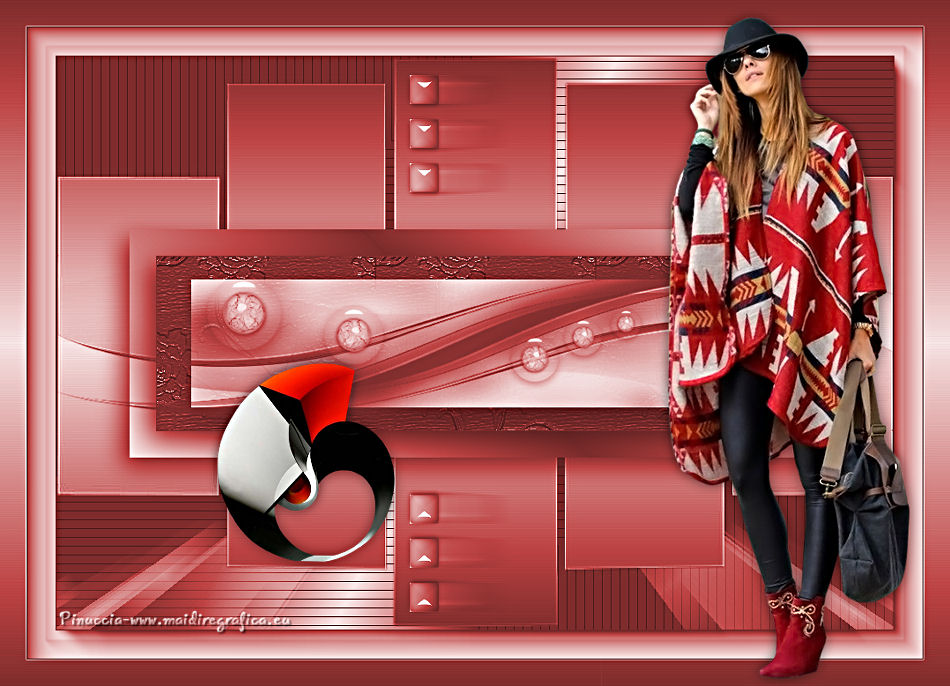
Version with tubes by Colybrix (femme433-coly) and Syl (SvB Decoratie 43)

If you have problems or doubts, or you find a not worked link, or only for tell me that you enjoyed this tutorial, write to me.
10 June 2018
|


