Home |
Home |

Mappa sito |
Mappa sito |
Tutorial |
Tutorial |
Tut tecnici |
Tut tecnici |
Links-Banner |
Links-Banner |
Regali-Award |
Regali-Award |
Informatica |
Informatica |
Archivio |
Archivio |
Mail |
Mail |
Privacy policy |
Privacy policy |
Novità |
Novità |
Home |
Home |
Mappa sito |
Mappa sito |
Tutorial |
Tutorial |
Tut tecnici |
Tut tecnici |
Links-Banner |
Links-Banner |
Regali-Award |
Regali-Award |
Informatica |
Informatica |
Archivio |
Archivio |
Mail |
Mail |
Privacy policy |
Privacy policy |
Novità |
Novità |
|
NO MATTER WHAT  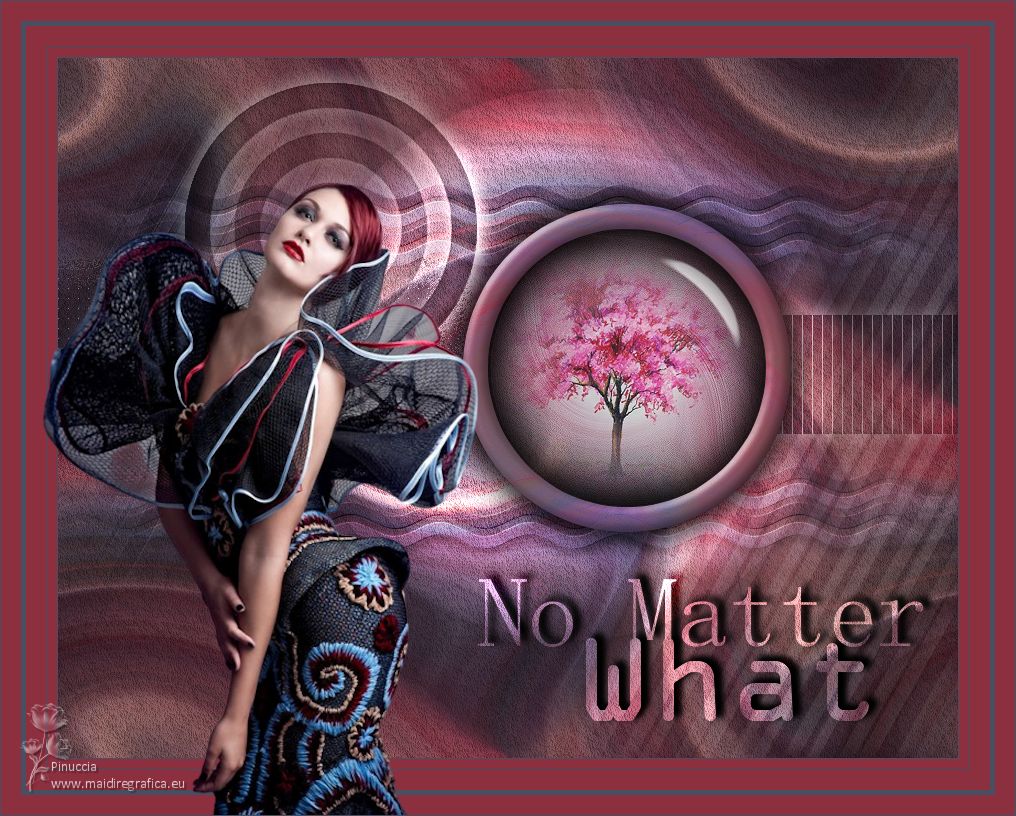


This tutorial was written with Psp2022 and translated with PspX17, but it can also be made using other versions of PSP. You can change Blend Modes according to your colors. In the newest versions of PSP, you don't find the foreground/background gradient (Corel_06_029). You can use the gradients of the older versions. The Gradient of CorelX here Copy the preset  in the folder of the plugin Alien Skin Eye Candy 5 Impact>Settings>Glass. in the folder of the plugin Alien Skin Eye Candy 5 Impact>Settings>Glass.One or two clic on the file (it depends by your settings), automatically the preset will be copied in the right folder. why one or two clic see here  Copy the selection in the Selections Folder. Copy the mask in the Masks Folder. 1. Choose 3 colors from your material. Foreground color #494e61, background color #a1b6cf colore 3 #8c2f3f.  To start set your foreground color to color 3 #8c2f3f. 2. Open a new transparent image 900 x 700 pixels. Flood Fill  the transparent image with color 3 #8c2f3f. the transparent image with color 3 #8c2f3f.Set your foreground color to 494e61, and your background color to #a1b6cf.  3. Selections>Select All. Open the woman's tube 1032MulherByPqnaAlice 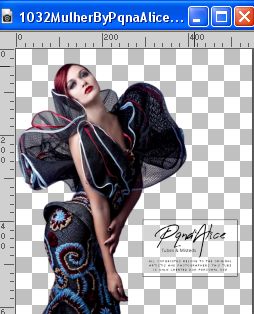 Erase the watermark and go to Edit>Copy. Minimize the tube. Go back to your work and go to Edit>Paste into Selection. Selections>Select None. 4. Effects>Image Effects>Seamless Tiling, default settings.  Adjust>Blur>Radial Blur. 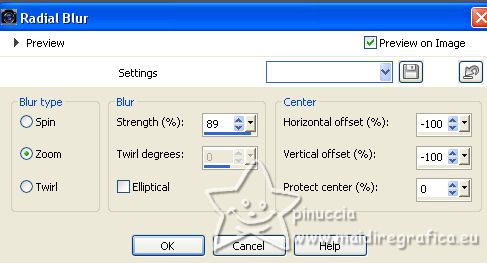 5. Effects>Distortion Effects>Twirl. 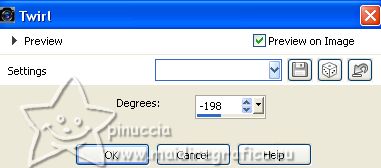 6. Effects>Plugins>AAA Filters - Textures 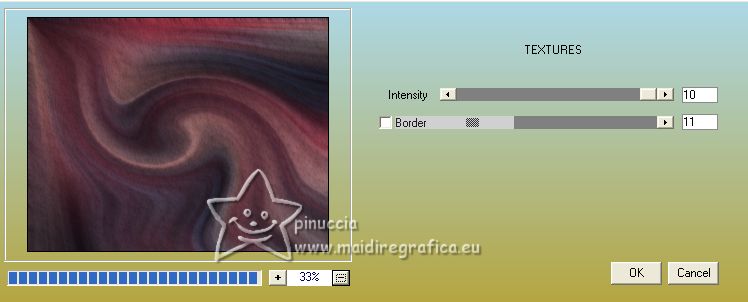 7. Effects>Edge Effects>Enhance. Effects>Image Effects>Seamless Tiling, default settings. 8. Layers>New Raster Layer. Selections>Load/Save Selection>Load Selection from Disk. Look for and load the selection Selection256_Xiki1 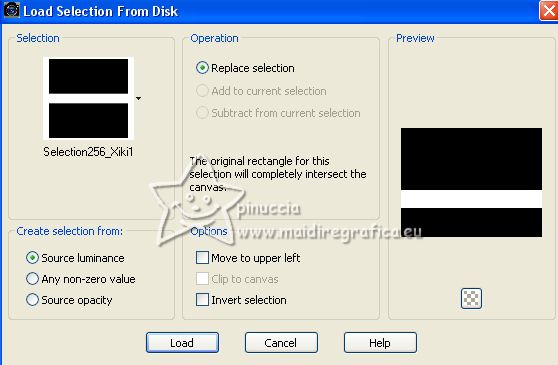 Reduce the opacity of your Flood fill to 40%. Flood Fill the selection with your background color.Selections>Select None. 9. Layers>New Raster Layer. Selections>Load/Save Selection>Load Selection from Disk. Look for and load the selection Selection256_Xiki2 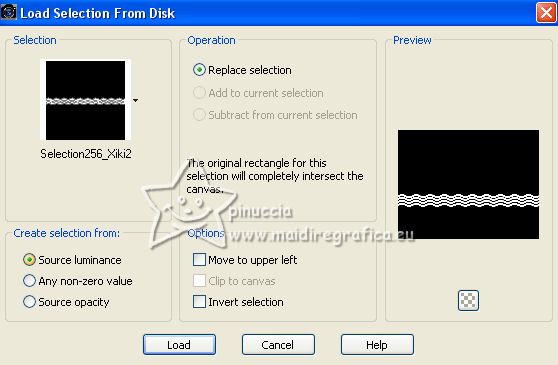 Set the opacity of your Flood Fill Tool to 60% and the Match Mode to RGB Value  Flood Fill the selections by interleaving foreground and background colors.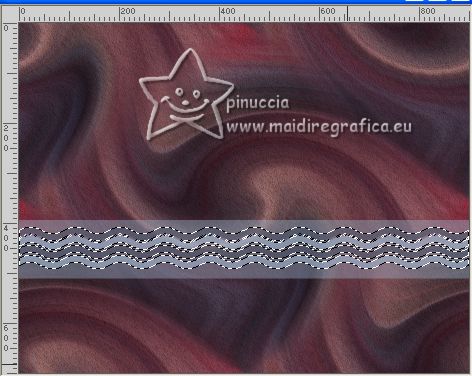 Selections>Select None. 10. Effects>Plugins>Mura's Seamless - Emboss at Alpha, default settings. 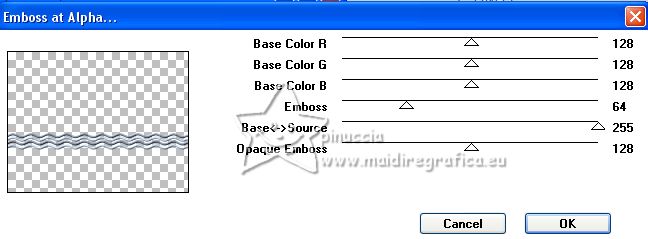 Effects>3D Effects>Drop Shadow, color black.  11. Activate the layer below, Raster 2. Effects>Plugins>AAA Filters - AAA Blur. 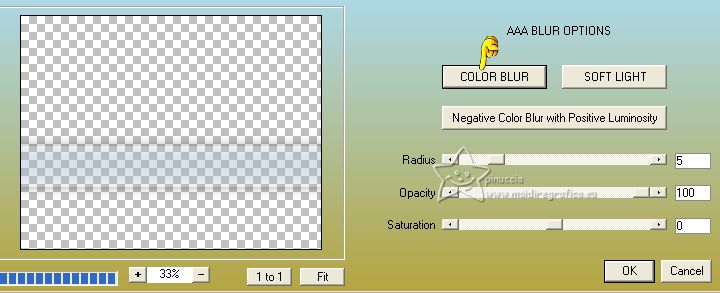 12. Activate the layer Raster 3. Layers>Merge>Merge Down. Layers>Load/Save Mask>Load Mask from Disk. Look for and load the mask nevoa.msk 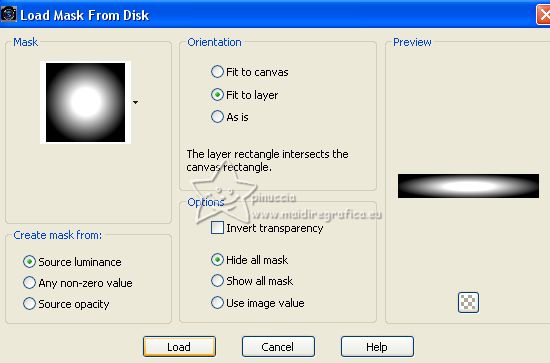 Layers>Merge>Merge Group. Change the Blend Mode of this layer to Overlay. Layers>Duplicate. Pick Tool  keep Position X: 0,00 and set Position Y: 99,00. 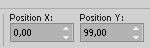 Layers>Merge>Merge Down. 13. Layers>New Raster Layer. Selections>Load/Save Selection>Load Selection from Disk. Look for and load the selection Selection256_Xiki3 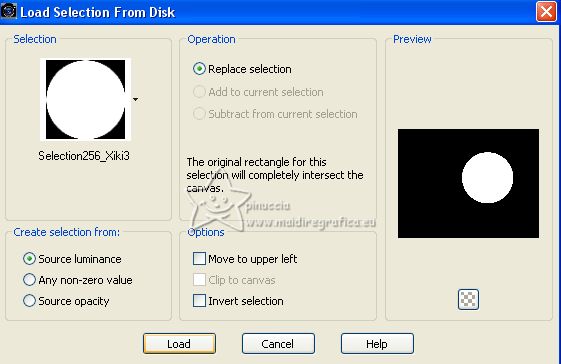 Set the opacity of your Flood Fill to 100. Set your foreground color to color 3 #8c2f3f  Flood fill the selection with color 3 #8c2f3f.Selections>Modify>Contract - 25 pixels. Press CANC on the keyboard  14. Activate the layer Group-Raster 2. Press CANC on the keyboard. 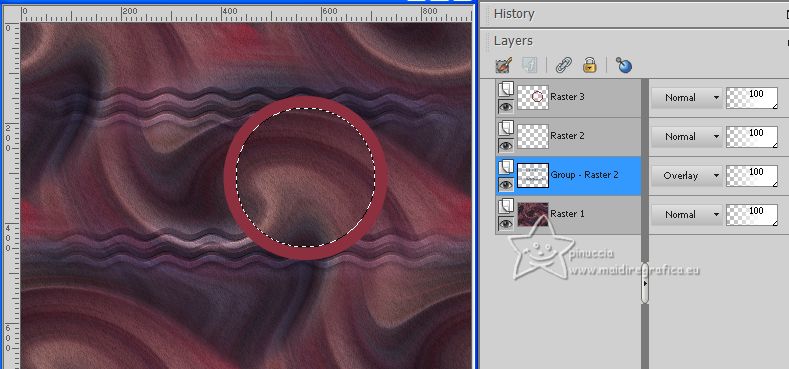 Layers>New Raster Layer. Open the landscape misted 098PaisagemByPqnaAlice 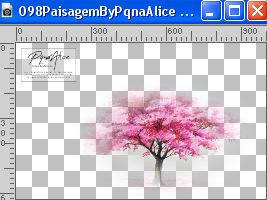 Erase the watermark and go to Edit>Copy. Go back to your work and go to Edit>Paste into Selection. Adjust>Sharpness>Sharpen. 15. Layers>Duplicate. Adjust>Blur>Radial Blur, same settings 16. Effects>Distortion Effects>Twirl, same settings. Layers>Arrange>Move Down. Selections>Select None. 17. Layers>Duplicate. Image>Flip>Flip Horizontal. Image>Flip>Flip Vertical. These commands, after mirroring and flipping it, leave the image in the same position. Therefore, if you are using an old version, after ImageMirror and Image>Flip, activate your Pick Tool and set Position X: 433,00 and Position Y: 171,00.  If you close the layer above of the original, you'll have this 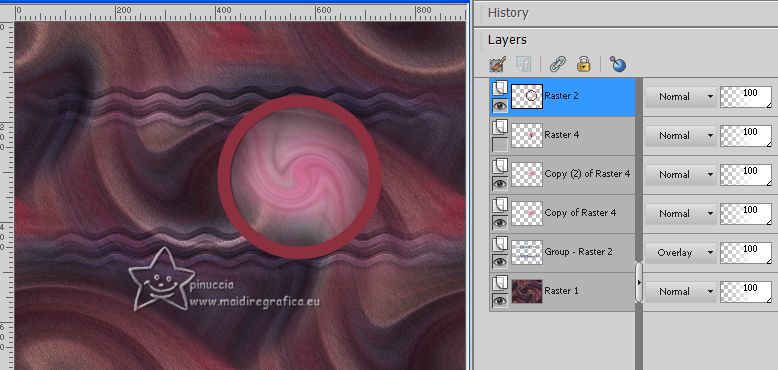 Layers>Merge>Merge Down. Effects>Edge Effects>Enhance. Repeat Enhance Edge. 18. Activate your top layer, Raster 2. 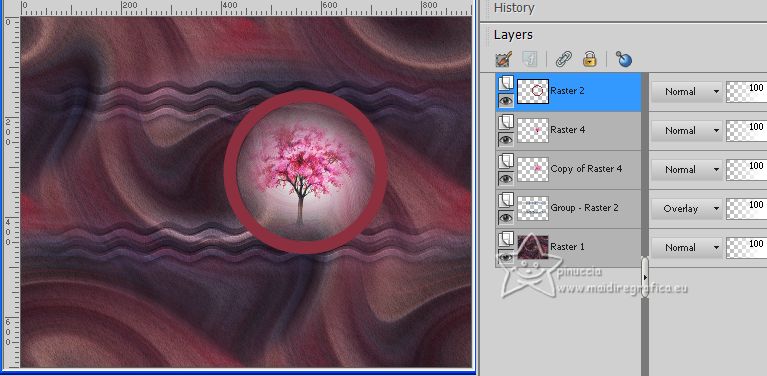 Layers>New Raster Layer. Selections>Load/Save Selection>Load Selection from Disk. Look for and load the selection Selection256_Xiki4 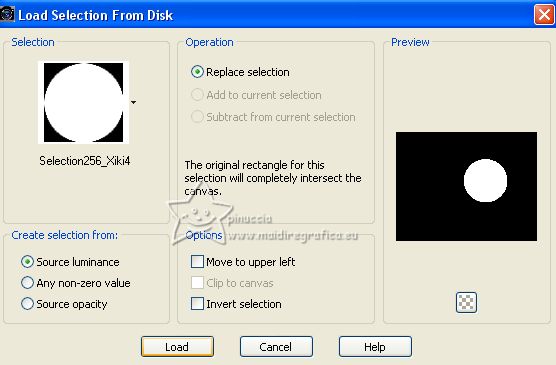 Effects>Plugins>Alien Skin Eye Candy 5 Impact - Glass. Select the preset GlassT246Xiki and ok.  Selections>Select None. Layers>Arrange>Move Down. 19. Activate the layer Raster 2. Effects>3D Effects>Inner Bevel. 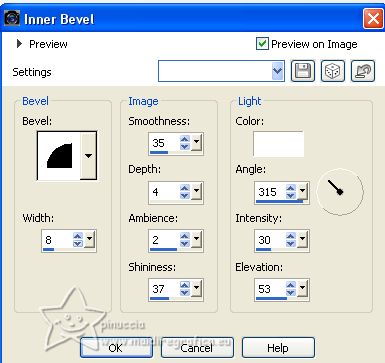 Effects>3D Effects>Drop Shadow, color black. 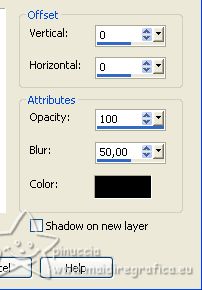 Change the Blend Mode of this layer to Luminance. 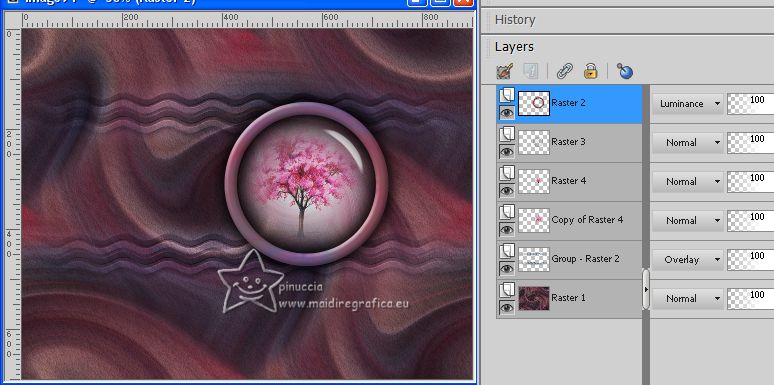 20. Activate the layer Raster 1. Open Decor246BySoxikibem 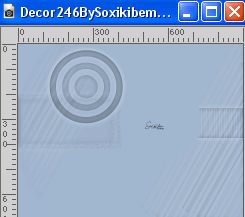 Edit>Copy. Go back to your work and go to Edit>Paste as new layer. Keep the Blend Mode of this layer to Hard Light, opacity 60, or adapt to your liking. 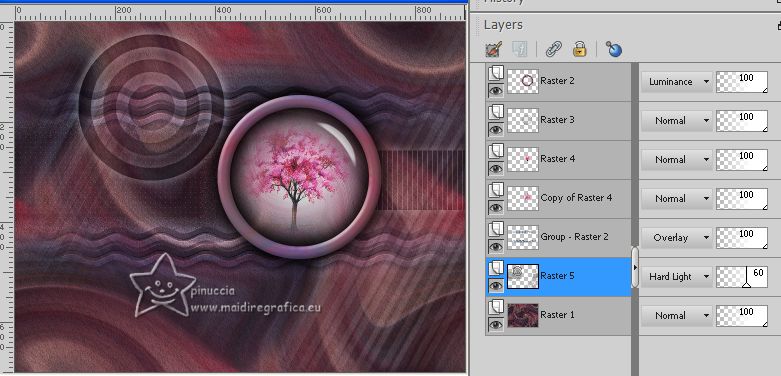 21. Open Decor246BySoxikibem2 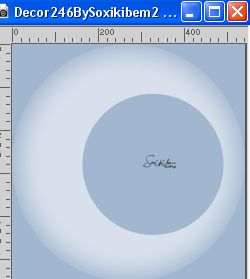 Edit>Copy. Go back to your work and go to Edit>Paste as new layer. Pick Tool and set Position X: 241,00 and Position Y: 30,00.  Change the Blend Mode of this layer to Dodge and keep the opacity to 70%.  22. For the borders, set your background color to color 3 #8c2f3f.  Image>Add borders, 1 pixel, symmetric, foreground color. Image>Add borders, 10 pixels, symmetric, color 3 Image>Add borders, 1 pixel, symmetric, foreground color. Image>Add borders, 20 pixels, symmetric, color 3 Image>Add borders, 5 pixels, symmetric, foreground color. Image>Add borders, 20 pixels, symmetric, color 3 23. Activate again the woman's tube 1032MulherByPqnaAlice and go to Edit>Copy. Go back to your work and go to Edit>Paste as new layer. For my example: Image>Mirror. Image>Resize, to 110%, resize all layers not checked. Place  the tube to the left side, or to your liking. the tube to the left side, or to your liking.Effects>3D Effects>Drop Shadow or an effect to your liking. 24. Open TituloNoMatterWhat_ByXiki 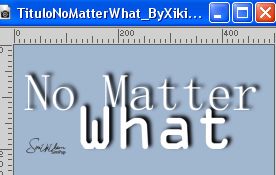 Edit>Copy. Go back to your work and go to Edit>Paste as new layer. Place the tube to your liking.Change the Blend Mode of this layer to Overlay. 25. Image>Add borders, 1 pixel, symmetric, foreground color. 26. Sign your work and save as jpg. For the tube of this version thanks Suizabella. 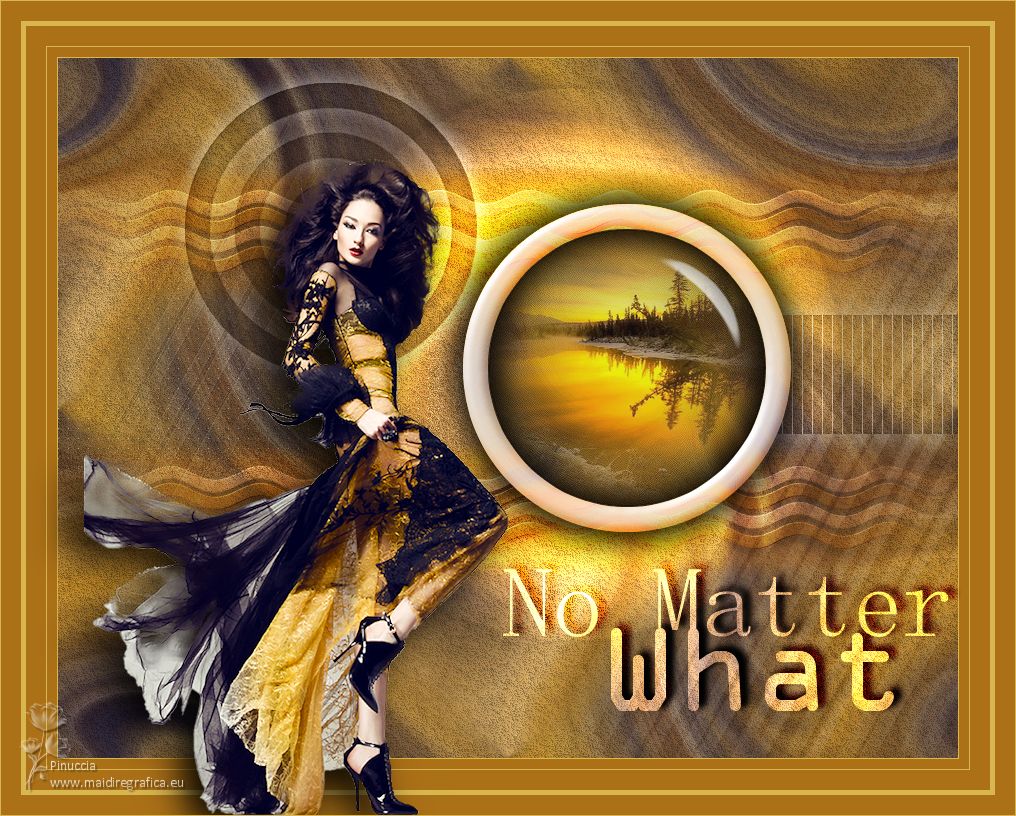  Your versions. Thanks  Nelly   If you have problems or doubts, or you find a not worked link, or only for tell me that you enjoyed this tutorial, write to me. 1 July 2023 |


 it must necessarily be imported into Unlimited