|
SOXIKIBEM - SIM 5 AÑOS  SIM - 5 YEARS OF VIRTUAL CONNECTION SIM - 5 YEARS OF VIRTUAL CONNECTION

For this tutorial, you will need:  For the tube thanks PqnaAlice (The links of the tubemakers here).  consult, if necessary, my filter section here Filters Unlimited 2.0 here Factory Gallery D - Shoutin'! here &<Bkg Designer sf10II> - Line Side Line (to import in Unlimited) here AAA Frames - Foto Frame here Italian Editors Effect - Mosaico here Virtual Painter 4 here Filters Factory Gallery and Italian Editors can be used alone or imported into Filters Unlimited. (How do, you see here) If a plugin supplied appears with this icon  it must necessarily be imported into Unlimited it must necessarily be imported into Unlimited You can change Blend Modes according to your colors.  1. Choose 2 colors to works. Set your foreground color to #808c58, and your background color to #fbb565.  2. Open a new transparent image 900 x 600 pixels. Flood Fill  the transparent image with your foreground color. the transparent image with your foreground color.Selections>Select All. 3. Open the misted 1094MulherByPqnaAlice 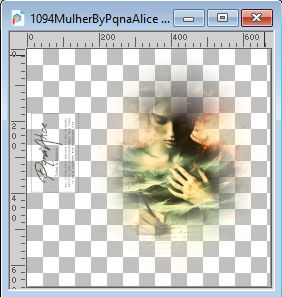 Erase the watermark and go to Edit>Copy. Go back to your work and go to Edit>Paste Into Selection. Selections>Select None. 4. Effects>Image Effects>Seamless Tiling - default settings.  Adjust>Blur>Radial Blur. 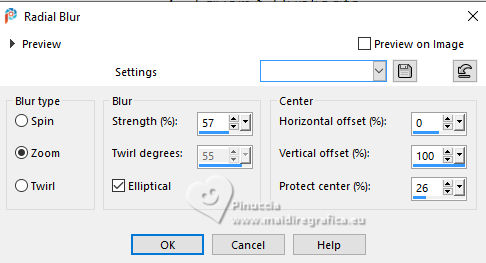 5. Layers>Duplicate. Effects>Plugins>Filter Factory Gallery D - Shoutin'! 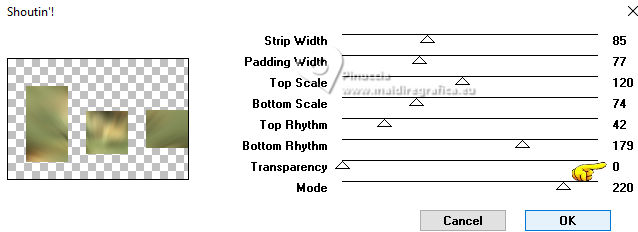 6. Selections>Select All. Selections>Float. Selections>Defloat. Selections>Modify>Select Selection Borders  7. Layers>New Raster Layer. Reduce the opacity of your Flood Fill Tool to 20%. Flood Fill the selection with your background color. Note: Set again the opacity of your Flood Fill Tool to 100%. 8. Edit>Paste as new layer - the tube 1094MulherByPqnaAlice is still in memory. Move  the tube to fit the left frame. the tube to fit the left frame.Again Edit>Paste as new layer, and snap it to the center frame. Another time Edit>Paste as new layer, and snap it to the right frame.  9. Selections>Invert. You are on the layer 5. Press CANC on the keyboard  Activate the layer 4 and press again CANC on the keyboard. Activate the layer 3 and press again CANC on the keyboard.  10. Selections>Invert. You are on the layer Raster 3. Effects>Texture Effects>Blinds, foreground color. 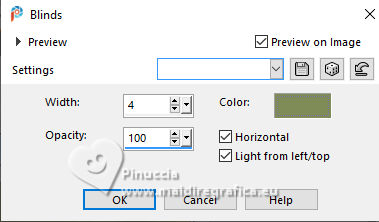 Adjust>Sharpness>Sharpen. 11. Activate the layer Raster 4. Effects>Texture Effects>Tiles. 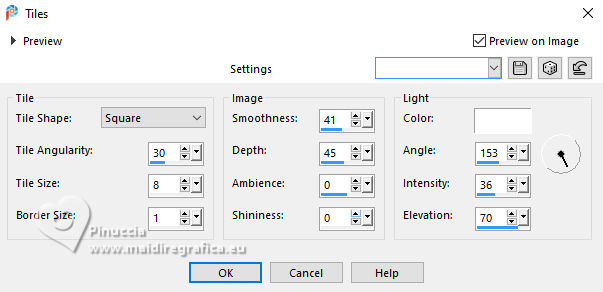 12. Activate the layer Raster 5. Effects>Texture Effects>Weave weave color: black #000000. 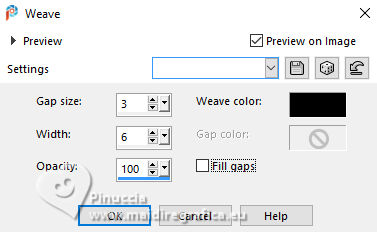 13. Keep selected. Layers>Merge>Merge Down - 2 times. Layers>Arrange>Move Down. 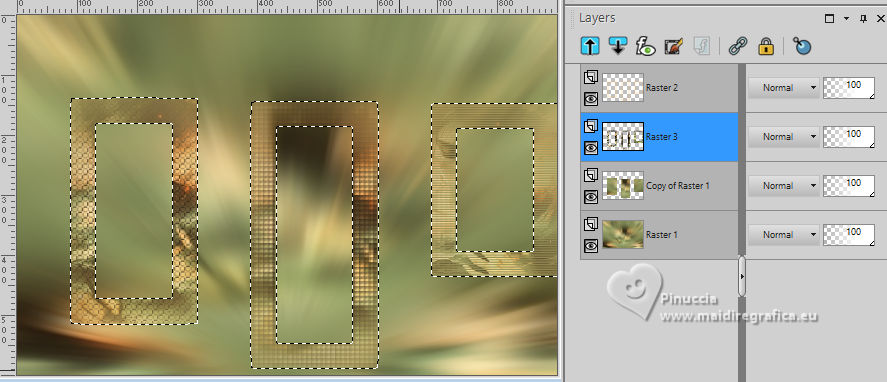 14. Effects>3D Effects>Drop Shadow, color black #000000. 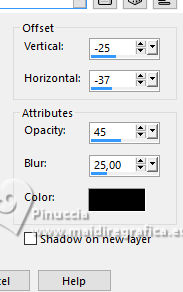 15. Activate the layer Raster 2. Layers>New Raster Layer. Effects>3D Effects>Cutout. 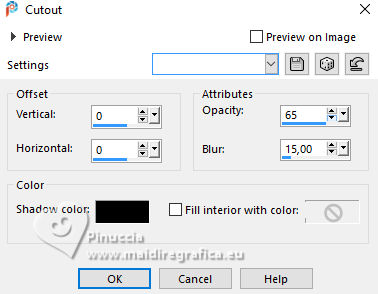 16. Selections>Select None. Activate your Magic Wand Tool  Click in the frames to select them. 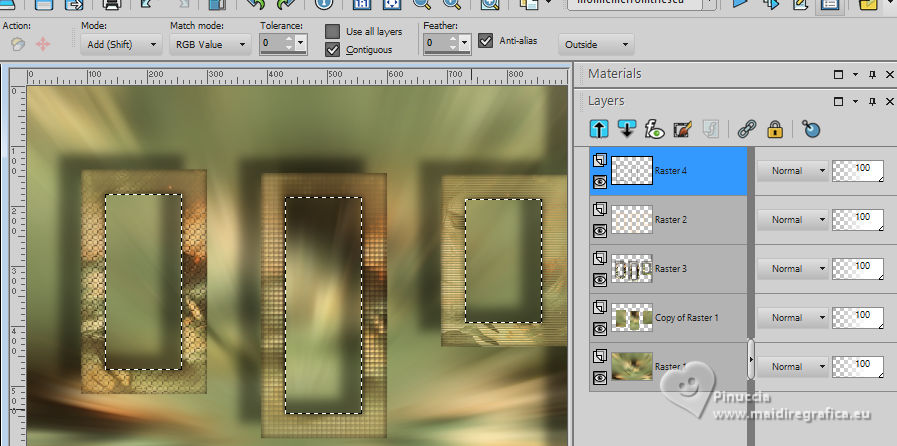 17. Activate the layer Raster 1. Selections>Promote Selection to Layer. Layers>Arrange>Move Up. Effects>Texture Effects>Fine Leather, foreground color. 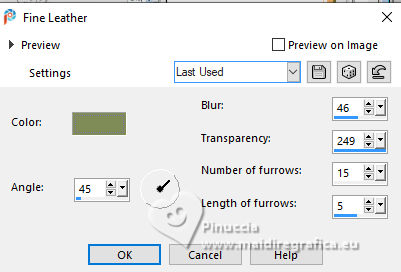 18. The tube 1094MulherByPqnaAlice is always in memory: Edit>Paste As New Layer. Place a part of the tube on the left rectangle.Again Edit>Paste As New Layer, and place another part on the central rectangle.Again Edit>Paste As New Layer and place another part on the right rectangle.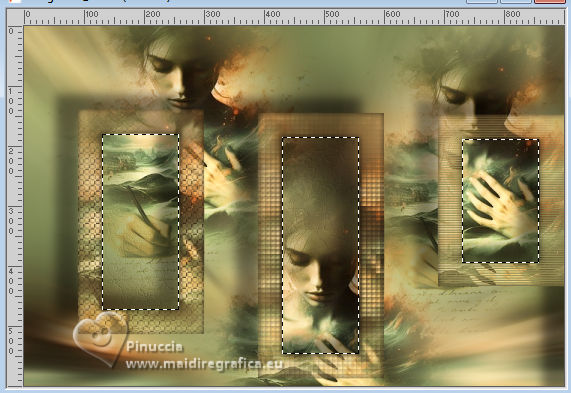 19. Layers>Merge>Merge Down - 2 times. Selections>Invert. Press CANC on the keyboard. 20. Selections>Invert. Layers>New Raster Layer. Effects>3D Effects>Cutout. Selections>Select None. 21. Activate the layer Copy of Raster 1. Effects>Reflection Effects>Rotating Mirror.  22. Effects>Image Effects>Seamless Tiling. 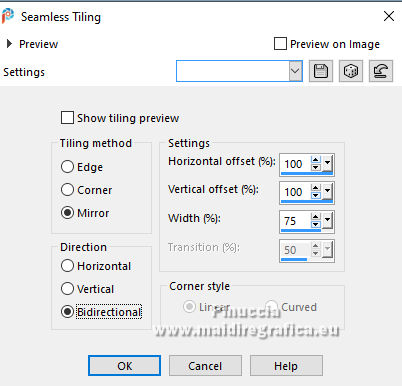 23. Effects>Plugins>Italian Editors Effect - Mosaico. 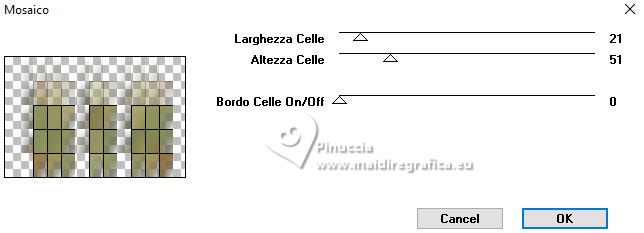 24. Effects>Plugins>Filters Unlimited 2.0 - &<Bkg Designer sf10II> - Line Side Line, default settings. 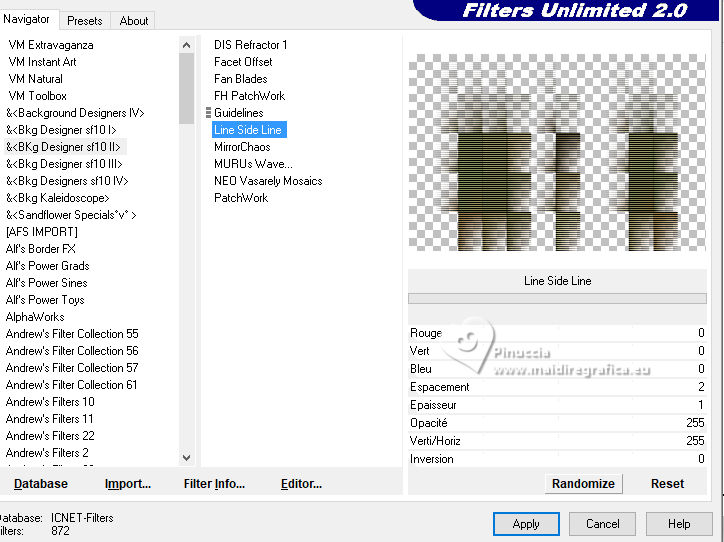 Change the Blend Mode of this layer to Lighten, or to your liking. Effects>3D Effects>Drop Shadow, color black #000000. 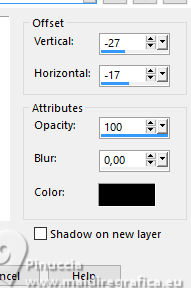 25. Activate the layer Raster 1. Effects>Plugins>Virtual Painter - Virtual Painter 4. 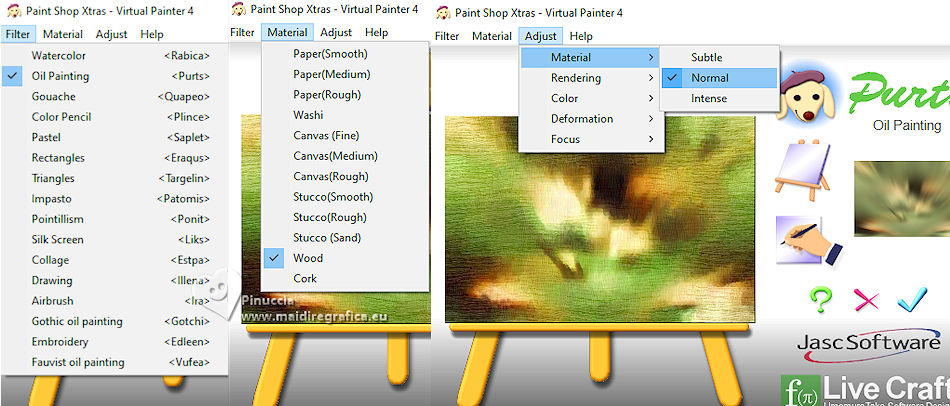 26. Close the two bottom layers: Copy of Raster 1 and Raster 1. Activate the layer above. Layers>Merge>Merge Visible. Pick Tool  Position X: -4,00, Position Y: -54,00. 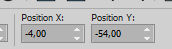 Open the closed layers: Layers>View>All. Layers>Merge>Merge Visibile. 27. Effects>Plugins>AAA Frames - Foto Frame.  28. Effects>Plugins>AAA Frames - Foto Frame. 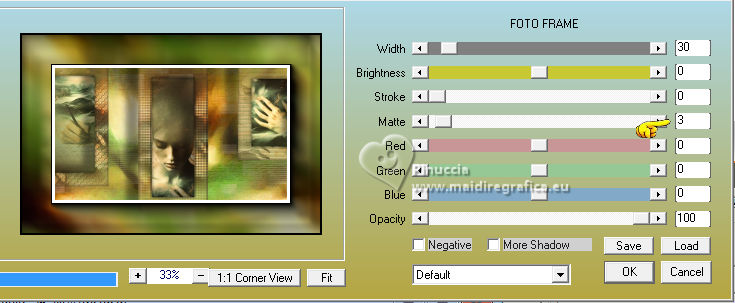 29. Open tituloSim_BySoxikibem  Erase the watermark and go to Edit>Copy. Go back to your work and go to Edit>Paste As New Layer. Pick Tool Position X: 42,00 - Position Y: 147,00.  30. Image>Resize, if you want. Sign your work. Save as jpg. For the tube of these versions thanks Béa  Luz Cristina   Your versions. Thanks  Louise   If you have problems or doubts, or you find a not worked link, or only for tell me that you enjoyed this tutorial, write to me. 30 June 2024 |