|
THE HOLIDAY MAGIC
english version

Thank you Sabine for inviting to translate your tutorials into english.
This tutorial is a personal creation of Sabine and it is prohibited to copy or distribute it on the net (forums, groupes.. etc), or to use it on commercials sites.
This tutorial was created with Corel16 and translate with CorelX3, but can also be made using other versions of PSP.
Since version PSP X4, Image>Mirror was replaced with Image>Flip Horizontal,
and Image>Flip with Image>Flip Vertical, there are some variables.
In versions X5 and X6, the functions have been improved by making available the Objects menu.
In the latest version X7 command Image>Mirror and Image>Flip returned, but with new differences.
See my schedule here
For this tutorial, you will need:
Material here
Plugins
consult, if necessary, my filter section here
VDL Adrenaline - Snowflakes here

You can change Blend Modes according your colors.
Copy the selections in the Selections Folder.
Set your foreground color to #4c86dd,
and your background color to #ffffff

1. Open "fond_holiday_magic".
Window>Duplicate. Close the original.
The copy will be the basis of your work.
Layers>New Raster Layer.
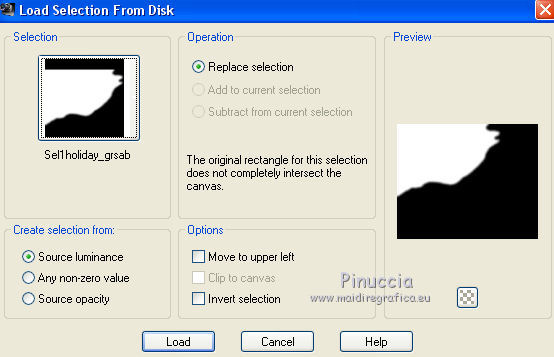
2. Selections>Load/Save Selection>Load Selection from Disk.
Look for and Load Sel1holiday_grsab.
3. Set the opacity of your Fill Flood tool to 72.

Flood Fill  the layer with your foreground color #4c86dd. the layer with your foreground color #4c86dd.
Selections>Select None.
4. Effects>Plugins>VDL Adrenaline-Snowflakes.

5. Selections>Load/Save Selection>Load Selection from Disk.
Load again Sel1holiday_grsab.
Selections>Invert.
Press CANC on the keyboard  . .
Selections>Invert.
6. Effects>Edge Effects>Enhance.
Change the Blend mode of this layer to Hard Light, opacity 100.
7. Layers>Duplicate.
Change the Blend Mode to Overlay, opacity 100.

8. Selections>Select None.
Layers>Merge>Merge down.
9. Layers>Duplicate.
Change the Blend mode of this layer to Multiply, opacity 69.
10. Layers>Duplicate.
Image>Mirror.
Layers>Merge>Merge down.
Change the Blend Mode of this layer to Multiply, opacity 85.

11. Layers>New Raster Layer (raster 2).
Selections>Load/Save Selection>Load Selection from Disk.
Look for and Load Sel2holiday_grsab.

Opacity of Flood Fill Tool to 38,
Flood Fill the selection with your background color #ffffff.
Selections>Select None.
12. Layers>New Raster Layer (Raster 3).
Selections>Load/Save Selection>Load Selection from Disk.
Look for and Load Sel3holiday_grsab.

Opacity of Flood Fill Tool to 50%,
and Flood Fill the selection with your foreground color #4c86dd.
Selections>Select None.
13. Effects>Edge Effects>Erode.
Edit>Repeat Erode.
Layers>Merge>Merge down.
Effects>Edge Effects>Enhance More.
14. Effects>Distortion Effects>Punch.

15. Open the tube Graph-Sabine Design-Tubes 451 - Edit>Copy.
Go back to your work and go to Edit>Paste as new layer.
Effects>Image Effects>Offset.

Adjust>Sharpness>Sharpen.
16. Layers>New Raster Layer (raster 4).
Selections>Load/Save Selection>Load Selection from Disk.
Look for and Load Sel4holiday_grsab.

Open the tube Graph-Sabine Desin-Tubes Misted54 - Edit>Copy.
Go back to your work and go to Edit>Plaste into Selection.
Effects>3D Effects>Drop Shadow.

Edit>Repeat Drop Shadow.
Selections>Select None.
Layers>Arrange>Move down.
17. Open the tube Deco1Holiday_grsab - Edit>Copy.
Go back to your layer and go to Edit>Paste as new layer (raster 5).
Layers>Arrange>Move down.
You should have this.

18. We are on the layer Raster 5:
Effects>Image Effects>Offset.

Adjust>Sharpen>Sharpen more.
Effects>3D Effects>Drop Shadow, color black.

19. Activate the top layer (Raster 3).
Open the tube Graph-Sabine Design-Tubes 316 - Edit>Copy.
Go back to your layer and go to Edit>Paste as new layer (raster 6).
Image>Resize, 1 time to 70% and 1 time to 80%, resize all layers not checked.
Move  the tube where you like. the tube where you like.
Effects>3D Effects>Drop Shadow, as you like.
For me:

20. Invert your Materials colors and close your background color.

Activate the Pen Tool  , Line style Solid, width 3,00. , Line style Solid, width 3,00.

From the top to down, draw a line as shown below; clic Apply to confirm.

Layers>Convert to Raster Layer (Raster 7).
21. Open the tube Deco2Holiday_grsab - Edit>Copy.
Go back to your layer and go to Edit>Paste as new layer (raster 8).
Place the tube under the line.

Layers>Merge>Merge down.
Effects>3D Effects>Drop Shadow.

22. Layers>Duplicate.
Image>Resize - 1 time to 85% and 1 time to 90%, resize all layers not checked.
Place the tube as shown below.

Change the Blend Mode of this layer to Luminance, opacity 83.

Layers>Duplicate.
Image>Mirror.
Activate the layer of the left red bow (raster 7).
Layers>Duplicate.
Image>Mirror.
Layers>Merge>Tous.
Edit>Copy.
23. Image>Add borders, 10 pixels, symmetric, color #db375f.
Selections>Select All.
Image>Add borders, 50 pixels, symmetric, color #ffffff.
Selections>Invert.
Edit>Paste into Selection.
Adjust>Blur>Gaussian Blur - radius 25.

Selections>Invert.
Effects>3D Effects>Drop Shadow, color black.

Selections>Select None.
Image>Add borders, 2 pixels, symmetric, color #db375f.
Open the tube Titre Holiday_grsab - Edit>Copy.
Go back to your work and go to Edit>Paste as new layer.
Place as you like.
Adjust>Sharpness>Sharpen.
The fonts used for the texts are in the material.
Image>Resize, to 900 pixels width, resize all layers checked.
Sign your work and save as jpg.
The tube of the right packets are by Luz Cristina; I don't know the authors of the other material.

Your versions. Thanks

Marie K
If you have problems or doubt, or you find a not worked link, or only for tell me that you enjoyed this tutorial, write to me.
5 December 2015
|