Thank you Rocky for your permission to translate your tutorials.
The site is closed
This tutorial is a personal creation of Rocktambule and it is prohibited to copy or distribute it on the net (forums, groupes.. etc), or to use it on commercials sites.
This tutorial was created and translated with Corel12, but can also be made using other versions of PSP.
Since version PSP X4, Image>Mirror was replaced with Image>Flip Horizontal,
and Image>Flip with Image>Flip Vertical, there are some variables.
In versions X5 and X6, the functions have been improved by making available the Objects menu.
In the latest version X7 command Image>Mirror and Image>Flip returned, but with new differences.
See my schedule here
For this tutorial, you will need:
A person tube of yours.
The rest of the material here
The tube of my version is by Min@
Attention: if you want the same effect of my final tag, choose a tube avec light shades,
otherwise le result will be much different
Plugins
consult, if necessary, my filter section here
Filters Unlimited 2.0 here
&<Bkg Designer sf10II> - Flutter (to import in Unlimited) here
the single effect is in the zip
Flaming Pear - Flexify 2 here
Neology - Sines waves here
the single effect is in the zip
Pixellisation - Patchwork here
the single effect is in the zip
Frischluft - Glasphere here
Filter Factory Gallery P - Frame 11 here
the single effect is in the zip
Filters Factory Gallery, Pixellisation et Neology can be used alone or imported into Filters Unlimited.
(How do, you see here)
If a plugin supplied appears with this icon  it must necessarily be imported into Unlimited

You can change Blend Modes according your colors.
Copy the selection in the Selection Folder.
1. Set your foreground color with color white,
and your background color with a dark color.
2. Open a new transparent image 800 x 500 pixels.

3. Selections>Select All.
Open your tube - Edit>Copy.
Go back to your work and go to Edit>Paste into Selection.
Selections>Select none.
4. Effects>Image Effects>Seamless Tiling, default settings.

5. Adjust>Blur>Gaussian blur - radius 25.

6. Layers>Merge>Merge All.
7. Effects>Plugins>Filters Unlimited 2.0 - Neology - Sinus waves, default settings.

8. Repeat one more time:
Effects>Plugins>Filters Unlimited 2.0 - Neology - Sinus waves, default settings.
9. Effects>Plugins>Frischluft - Glass Sphere.

10. Effects>Plugins>Flaming Pear - Flexify 2.
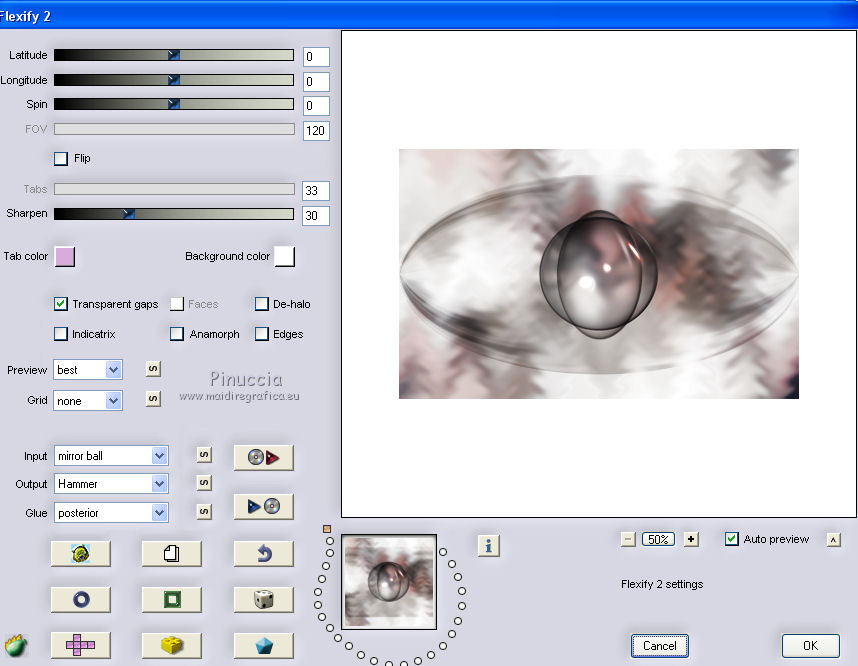
11. Effects>Plugins>Flaming Pear - Flexify 2.

12. Layers>New Raster Layer.
Flood Fill  with color white.
13. Effects>Plugins>Filters Unlimited 2.0 - Filter Factory Gallery P - Frame 11.
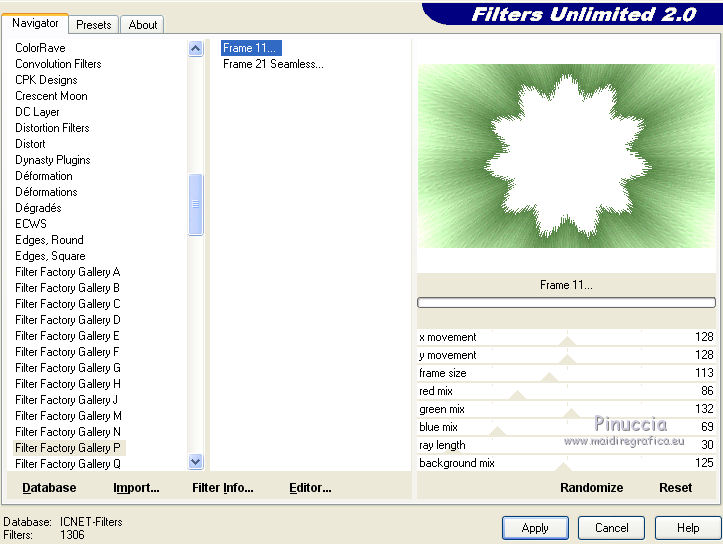
to obtein others shades of color, you can play with red, green and blue mix.
For exemple this are the settings I used for the first version after the tutorial.

14. Activate the Magic Wand tool 

clic on the middle form to select it.

Press CANC on the keyboard 
Selections>Select None.
Change the Blend Mode of this layer to Burn.
16. Selections>Load/Save Selection>Load Selection from Disk.
Look for and Load mai5-selection1.

Selections>Promote selection to layer.
Selections>Select None.
17. Effects>Plugins>Filters Unlimited 2.0 - Pixellisation - Patchwork.

18. Effects>Edge Effects>Enhance.
Change the Blend mode of this layer to Luminance (Legacy).
19. Layers>Duplicate.
Image>Flip.
You should have this.

20. Layers>Merge>Merge All.
21. Image>Add borders, 2 pixels, symmetric, background color.
Image>Add borders, 15 pixels,symmetric, color white.
Image>Add borders, 2 pixels, symmetric, background color.
22. Set your foreground color to Gradient, style Linear.

Flood Fill with the gradient.
Select the white border with the Magic wand tool
Flood Fill the selection with the gradient.
23. Effects>Plugins>Filters Unlimited 2.0 - &<Bkg Designer sf10II> - Flutter.

Selections>Select None.
24. Open the wordart - Edit>Copy.
Go back to your work and go to Edit>Paste as new layer.
Colorize it or change the blend mode to Luminance (L).
25. Open deco1 - Edit>Copy.
Go back to your work and go to Edit>Paste as new layer.
Colorize it or change the blend mode to Luminance (L).
26. Open your person tube Edit>Copy.
Go back to your work and go to Edit>Paste as new layer.
Move it  to the right side
(don't cover the middle form).
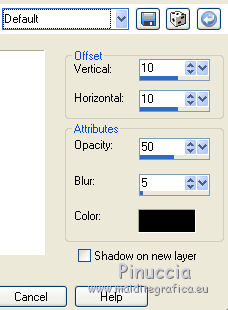
27. Effect>3D Effects>Drop Shadow, default settings.
28. Sign your work.
Layers>Merge>Merge all et save as jpg.
There are many versions of this tutorial, because I wanted tested many shades of color.
The tubes used are by:
Aclis:

Guismo

Mina

Aclis

Your versions. Thanks

Marie K.
If you have problems or doubts, or you find a not worked link, or only for tell me that you enjoyed this tutorial, write to me.
17 May 2014