Thank you Rocky for your permission to translate your tutorials.
The site is closed

This tutorial is a personal creation of Rocktambule and it is prohibited to copy or distribute it on the net (forums, groupes.. etc), or to use it on commercials sites.
This tutorial was created and translated with Corel12, but can also be made using other versions of PSP.
Since version PSP X4, Image>Mirror was replaced with Image>Flip Horizontal,
and Image>Flip with Image>Flip Vertical, there are some variables.
In versions X5 and X6, the functions have been improved by making available the Objects menu.
In the latest version X7 command Image>Mirror and Image>Flip returned, but with new differences.
See my schedule here
For this tutorial, you will need:
A person and a landscape of yours.
The rest of material here
For my tube thanks Yoka and Mina.
Plugins
consult, if necessary, my filter section here
Filters Unlimited 2.0 here
Simple - Top bottom wrap (bonus) here
Alien Skin Eye Candy 5 Impact - Extrude here
Filters Simple can be used alone or imported into Filters Unlimited.
(How do, you see here)
If a plugin supplied appears with this icon  it must necessarily be imported into Unlimited

You can change Blend Modes according your colors.
Copy the Textures in the Textures Folder.
1. Set your foreground color with color black,
and your background color with color white.

2. Open calquealphamai2-rocky.
The image, which will be the basis of your work, is not empty, but contains the selections saved to alpha channel.
3. Open the image "fond" - Edit>Copy.
Go back to your work and go to Edit>Paste into Selection.
Selections>Select none.
4. If you want, colorize according to your colors.
5. Layers>New raster layer.
Selections>Selection All.
Open your person tube - Edit>Copy.
Go back to your layer and go to Edit>Paste into Selection.
Selections>Select none.
6. Effects>Image Effects>Seamless Tiling - default settings.

7. Adjust>Blur>Gaussian Blur - radius 30.

8. Effects>Texture Effects>Texture - select texturemai1

9. Selections>Load/Save Selection>Load Selection from Alpha Channel.
Open the menu of selections and load selection3.

Selections>Promote selection to layer.
Selections>Select none.
10. Delete the middle layer: clic on the red cross to do it

11. Activate the top layer.

Effects>Plugins>Alien Skin Eye Candy 5 Impact - Extrude.
Select the preset Small Offset, Solid Color and under Basic change with color black.

12. Activate the bottom layer.
Layers>New raster layer.
13. Selections>Load/Save Selection>Load Selection from Alpha Channel.
Selection1 is immediately available. You should only clic Load.

14. Open your landscape tube - Edit>Copy.
Go back to your work and go to Edit>Paste into Selection.
15. Effects>3D Effects>Drop Shadow, default settings.
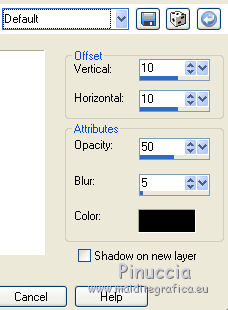
Repeat Drop Shadow but vertical and horizontal -10.
16. Effects>Texture Effects>Texture - select texturemai2

Selections>Select none.
17. Again activate the top layer (promoted selection).
Effects>Plugins>Filters Unlimited 2.0 - Simple - Top Bottom Wrap.

Change the blend mode of this layer to Luminance (legacy).
18. Activate the landscape layer
If your want, change the blend mode of this layer to Luminance (L) or according your colors.
Selections>Load/Save Selection>Load Selection from Alpha Channel.
Open the menu of selections and load selection2.

Selections>Promote selection to layer.
19. Effects>Texture Effects>Texture - select texturemai3

20. Effects>3D Effects>Buttonize.
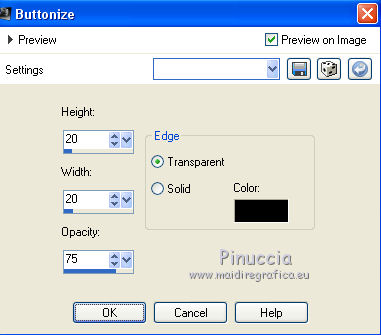
Selections>Select none.
Layers>Arrange>Bring to Top.
21. Effects>Reflection Effects>Feedback.

22. Image>Resize - 45%, resize all layers not checked.
23. Effects>3D Effects>Inner bevel.
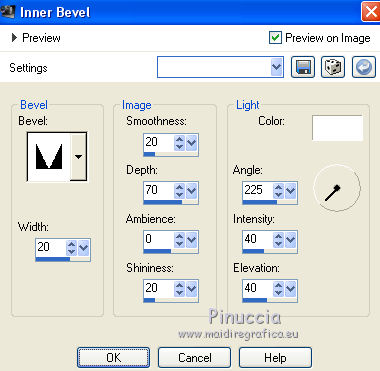
Move  in the upper left corner,
and give it a small rotation effect.

24. Again activate the bottom layer.
Open the tube "deco" (with blend mode Luminace legacy) - Edit>Copy.
Go back to your work and go to Edit>Paste as new layer.
If you don't see well (according your colors), turn down the opacity of landscape layer.
25. Activate the top layer.
Open your person tube - Edit>Copy.
Go back to your work and go to Edit>Paste as new layer.
If it is necessary Image>Resize, according your tube, resize all layers not checked.
Move  the tube to the right side.
26. Effects>3D Effects>Drop Shadow, default settings.

27. Image>Add borders, 2 pixels, symmetric, color white.
28. Edit>Copy.
Selections>Select all.
29. Image>Add borders, 25 pixels, symmetric, color black.
Selections>Inverser.
Edit>Paste into Selection.
30. Adjust>Blur>Gaussian blur - radius 30.

31. Effects>3D Effects>Inner bevel.

32. Sign your work and save as jpg.

If you have problems or doubt, or you find a not worked link, or only for tell me that you enjoyed this tutorial, write to me.
7 May 2014

