Home |
Home |

Mappa sito |
Mappa sito |
Tutorial |
Tutorial |
Tut tecnici |
Tut tecnici |
Links-Banner |
Links-Banner |
Regali-Award |
Regali-Award |
Informatica |
Informatica |
Archivio |
Archivio |
Mail |
Mail |
Privacy policy |
Privacy policy |
Novità |
Novità |
Home |
Home |
Mappa sito |
Mappa sito |
Tutorial |
Tutorial |
Tut tecnici |
Tut tecnici |
Links-Banner |
Links-Banner |
Regali-Award |
Regali-Award |
Informatica |
Informatica |
Archivio |
Archivio |
Mail |
Mail |
Privacy policy |
Privacy policy |
Novità |
Novità |
|
MERRY CHRISTMAS  
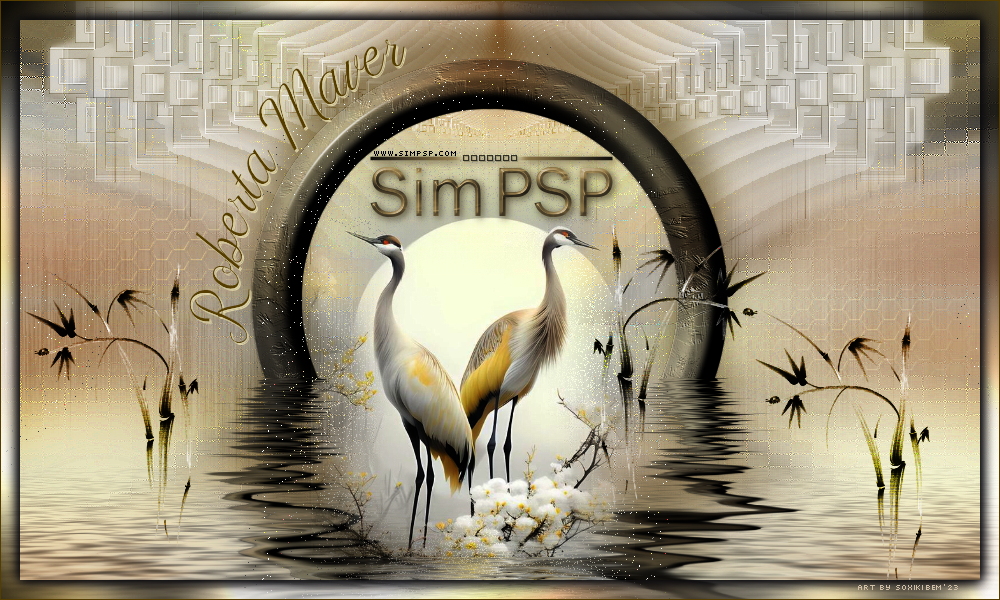

This tutorial was written with Psp2022 and translated with Psp2020, but it can also be made using other versions of PSP. Plugins consult, if necessary, my filter section here Filters Unlimited 2.0 here Mehdi - Wavy Lab here AP 01 [Innovations] - Lines silverLining here  You can change Blend Modes according to your colors. In the newest versions of PSP, you don't find the foreground/background gradient (Corel_06_029). You can use the gradients of the older versions. The Gradient of CorelX here Copy the selections in the Selections Folder. 1. Choose 2 colors for your work. Set your foreground color to #71010f, and your background color to #d6c9cc.  extra color: white #ffffff 2. Open a new transparent image 1000 x 600 pixels. Effects>Plugins>Mehdi - Wavy Lab. This filter creates gradients with the colors of your Materials palette. The first is your background color, the second is your foreground color. Keep the last color created by the filtre.  3. Effects>Plugins>Filters Unlimited 2.0 - Special Effect 1 - Plastic Surface  4. Effects>Edge Effects>Enhance. Effects>Plugins>Filters Unlimited 2.0 - Special Effect 1 - Venetian Blinds (vertical)  5. Effects>Plugins>Filters Unlimited 2.0 - Special Effect 1 - Plastic Surface  6. Selection>Load/Save Selection>Load Selection From Disk. Look for and load the selection MerryChristmas01_RobertaM.  Selections>Promote Selection to layer. Selections>Select None. Adjust>Add/Remove Noise>Add Noise.  7. Effects>Plugins>AP 01 [Innovations] - Lines SilverLining.  Change the Blend Mode of this layer to Soft Light. Activate the layer Raster 1. 8. Selection>Load/Save Selection>Load Selection From Disk. Load again the selection MerryChristmas01_RobertaM Selections>Invert. Selections>Promote Selection to Layer. Layers>Arrange>Bring to Top. Selections>Select None. 9. Adjust>Add/Remove Noise>Add Noise. Adjust>Sharpness>Sharpen More. Change the Blend Mode of this layer to Soft Light. 10. Effects>Distortion Effects>Wave.  Effects>3D Effects>Drop Shadow - color #000000. 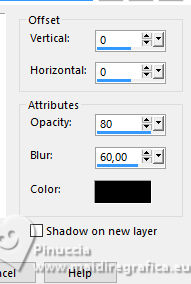 11. Open the landscape Paisagem08_byRobertaMaver  Edit>Copy. Go back to your work and go to Edit>Paste as New Layer. Adjust>Sharpness>Sharpen. Objects>Align>Left. 12. Open Decor01_byRobertaMaver  Edit>Copy. Go back to your work and go to Edit>Paste as New Layer. Change the Blend Mode of this layer to Luminance (L) 13. Image>Add Borders, 5 pixels, symmetric, color white #ffffff. 14. Selections>Select All. Image>Add Borders, 50 pixels, symmetric, foreground color #71010f. Effects>3D Effects>Drop Shadow, color #000000.  Selections>Select None. 15. Image>Resize, 1000 pixels width, resize all layers checked.  Adjust>Sharpness>Sharpen. 16. Open your main tube Tube08_byRobertaMaver  Edit>Copy. Go back to your work and go to Edit>Paste a new Layer. Image>Resize, if necessary - for the supplied tube to 70%, resize all layers not checked. Adjust>Sharpness>Sharpen. Move  the tube to the right. the tube to the right.Effects>3D Effects>Drop Shadow, at your choice. 17. Open Decor02_byRobertaMaver  Edit>Copy. Go back to your work and go to Edit>Paste as New Layer. Pick Tool  Position X: 87,00 - Position Y: 27,00.  18. Open Titulo_byRobertaMaver  Edit>Copy. Go back to your work and go to Edit>Paste a New Layer. Move the tube at the bottom left.19. Image>Add Borders, 1 pixels, symmetric, color white #ffffff. 20. Sign your work and save as jpg. For the tube of this version thanks Kyra Creations    Your versions. Thanks Your versions. Thanks Marion  Sue  DeniseD  If you have problems or doubts, or you find a not worked link, or only for tell me that you enjoyed this tutorial, write to me. 23 November 2024 |