|
WITH ALL MY HEART


Thanks Gerrie for your invitation to translate your tutorials.

This tutorial was translated with PSP2020 but it can also be made using other versions of PSP.
Since version PSP X4, Image>Mirror was replaced with Image>Flip Horizontal,
and Image>Flip with Image>Flip Vertical, there are some variables.
In versions X5 and X6, the functions have been improved by making available the Objects menu.
In the latest version X7 command Image>Mirror and Image>Flip returned, but with new differences.
See my schedule here
 Italian translation qui Italian translation qui
 French translation here French translation here
 Your versions ici Your versions ici
For this tutorial, you will need:
Material
here
Thanks for the tube Alies
(you find here the links to the material authors' sites)
Plugins
consult, if necessary, my filter section here
Filters Unlimited 2.0 here
Mehdi - Sorting Tiles here
AFS IMPORT - sqborder2 here
&<Bkg Kaleidoscope> - Kaleidoscope Butterfly (da importare in Unlimited) here
&<Bkg Designer sf10I> - Cruncher (da importare in Unlimited) here
AP Lines - Lines SilverLining here
Nik Software - Color Efex Pro here
Filters AFS IMPORT can be used alone or imported into Filters Unlimited.
(How do, you see here)
If a plugin supplied appears with this icon  it must necessarily be imported into Unlimited it must necessarily be imported into Unlimited

You can change Blend Modes according to your colors.
In the newest versions of PSP, you don't find the foreground/background gradient (Corel_06_029).
You can use the gradients of the older versions.
The Gradient of CorelX here
Open the mask in PSP et minimize it with the rest of the material.
1. Choose two colors from your tube.
Set your foreground color to light color, for me #fdfbfd,
and your background color to dark color, for me #c498b3.

Set your foreground color to a Foreground/Background Gradient, style Linear.

2. Open Alpha-With all my heart.
Window>Duplicate or, on the keyboard, shift+D to make a copy.

Close the original.
The copy, that will be the basis of your work, is not empty,
but contains the selections saved on the alpha channel.
Flood Fill  the transparent image with your Gradient. the transparent image with your Gradient.
3. Adjust>Add/Remove Noise>Add Noise.

4. Effects>Plugins>Mehdi - Sorting Tiles.

5. Effects>Plugins>AFS IMPORT - sqborder2.

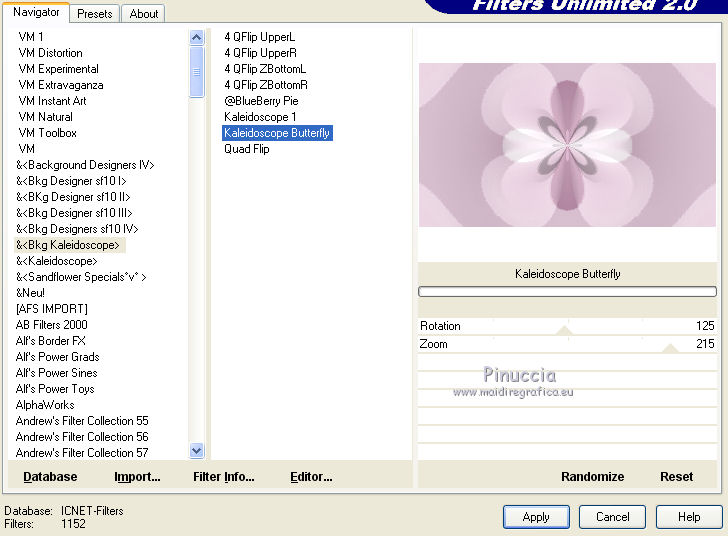
6. Effects>Plugins>Filters Unlimited 2.0 - &< Kaleidoscope> - Kaleidoscope Butterfly, default settings

7. Effects>Image Effects>Seamless Tiling.

8. Layers>New Raster Layer.
Selections>Load/Save Selection>Load Selection from Alpha Channel.
Open the Selections menu and load the selection #2.

Flood Fill  the selection with your background color. the selection with your background color.
9. Effects>Plugins>AP Lines - SilverLining.

Selections>Select None.
10. Effects>Plugins>Filters Unlimited 2.0 - &<Bkg Designer sf10I> - Cruncher.

11. Activate the layer Raster 1.
Selections>Load/Save Selection>Load Selection from Alpha Channel.
The selection is immediately available. You just have to click Load.

Selections>Promote Selection to layer.
12. Effects>Plugins>AP Lines - Lines SilverLining, same settings.

Selections>Select None.
13. Effects>3D Effects>Drop Shadow, color #000000.

14. Effects>Image Effects>Seamless Tiling, same settings.

15. Layers>New Raster Layer.
Set your foreground color to white (or a color at your choice).
Flood Fill  the layer with color white. the layer with color white.
16. Layers>New Mask layer>From image
Open the menu under the source window and you'll see all the files open.
Select the mask marymaszk-2020

Layers>Merge>Merge Group.
17. Activate the top layer.
Open Deco_01 and go to Edit>Copy.
Go back to your work and go to Edit>Paste as new layer.
Don't move it.
Layers>Duplicate.
Move  this tube at the upper right. this tube at the upper right.
Layers>Duplicate.
Move  this tube at the bottom right. this tube at the bottom right.

18. Open the Wordart and go to Edit>Copy.
Go back to your work and go to Edit>Paste as new layer.
Move  over the line to the right side. over the line to the right side.

19. Open Deco_02 and go to Edit>Copy.
Go back to your work and go to Edit>Paste as new layer.
Move  the tube at the bottom right. the tube at the bottom right.

20. Open the woman tube Alies762-Valentine and go to Edit>Copy.
Go back to your work and go to Edit>Paste as new layer.
Image>Resize, to 75%, resize all layers not checked.
Move  the tube to the left side. the tube to the left side.
Effects>3D Effects>Drop Shadow, at your choice.
21. Image>Add borders, 1 pixel, symmetric, foreground color.
Image>Add borders, 5 pixels, symmetric, background color.
Activate your Magic Wand Tool 

and click on the last border to select it.
22. Effects>3D Effects>Outer Bevel.

Selections>Select None.
23. Image>Add borders, 35 pixels, symmetric, foreground color.
Image>Add borders, 5 pixels, symmetric, background color.
Activate your Magic Wand Tool 

and click on the last border to select it.
24. Effects>3D Effects>Outer Bevel.

Selections>Select None.
25. Image>Add borders, 15 pixels, symmetric, foreground color.
26. Sign your work on a new layer.
Image>Add borders, 1 pixel, symmetric, background color.
27. Effects>Plugins>Nik Software - Color Efex Pro - Tonal Contrast

Image>Resize, 800 pixels width, resize all layers checked.
Save as jpg.
Version with tube by Beatriz

 Your versions here Your versions here

If you have problems or doubts, or you find a not worked link, or only for tell me that you enjoyed this tutorial, write to me.
23 January 2021
|

