|
I WILL SURVIVE


Thanks Gerrie for your invitation to translate your tutorials.

This tutorial was translated with PSP2020 but it can also be made using other versions of PSP.
Since version PSP X4, Image>Mirror was replaced with Image>Flip Horizontal,
and Image>Flip with Image>Flip Vertical, there are some variables.
In versions X5 and X6, the functions have been improved by making available the Objects menu.
In the latest version X7 command Image>Mirror and Image>Flip returned, but with new differences.
See my schedule here
 Italian translation qui Italian translation qui
 French translation here French translation here
 Your versions ici Your versions ici
For this tutorial, you will need:
Material
here
Thanks for the tubes Syl and Tocha and for the masks Animabelle and Casio.
(you find here the links to the material authors' sites)
Plugins
consult, if necessary, my filter section here
Filters Unlimited 2.0 here
&<Bkg Designer sf10I> - Corner Half Wrap (to import in Unlimited) here
AAA Frames - Foto Frame / AAA Filters - Custom here
Toadies - What are you here
Alien Skin Eye Candy 5 Impact - Glass here
Filters VM Stylize can be used alone or imported into Filters Unlimited.
(How do, you see here)
If a plugin supplied appears with this icon  it must necessarily be imported into Unlimited it must necessarily be imported into Unlimited

You can change Blend Modes according to your colors.
In the newest versions of PSP, you don't find the foreground/background gradient (Corel_06_029).
You can use the gradients of the older versions.
The Gradient of CorelX here
If you want change the colors of your images:
Note the codes of Hue (H) and Saturation (S) of your background color.
Adjust>Hue and Saturation>Colorize and copy the codes in the respective cases.
Open the masks in PSP and minimize them with the rest of the material.
1. Set your foreground color to #ffdce9,
and your background color to #ff5ea2.

Set your foreground color to a Foreground/Background Gradient, style Linear.

2. Open Alfa_I Will Survive
Window>Duplicate or, on the keyboard, shift+D to make a copy.

Close the original.
The copy, that will be the basis of your work, is not empty,
but contains one selection saved on the alpha channel.
Flood Fill  the transparent image with your Gradient. the transparent image with your Gradient.
3. Selections>Select All.
Open the woman tube Tocha 24399 and go to Edit>Copy.
Minimize the tube.
Go back to your work and go to Edit>Paste into Selection.
Selections>Select None.
4. Adjust>Blur>Radial Blur.

5. Effects>Image Effects>Seamless Tiling.

6. Layers>Duplicate.
Image>Free Rotate - 90 degrees to right.

7. Image>Resize, to 70%, resize all layers not checked.
Effects>Image Effects>Seamless Tiling, same settings.
8. Layers>Duplicate.
Change the Blend Mode of this layer to Multiply, or according to your colors.
9. Activate the bottom layer.
Selections>Load/Save Selection>Load Selection from Alpha Channel.
The selection Select 1 is immediately available. You just have to click Load.

Selections>Promote Selection to layer.
Selections>Select None.
Layers>Arrange>Bring to top.
10. Effects>Plugins>Toadies - What are you.

Change the Blend Mode of this layer to Screen or according to your colors.
11. Set your foreground color to white #ffffff.
Layers>New Raster Layer.
Flood Fill  the layer with color #ffffff. the layer with color #ffffff.
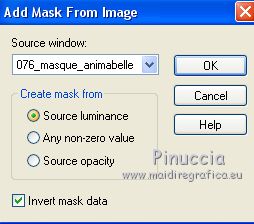
Layers>New Mask layer>From image
Open the menu under the source window and you'll see all the files open.
Select the mask 076_masque_animabelle.

Layers>Merge>Merge Group.
12. Layers>New Raster Layer.
Flood Fill  the layer with color #ffffff. the layer with color #ffffff.
Layers>New Mask layer>From image
Open the menu under the source window
and select the mask 079_masque_animabelle.

Layers>Merge>Merge Group.
Effects>Edge Effect>Enhance.
13. Image>Add borders, symmetric not checked, color #d8547c.

14. Activate your Magic Wand Tool 

Click on the border to select it.
15. Effects>Plugins>AAA Frames - Foto Frame.

Selections>Select None.
16. Image>Add borders, symmetric not checked, color #d8547c.

17. Activate your Magic Wand Tool 

Click on the border to select it.
18. Effecs>Plugins>Filters Unlimited 2.0 - &<Bkg Designer sf10I> - Corner Half Wrap.

Selections>Invert.
Effects>3D Effects>Drop Shadow.

Selections>Select None.
19. Layers>New Raster Layer.
Flood Fill  the layer with color #ffffff. the layer with color #ffffff.
Layers>New Mask layer>From image
Open the menu under the source window
and select the mask cas_Mask_0315_06.

Layers>Merge>Merge Group.
20. Activate again the woman tube Tocha 24399 and go to Edit>Copy.
Go back to your work and go to Edit>Paste as new layer.
Image>Resize, to 70%, resize all layers not checked.
Place  the tube at your choice. the tube at your choice.
Effects>3D Effects>Drop Shadow, at your choice.
21. Choose a wordart - for me SvB Pink Ribben 1 and go to Edit>Copy.
Go back to your work and go to Edit>Paste as new layer.
I resized 1 time to 70% and 1 time to 80%, resize all layers not checked.
Place  the tube at your choice. the tube at your choice.
I did
  
Effects>3D Effects>Drop Shadow, at your choice.
22. Open the tube SvB Pink Ribben.4 and go to Edit>Copy.
Go back to your work and go to Edit>Paste as new layer.
Move  the tube to the bottom left. the tube to the bottom left.
23. Effects>Plugins>Alien Skin Eye Candy 5 Impact - Glass.

Effects>3D Effects>Drop Shadow, at your choice.
24. Open the tube Vlinder and go to Edit>Copy.
Go back to your work and go to Edit>Paste as new layer.
Move  the tube to the top left. the tube to the top left.
25. Sign your work on a new layer.
Image>Add borders, 1 pixel, symmetric, background color.
26. Effects>Plugins>AAA Filters - Custom - click on Landscape and ok.

27. Effects>Plugins>AAA Filters - Custom - click on Sharp and ok.

28. Save as jpg.
Versions with tubes by DBK Katrina

and Azalée

 Your versions here Your versions here

If you have problems or doubts, or you find a not worked link, or only for tell me that you enjoyed this tutorial, write to me.
1 October 2020
|

