|
BEAUTY QUEEN


Thanks Gerrie for your invitation to translate your tutorials.

This tutorial was translated with PSP2020 but it can also be made using other versions of PSP.
Since version PSP X4, Image>Mirror was replaced with Image>Flip Horizontal,
and Image>Flip with Image>Flip Vertical, there are some variables.
In versions X5 and X6, the functions have been improved by making available the Objects menu.
In the latest version X7 command Image>Mirror and Image>Flip returned, but with new differences.
See my schedule here
 Italian translation qui Italian translation qui
 French translation here French translation here
 Your versions ici Your versions ici
For this tutorial, you will need:
Material
here
Thanks for the tube Cady.
(you find here the links to the material authors' sites)
Plugins
consult, if necessary, my filter section here
Lucis Art - in the material
Alien Skin Eye Candy 5 Impact - Glass here
Nik Software - Color Efex Pro here
Mura's Meister - Copies here

You can change Blend Modes according to your colors.
If you want change the colors of your images:
Note the codes of Hue (H) and Saturation (S) of your background color.
Adjust>Hue and Saturation>Colorize and copy the codes in the respective cases.
Copy the preset  in the folder of the plugin Alien Skin Eye Candy 5 Impact>Settings>Glass. in the folder of the plugin Alien Skin Eye Candy 5 Impact>Settings>Glass.
One or two clic on the file (it depends by your settings), automatically the preset will be copied in the right folder.
why one or two clic see here
Copy the Picture Frame Corel_09_053 in the Picture Frames Folder.
Open the mask in PSP et minimize it with the rest of the material.
1. Choose two colors from your tube.
Set your foreground color to light color, for me #cbc6b0,
and your background color to dark color, for me #641d1e.

2. Open Alfa_Beauty Queen
Window>Duplicate or, on the keyboard, shift+D to make a copy.

Close the original.
The copy, that will be the basis of your work, is not empty,
but contains one selection saved on the alpha channel.
Flood Fill  the transparent image with your foreground color. the transparent image with your foreground color.
3. Layers>New Raster Layer.
Flood Fill  with your background color. with your background color.
4. Layers>New Mask layer>From image
Open the menu under the source window and you'll see all the files open.
Select the mask @nn_141012_mask_189_tdstudio.

Layers>Merge>Merge Group.
5. Open Deco_01 and go to Edit>Copy.
Go back to your work and go to Edit>Paste as new layer.
Layers>Merge>Merge All.
6. Effects>Plugins>Lucis - LucisArt
select Plaid 3; if necessary, play with the settings to the right, to darken or lighten your colors
To apply, click on the check mark.

7. Open Wordart and go to Edit>Copy.
Go back to your work and go to Edit>Paste as new layer.
Place  rightly the text on the frame. rightly the text on the frame.

If you want, you can change the color of your text, with your Color Changer Tool 
In previous versions, or in case the tool did not give you a satisfactory resul,
you can simply use your Flood Fill Tool, in RGB Value.

Layers>Duplicate.
Layers>Merge>Merge Down.
Effects>3D Effects>Drop Shadow, at your choice.
8. Layers>New Raster Layer.
Selections>Load/Save Selection>Load Selection from Alpha Channel.
The selection is immediately available. You just have to click Load.

Flood Fill  the selection with your dark color . the selection with your dark color .
9. Image>Picture Frame - select the Picture Frame Corel_09_053
(if you want, you can choose another frame, according to your colors)

Activate the layer below Raster 2.

Press CANC on the keyboard 

10. Activate the top layer.
Selections>Select None.

Layers>Duplicate.
Activate the layer below of the original, Raster 2 Picture Frame

11. Effects>Plugins>Mura's Meister - Copies.

Effects>3D Effects>Drop Shadow, at your choice.
If you want, you can change the color of the frame with your Color Changer Tool 
12. Activate the top layer Copy of Raster 2 Picture Frame
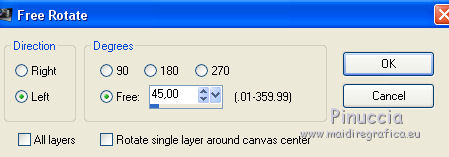
Image>Free Rotate - 45 degrees to left

13. Activate your Magic Wand tool 
and click in the frame to select it.

14. Open the tube by Cady, erase the watermark and go to Edit>Copy.
Go back to your work and go to Edit>Paste into selection.
Selections>Select None.
Effects>3D Effects>Drop Shadow, at your choice.
15. Edit>Paste as new layer (the tube by Cady is still in memory).
Image>Resize, to 90%, resize all layers not checked.
Image>Mirror.
Move  the tube to the right side. the tube to the right side.
Effects>3D Effects>Drop Shadow, at your choice.
16. Active your Selection Tool  , circle, , circle,
and design a little selection of the tube at your choice; for me

Selections>Promote Selection to Layer.
17. Selections>Modify>Select Selection Borders.

Flood Fill  with your dark color (or a color at your choice). with your dark color (or a color at your choice).
Selections>Select None.
18. Effects>Plugins>Alien Skin Eye Candy 5 Impact - Glass.
Select the preset Gerrie Beauty et ok.

19. Move  the the image up, between the frames the the image up, between the frames

Layers>Duplicate.
Move  the image down the image down

20. Sign your work on a new layer.
21. Image>Add borders, 1 pixel, symmetric, with a color at your choice.
22. Effects>Plugins>Nik Software Color Efex Pro - Graduated Neutral Density.

23. Image>Resize, at your choise, resize all layers checked.
Save as jpg.
Version with tube by Alies


If you have problems or doubts, or you find a not worked link, or only for tell me that you enjoyed this tutorial, write to me.
6 November 2020
|

