|
BEAUTIFUL AUTUMN


Thanks Gerrie for your invitation to translate your tutorials.

This tutorial was created with PSP2020 and translated with PSPX7, but it can also be made using other versions of PSP.
Since version PSP X4, Image>Mirror was replaced with Image>Flip Horizontal,
and Image>Flip with Image>Flip Vertical, there are some variables.
In versions X5 and X6, the functions have been improved by making available the Objects menu.
In the latest version X7 command Image>Mirror and Image>Flip returned, but with new differences.
See my schedule here
 Italian translation qui Italian translation qui
 French translation here French translation here
 Your versions ici Your versions ici
For this tutorial, you will need:

(you find here the links to the material authors' sites)

consult, if necessary, my filter section here
Filters Unlimited 2.0 here
Filter Bruits - à importer dans Unlimited - dans le matériel.
Mehdi - Wavy Lab 1.1. here
Dsb Flux - Radial Warp here
VM Distortion - Circulator here
Graphics Plus - Cross Shadow here
Toadies - Sucking Toad Bevel II here
Filter Factory Gallery A - Zoom in here
Alien Skin Eye Candy 5 Impact - Glass here
L&K's - L&K's Zitah here
AAA Frames - Foto Frame / AAA Filters - Custom here
Filters VM Distortion, Graphics Plus, Toadies and Factory Gallery can be used alone or imported into Filters Unlimited.
(How do, you see here)
If a plugin supplied appears with this icon  it must necessarily be imported into Unlimited it must necessarily be imported into Unlimited

You can change Blend Modes according to your colors.
In the newest versions of PSP, you don't find the foreground/background gradient (Corel_06_029).
You can use the gradients of the older versions.
The Gradient of CorelX here
Copy the preset  in the folder of the plugin Alien Skin Eye Candy 5 Impact>Settings>Glass. in the folder of the plugin Alien Skin Eye Candy 5 Impact>Settings>Glass.
One or two clic on the file (it depends by your settings), automatically the preset will be copied in the right folder.
why one or two clic see here

Open the masks in PSP and minimize them with the rest of the material.
1. Choose two colors from your tube
and set your foreground color to light color: #921606,
and your background color to dark color: #48435a.
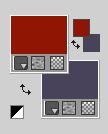
Extra colors: 3 #c2bec4 - 4 #ffffff
2. Open a new transparent image 900 x 600 pixels.
3. Effects>Plugins>Mehdi - Wavy Lab 1.1.
This filter creates gradients with the colors of your Materials palette.
The first is your background color, the second is your foreground color.
Keep the last two colors created by the filtre:

4. Effects>Plugins>Toadies - Sucking Toad Bevel II.2, default settings.

5. Effects>Image Effects>Seamless Tiling, default settings.
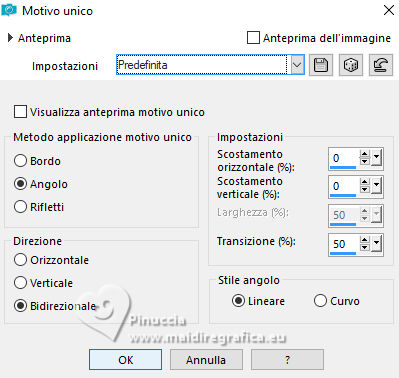
6. Effects>Plugins>Filter Factory A - Zoom In, default settings

7. Effects>Plugins>Filters Unlimited 2.0 - Smelter 2, default settings.

8. Effects>Plugins>Filters Unlimited 2.0 - Paper Textures - Filter Paper.

9. Set your background color to color white #ffffff.
Layers>New Raster Layer.
Flood Fill  the layer with color white. the layer with color white.
10. Layers>New Mask layer>From image
Open the menu under the source window and you'll see all the files open.
Select the mask masker

Layers>Merge>Merge Group.
Effects>Edge Effects>Enhance.
11. Layers>Merge>Merge visible.
12. Effects>Plugins>L&K's - L&K's Zitah, default settings.

13. Layers>New Raster Layer.
Flood Fill  the layer with your foreground color. the layer with your foreground color.
14. Layers>New Mask layer>From image
Open the menu under the source window
and select the mask mask_1_MJ

Layers>Merge>Merge Group.
15. Effects>Plugins>Filters Unlimited 2.0 - Filter Bruits - Bruit flou Rotation, default settings.

16. Effects>Image Effects>Seamless Tiling, default settings.

17. Set again your background color to #48435a.
Layers>New Raster Layer.
Selection Tool 
(no matter the type of selection, because with the custom selection your always get a rectangle)
clic on the Custom Selection 
and set the following settings.

Flood Fill  the selection with your background color. the selection with your background color.
Selections>Select None.
18. Effects>Distortion Effects>Wave.

19. Effects>Plugins>DSB Flux - Radial Warp.

20. K key on the keyboard to activate your Pick Tool 
and set Position X: 197,00 and Position Y: -2,00.

M key to deselect the Tool.
21. Activate your Magic Wand Tool 

Click in the figure to select it.

22. Open your background image Achtergrondplaatje 
Edit>Copy.
Go back to your work and go to Edit>Paste into Selection.
Selections>Select None.
Reduce the opacity of this layer to 60%, or according to your colors.
Effects>3D Effects>Drop Shadow, color black.

23. Image>Add borders, 3 pixels, symmetric, color 3 #c2bec4  . .
24. Layers>Duplicate.
Image>Resize, to 74%, resize all layers not checked.
25. Effects>3D Effects>Drop Shadow, same settings.

26. Layers>Duplicate.
Activate the layer below of the original.
27. Effects>Geometric Effects>Skew.

Edit>Repeat Skew.
28. Selections>Select All.
Image>Add borders, 5 pixels, symmetric, foreground color.
Selections>Invert.
29. Effects>Plugins>Filters Unlimited 2.0 - Filter Bruits - Bruit flou Rotation, default settings.

30. Selections>Select All.
Image>Add borders, symmetric not checked, background color.

Selections>Invert.
31. Effects>Plugins>Graphics Plus - Cross Shadow, default settings.

32. Effects>Plugins>AAA Frames - Foto Frame.

Selections>Select None.
33. Activate your Text Tool  , font Big Apple (or to your liking). , font Big Apple (or to your liking).

Adapt the size according to your font and your PSP version.
Write Autumn with your background color (or to your liking).
Layers>Convert in Raster Layer.
34. Effects>3D Effects>Drop Shadow, color black.

35. Image>Free Rotate - 90 degrees to right.

Move  the text to the right or to your liking. the text to the right or to your liking.
Layers>Duplicate.
Activate the layer below of the original.
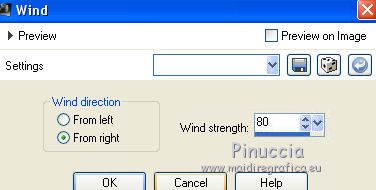
36. Effects>Distortion Effects>Wind, to the right, strength 80.
Change the Blend Mode of this layer to Screen.
37. With your colors: foreground #911606,
background #48435a.

set your foreground color to a Foreground/Background Gradient, style Linear.

38. Activate your top layer.
Layers>New Raster Layer.
Flood Fill  the layer with your Gradient. the layer with your Gradient.
39. Effects>Plugins>VM Distortion - Circulator, default settings.

40. Effects>Geometric Effects>Perspective Vertical.

41. Activate your Magic Wand Tool 

click in the little circle to select it.
42. Edit>Paste into Selection (your background image is still in memory).

43. Effects>Plugins>Alien Skin Eye Candy 5 Impact - Glass.
Select the preset Beautiful Autumn_Gerrie and ok
Here below the settings, in case of problems with the preset.

Selections>Select None.
44. Effects>3D Effects>Drop Shadow, color black.

45. K key to activate your Pick Tool 
and set Position X: 824,00 and Position Y: 158,00.


M key to deselect the tool.
46. Open the woman's tube PSPMagnifique_Gerrie 
Edit>Copy.
Go back go your work and go to Edit>Paste as new layer.
Move  the tube to the left. the tube to the left.
Layers>Duplicate.
Activate the layer below of the original.
47. Effects>Distortion Effects>Wind, same settings.

48. Effects>Texture Effects>Mosaic Antique.

49. Sign your work on a new layer.
50. Image>Add borders, 1 pixel, symmetric, background color.
51. Effects>Plugins>AAA Filters - Custom - click on Sharp and ok.

52. Save as jpg.
For the tube of this version thanks Jeanne

For the tube of this version thanks Krys


If you have problems or doubts, or you find a not worked link, or only for tell me that you enjoyed this tutorial, write to me.
16 August 2023

|

