|
AUTUMN TREASURE


Thanks Gerrie for your invitation to translate your tutorials.

This tutorial was translated with PSP2020 but it can also be made using other versions of PSP.
Since version PSP X4, Image>Mirror was replaced with Image>Flip Horizontal,
and Image>Flip with Image>Flip Vertical, there are some variables.
In versions X5 and X6, the functions have been improved by making available the Objects menu.
In the latest version X7 command Image>Mirror and Image>Flip returned, but with new differences.
See my schedule here
 Italian translation qui Italian translation qui
 French translation here French translation here
 Your versions ici Your versions ici
For this tutorial, you will need:
Material
here
Thanks Nikita for the tube and the mask.
(you find here the links to the material authors' sites)
Plugins
consult, if necessary, my filter section here
Virtual Painter - Virtual Painter 4 here
Alien Skin Eye Candy 5 Impact - Perspective Shadow here
Animation Shop here

You can change Blend Modes according to your colors.
In the newest versions of PSP, you don't find the foreground/background gradient (Corel_06_029).
You can use the gradients of the older versions.
The Gradient of CorelX here
Copy the preset  in the folder of the plugin Alien Skin Eye Candy 5 Impact>Settings>Shadow. in the folder of the plugin Alien Skin Eye Candy 5 Impact>Settings>Shadow.
One or two clic on the file (it depends by your settings), automatically the preset will be copied in the right folder.
why one or two clic see here

Open the mask in PSP and minimize it with the rest of the material,
except the animations that you'll use in Animation Shop.
1. Set your foreground color to light color #c9b464
and your background color to dark color #675414.

Set your foreground color to a Foreground/Background Gradiente, style Rectangular.

Open Calque Alpha.
Window>Duplicate or, on the keyboard, shift+D to make a copy.

Close the original.
The copy, that will be the basis of your work, is not empty,
but contains a selection saved to alpha channel.
Flood Fill  the transparent image with your Gradient. the transparent image with your Gradient.
3. Effects>Plugins>Virtual Painter - Virtual Painter 4
Filter: Oil Painting.

4. Layers>Duplicate.
Layers>New Mask layer>From image
Open the menu under the source window and you'll see all the files open.
Select the mask 1250181907_nikita_masques.

Layers>Merge>Merge Group.
5. Effects>3D Effects>Drop Shadow, color black.

Layers>Duplicate.
6. Layers>New Raster Layer.
Selections>Load/Save Selection>Load Selection from Alpha Channel.
The selection #1 is immediately available. You just have to click Load.

Flood Fill  the selection with your background color #675414. the selection with your background color #675414.
Selections>Select None.
Change the Blend Mode of this layer to Soft Light.

For my example I made Screen

7. Open the landscape "misted achtergrond"
(608 pixels width: keep this size if you use another tube).
Edit>Copy.
Go back to your work and go to Edit>Paste as new layer.
Move  the tube to the right side. the tube to the right side.
8. Open the woman tube 156914730902_femmes_nikita
(514 pixels height)
Erase the watermark and go to Edit>Copy.
Go back to your work and go to Edit>Paste as new layer.
Move  the tube to the left side. the tube to the left side.

9. Effects>Plugins>Alien Skin Eye Candy 5 Impact - Perspective Shadow.
Select the preset Autumn treasure and ok.

10. Open the wordart Autumn treasure and go to Edit>Copy.
Go back to your work and go to Edit>Paste as new layer.
(In the material you find a copy of the wordart to colorize).
Move  the tube at the bottom right, or to your liking. the tube at the bottom right, or to your liking.
Effects>3D Effects>Drop Shadow, at your choice.
11. Sign your work on a new layer.
Layers>Merge>Merge All.
12. Edit>Copy.
Open Animation Shop and go to Edit>Paste>Paste as new animation.
13. Edit>Duplicate and repeat until you get an animation of 22 frames.
Click on the first frame to select it and go to Edit>Selection All.
14. Open one of the birds animation, Vogel, also composed by 22 frames.
Animation>Resize - 350 pixels width.

Edit>Select All.
Edit>Copy.
Activate your work and go to Edit>Paste>Paste into the selected frame.
Place rightly the animation; for me

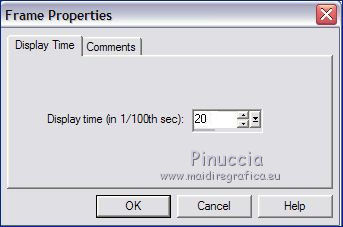
15. Animation>Frame Proprierties and set the Display time to 20

Check the result clicking of View animation 
and save as gif.
Version with tube by Luz Cristina (the landscape is mine)

Version with frame

 Your versions here Your versions here

If you have problems or doubts, or you find a not worked link, or only for tell me that you enjoyed this tutorial, write to me.
9 September 2021

|

