|
FEEL THE MAGIC OF SAN VALENTIJN


Thanks Gerrie for your invitation to translate your tutorials.

This tutorial was translated with PSP2020 but it can also be made using other versions of PSP.
Since version PSP X4, Image>Mirror was replaced with Image>Flip Horizontal,
and Image>Flip with Image>Flip Vertical, there are some variables.
In versions X5 and X6, the functions have been improved by making available the Objects menu.
In the latest version X7 command Image>Mirror and Image>Flip returned, but with new differences.
See my schedule here
 Italian translation qui Italian translation qui
 French translation here French translation here
 Your versions ici Your versions ici

For this tutorial, you will need:

For the tube thanks Grace.
For the masks thanks Exkizz and Hazal.
The animation is by Simone
(you find here the links to the material authors' sites)

consult, if necessary, my filter section here
Filters Unlimited 2.0 here
Toadies - Motion Trail here
VM Stylize - Zoom blur here
Filter Factory Gallery N - Diamond Glass here
Mehdi - Wavy Lab here
Alien Skin eye Candy 5 Impact - Perspective Shadow here
MV's Plugins - Pano warp here
Filters Toadies, VM Stylize, and Factory Gallery can be used alone or imported into Filters Unlimited.
(How do, you see here)
If a plugin supplied appears with this icon  it must necessarily be imported into Unlimited it must necessarily be imported into Unlimited
Animation Shop here

You can change Blend Modes according to your colors.
Copy the brushes in Brushes folder. Attention, please, every brush is composed by two files, you must place both the files in the folder.
See my notes about Brushes here
Copy the preset Emboss 3 in the Presets Folder.
Open the masks in PSP and minimize them with the rest of the material.
1. Set your foreground color to #bc6e3c,
and your background color to #322822.

2. Open a new transparent image 900 x 600 pixels.
3. Effects>Plugins>Mehdi - Wavy Lab.
This filter creates gradients with the colors of your Materials palette.
The first is your background color, the second is your foreground color.
Keep the third color created by the filtre.

4. Effects>Plugins>Filters Unlimited 2.0 - Filter Factory Gallery N - Diamond Glass, default settings

Layers>Duplicate.
5. Effects>Plugins>Filters Unlimited 2.0 - Color Effects - Invert Lightness,Keep Color.

Change the Blend Mode of this layer to Soft Light.

6. Layers>New Raster Layer.
Flood Fill  the layer with your background color #322822. the layer with your background color #322822.
7. Layers>New Mask layer>From image
Open the menu under the source window and you'll see all the files open.
Select the mask Exkizz_Mask_Aurora1.

Layers>Merge>Merge Group.
8. Layers>Duplicate.
Image>Flip.
Layers>Merge>Merge Down.
Change the Blend Mode of this layer to Soft Light, or according to your colors.

9. Layers>Merge>Merge All.
Layers>Duplicate.
Image>Resize, to 80%, resize all layers not checked.
Image>Free Rotate - 90 degrees to left.

10. Effects>Plugins>Filters Unlimited 2.0 - VM Stylize - Zoom blur, default settings.

11. Layers>New Raster Layer.
Flood Fill  the layer with your background color #322822. the layer with your background color #322822.
12. Layers>New Mask layer>From image
Open the menu under the source window
and select the mask mask_hazal21.

Layers>Merge>Merge Group.
13. Layers>Merge>Merge All.
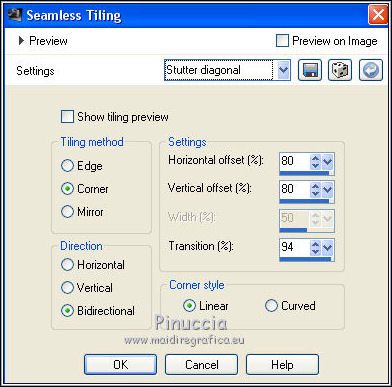
14. Effects>Image Effects>Seamless Tiling, Stutter diagonal.

Effects>User Defined Filters - select the preset Emboss 3 and ok.

15. Layers>Duplicate.
Image>Resize, to 80%, resize all layers not checked.
16. Effects>Plugins>Toadies - Motion Trail.

17. Repeat Effects>Plugins>Toadies - Motion Trail with these settings.

18. Effects>Plugins>MV's Plugins - Pano Warp.

19. Effects>Plugins>Alien Skin Eye Candy 5 Impact - Perspective Shadow,
select the preset Drop Shadow Lowest and ok.

20. Layers>New Raster Layer.
Flood Fill  the layer with your foreground color #bc6e3c. the layer with your foreground color #bc6e3c.
Layers>New Mask layer>From image
Open the menu under the source window
and select the mask exkizz_mask_aurora2.

Layers>Merge>Merge Group.
Adjust>Sharpness>Sharpen.
21. Open the element Magnifique Element 1 
Edit>Copy.
Go back to your work and go to Edit>PAste as new layer.
Move  to the left. to the left.

Layers>Duplicate.
Image>Mirror.
22. Open the man tube 57 
Edit>Copy.
Go back to your work and go to Edit>PAste as new layer.
Move  the tube to the left side. the tube to the left side.

Effects>3D Effects>Drop Shadow, at your choice.
23. Open the woman tube Grace's_TLC_I 
Edit>Copy.
Go back to your work and go to Edit>PAste as new layer.
Image>Resize, to 80%, resize all layers not checked.
Move  the tube to the right side. the tube to the right side.
Move this layer under the layer of Element1.

Effects>3D Effects>Drop Shadow, at your choice.
24. Open Magnifique Element 2 
Edit>Copy.
Go back to your work and go to Edit>PAste as new layer.
Don't move it.

25. Image>Add borders, 1 pixel, symmetric, foreground color #bc6e3c.
Image>Add borders, 20 pixels, symmetric, background color #322822.
Image>Add borders, 1 pixel, symmetric, foreground color #bc6e3c.
Image>Add borders, 30 pixels, symmetric, background color #322822.
26. Layers>New Raster Layer.
Activate your Brush Tool 
look for and select one of the two brushes supplied Feel the magic of valentijin size 300 pixels

or, if you prefer the brush Penseel Gerrie

Apply the brush, left-clicking to use your foreground color.
Change the Blend Mode of this layer to Screen, or according to your colors.

or

27. Sign your work on a new layer.
28. Layers>Merge>Merge All.
Edit>Copy.
29. Open Animation Shop and go to Edit>Paste>Paste as new animation.
Edit>Duplicate and repeat until you'll get an animation composed by 13 frames.
Click on the first frame to select it.
Edit>Select All.
30. Open the animation SimoneAni-TheKiss, also made up of 13 frames.
Edit>Select All.
Edit>Copy.
Activate your work and go to Edit>Paste>Paste in the selected frame,
and place rightly the gif.
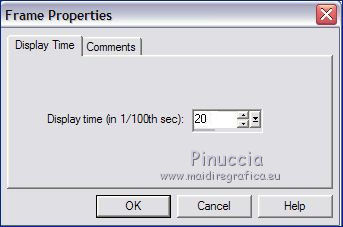
31. Animation>Animation Properties and set to 20.

32. Animation>Resize Animation, to your liking, for me 900 pixels width.
Check your result by clicking on View animation 
and save as gif.
For the tubes of these version thanks
Yadi and Nena Silva

Min@


 Your versions here Your versions here

If you have problems or doubts, or you find a not worked link, or only for tell me that you enjoyed this tutorial, write to me.
2 February 2023

|

