This tutorial was created using PSP X but it may be esecuted using other versions of PSP.
Since version PSP X4, Image>Mirror was replaced with Image>Flip Horizontal,
and Image>Flip with Image>Flip Vertical, there are some variables.
In versions X5 and X6, the functions have been improved by making available the Objects menu.
In the latest version X7 command Image>Mirror and Image>Flip returned, but with new differences.
See my schedule here
 Traduzione italiana ici
 English translation ici
 Versions ici

The tutorial has been translated into russian by TalaNat.
Thank you very much, TalaNat for this translation.
Our friend TalaNat left us. Her site is closed
For this tutorial, you will need:
Material here
The brush en english here
For the tube, thanks to Irene.
Plugins:
if you have a doubt about plugins, see my section plugins here
FM Tile Tools - Blend Emboss qui
Alien Skin Xenofex 2.0 - Burnt Edges qui
Filters Unlimited 2.0 qui
Photo Aging Kit qui
Virtual Painter 4 qui
OptikVerve Labs - Virtual Photographer qui
Penta.com - Jeans qui
Graphics Plus - Cross Shadow, Emboss qui
Filters Penta.com and Graphics Plus can be used alone or imported into Filters Unlimited.
(How do, you see here)
If a plugin supplied appears with this icon  it must necessarily be imported into Unlimited

You can change Blend Modes according to your colors.
In the newest versions of PSP, you don't find the foreground/background gradient (Corel_06_029).
You can use the gradients of the older versions.
The Gradient of CorelX here

Place the mask in Mask folder.
Place the brush in Brush folder. Attention, please, the brush is composed by two files, you must place both the files in the folder.
See my notes about Brushes here
1. In Material Palette,
set the Foreground color to #c09b81,
and the Background color to #925052.

Set your foreground color to a Foreground/Background Gradient, Style Linear, using the settings shown below:

2. New>New Image 900 x 600 pixels, transparent.
Flood fill  the new image with Gradient.
Adjust>Blur>Gaussian Blur - Radius 20.

Selections>Select all.
Layers>New Raster Layer.
Open the tube DI_moedertje7 and go to Edit>Copy.
Back to your tag and Edit>Paste into Selection.
Selections>Select none.
3. Effects>Image Effects>Seamless Tiling, default.

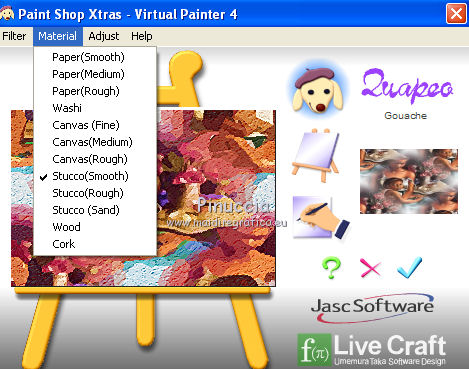
4. Effects>Plugins>Virtual Painter 4
Filter: Gouache; Material: Stucco (Smooth), Adjust: all Normal.

5. Effects>Plugins>OptikVerveLab - Virtual Photographer.
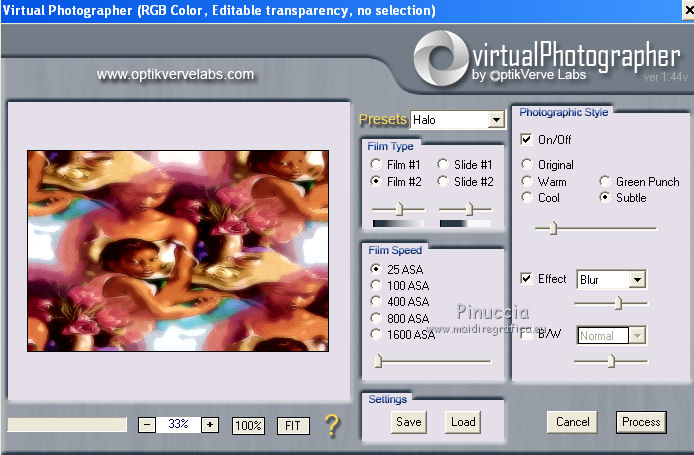
Blend Mode to Soft Light, opacity to 60.
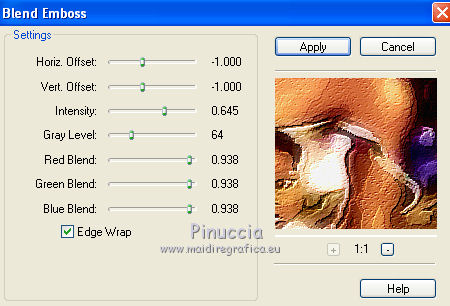
6. Effects>Plugins>FM Tile Tools - Blend Emboss, setting as seen below.
7. Edit>Past As New Layer (the tube is in memory).
Image>Mirror.
Image>Resize, to 120%, resize all layers unchecked.
8. Layers>Load/Save Mask>Load Mask from Disk.
Choose LIB016a, settings as below.

Layers>Merge>Merge group.
Move  the tube to the right.
Layers>Merge>Merge visible.
9. Layers>Duplicate.
Image>Resize - 85%, resize all layer unchecked.
10. Effects>Plugins>Alien Skin Xenofex 2.0 - Burnt Edges - foreground color.

Effects>3D Effects>Drop Shadow.

Repeat Effects>3D>Effects>Drop Shadow, vertical and horizontal to -5.
11. Activate the bottom level.
Effects>Art Media Effects>Brush Strokes

Adjust>Blur>Gaussian Blur - Radius 3.

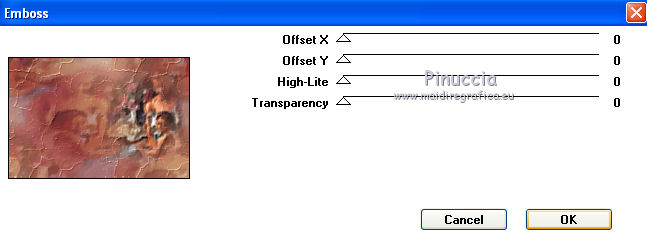
12. Effects>Plugins>Filters Unlimited 2.0 - Photo Aging Kit - Cracked paper

Effects>Plugins>Graphics Plus - Emboss.
13. Activate the top layer.
Layers>New Raster Layer.
Set Foreground to #c09b81.
14. Activate Brush tool 
select the brush "pinucciamother2012",
and apply with foreground color.
15. Effects>Effects 3D>Drop Shadow.

Repeat Effects>Effects 3D>Drop Shadow, using the setting shown below.

16. Again activate the bottom layer.
Selections>Select All.
Selections>Modify>Contract - 25 pixels.

Selections>Invert.
Selections>Promote Selections to layer.
Layers>Arrange>Bring to top.
17. Effects>Texture Effects>Straw Wall, foreground color:

Effects>Edge Effects>Enhance.
Blend mode to Soft light.
Selections>Invert.
Selections>Modify>Select Selection Borders.

Layers>New Raster Layer.
Flood fill with background color.
18. Effects>Plugins>Penta.com - Jeans, standard.

Effects>Edge Effects>Enhance.
Selections>Select None.
19. Effects>Effects 3D>Drop Shadow.

Repeat Effects>Effects 3D>Drop Shadow, verticale and horizontal with - 5.
20. Selections>Select All.
Selections>Modify>Contract - 4 pixels.
Selections>Invert.
Layers>New Raster Layer.
Flood fill with background color.
21. Effects>Plugins>Penta.com - Jeans, standard.
Effects>Edge Effects>Enhance.
Selections>Select None.
22. Effects>Effects 3D>Drop Shadow.
Repeat Effects>Effects 3D>Drop Shadow, verticale and horizontal with - 5.
23. Sign your tag.
Optional, to give a little of light to the background:
Activate the bottom layer.
Effects>Plugins>Graphics Plus - Cross Shadow.

24. Layers>Merge>Merge All.
Save as jpg.
With filter Graphics Plus.

Mother's Day 2023, for the tube of this version thanks Lana

Mother's Day 2023, the tube of this version is mine

The tube of this version is by Irene
The tube of this version is by Nimue La Fee
The tubes used for these versions are by
Gabry
Animabelle
Version with a Guismo's tube.

If you have problems or doubt, or you find a not worked link, or only for tell me that you enjoyed this tutorial, write to me.
24 April 2012