|
TOP ROSENMAN


This tutorial was translated with PSPX7 but it can also be made using other versions of PSP.
Since version PSP X4, Image>Mirror was replaced with Image>Flip Horizontal,
and Image>Flip with Image>Flip Vertical, there are some variables.
In versions X5 and X6, the functions have been improved by making available the Objects menu.
In the latest version X7 command Image>Mirror and Image>Flip returned, but with new differences.
See my schedule here
 French translation here French translation here
 Your versions ici Your versions ici
For this tutorial, you will need:
Material
here
Tube Woman1075_by Clo
Misted visg22-coly by Colybrix
(you find here the links to the material authors' sites)
Plugins
consult, if necessary, my filter section here
Filters Unlimited 2.0 here
Richard Rosenman - Grid Generator here
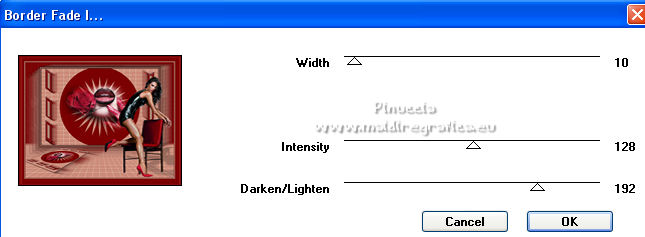
Alf's Border FX - Border Fade I here
Alien Skin Eye Candy 5 Impact - Glass, Perspective Shadow here
Mura's Meister - Perspective Tiling here
Mura's Meister - Copies here
Flaming Pear - Flexify 2 here
Andromeda - Perspective here
AAA Frames - Frame Works here
Filters Alf's Border FX can be used alone or imported into Filters Unlimited.
(How do, you see here)
If a plugin supplied appears with this icon  it must necessarily be imported into Unlimited it must necessarily be imported into Unlimited

You can change Blend Modes according to your colors.
Copy the selections in the Selections Folder.
1. Open a new transparent image 900 x 600 pixels.
2. Set your foreground color to #ac8b78,
and your background color to #7c0002.
Flood Fill  the transparent image with foreground color #ac8b78. the transparent image with foreground color #ac8b78.
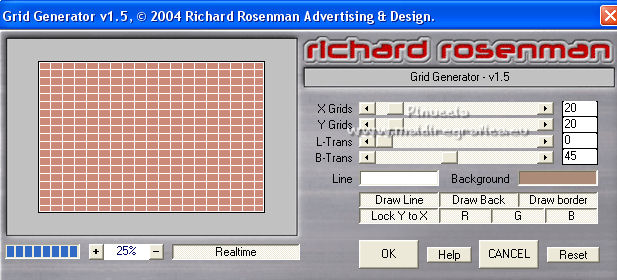
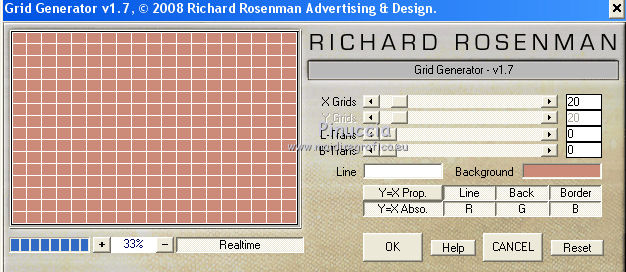
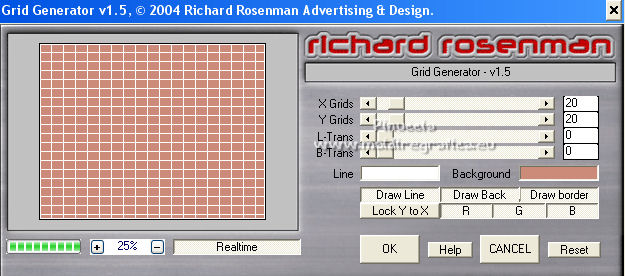
3. Effects>Plugins>Richard Rosenman - Grid Generator - color #ac8b78.
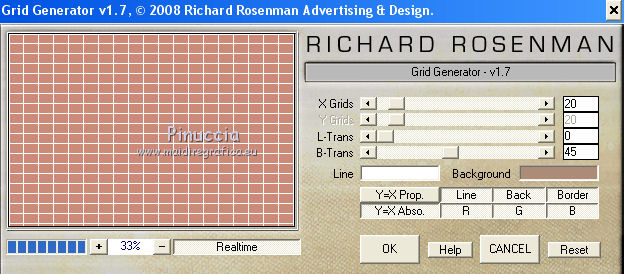
If you use the previous version
4. Selections>Load/Save Selection>Load Selection from Disk.
Look for and load the selection sel.505.nines

5. Layers>New Raster Layer.
Flood Fill the layer with your background color #7c0002.
6. Effects>3D Effects>Buttonize - color #ffffff.

7. Selections>Load/Save Selection>Load Selection from Disk.
Look for and load the selection sel.505.2.nines

The new selection will replace the previous one
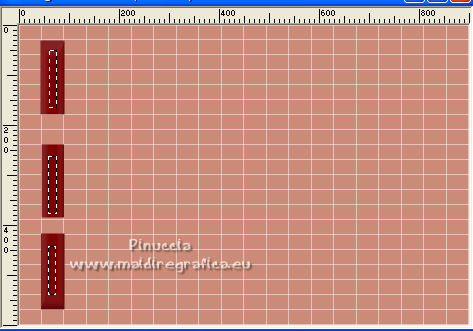
Flood Fill the selection with your foreground color #ac8b78.
Selections>Select None.
8. Effects>Plugins>Alien Skin Eye Candy 5 Impact - Glass.
Select the preset Clear and ok.

9. Layers>Duplicate.
Activate the layer below of the original.
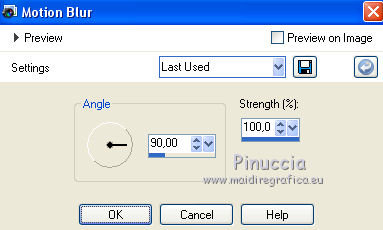
10. Adjust>Blur>Motion Blur.
11. Activate the layer above of the copy.
Layers>Merge>Merge Down.
12. Layers>Duplicate.
Image>Mirror.
Layers>Merge>Merge Down.
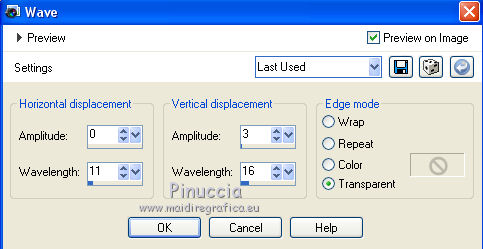
13. Effects>Distortion Effects>Wave.
14. Activate your bottom layer, Raster 1.
Selections>Load/Save Selection>Load Selection from Disk.
Look for and load the selection sel.505.1.nines

Selections>Promote Selection to Layer.
15. Layers>New Raster Layer.
Flood Fill the layer with your background color #7c0002.
16. Selections>Modify>Contract - 5 pixels.
Press CANC on the keyboard 
Selections>Select None.
Layers>Merge>Merge Down.
17. Effects>Plugins>Flaming Pear - Flexify 2 - Tab color #7c0002.
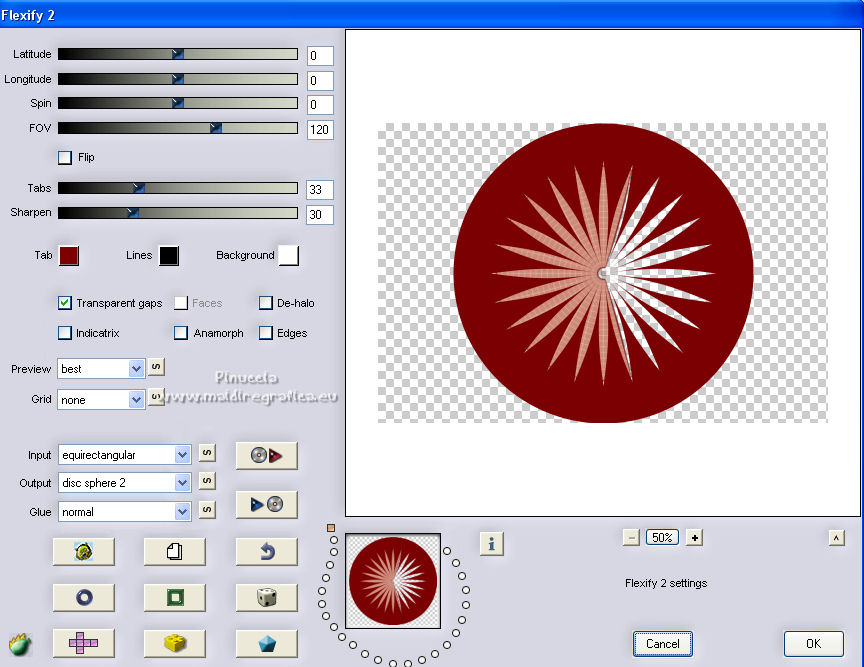
If you have problems finding the preset (because the list is not in alphabetical order),
position yourself on the first preset to select it,
and click on the letter D as many times as necessary to find the "disc sphere 2" preset.
See notes on this here
18. Open the misted visg22-coly, erase the watermark and go to Edit>Copy.
Go back to your work and go to Edit>Paste as new layer.
Image>Resize, to 90%, resize all layers not checked.
Don't move it.
19. Layers>Merge>Merge visible.
20. Image>Resize, to 90%, resize all layers checked.
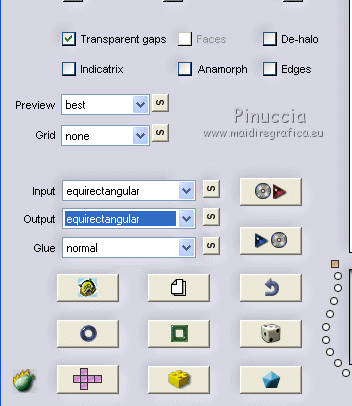
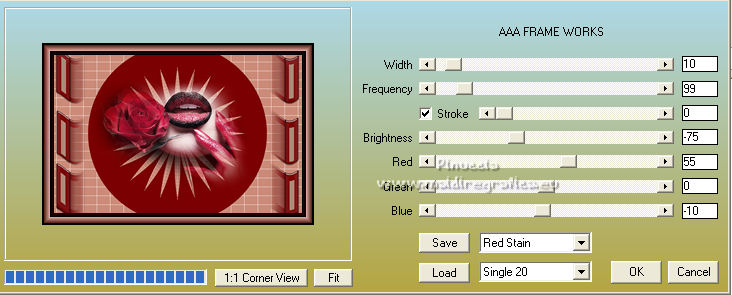
21. Effects>Plugins>AAA Frames - Frame Works.
Sélectionner le preset Red Stain/Double 20
22. Edit>Copy.
Image>Resize, to 90%, resize all layers not checked.
23. Image>Canvas Size - 900 x 700 pixels.

24. Layers>New Raster Layer.
Layres>Arrange>Move Down.
Selections>Select All.
Edit>Paste into Selection.
Selections>Select None.
25. Adjust>Blur>Gaussian Blur - radius 20.

26. Effects>Plugins>Richard Rosenman - Grid Generator - color #cb8b78.
If you use the previous version
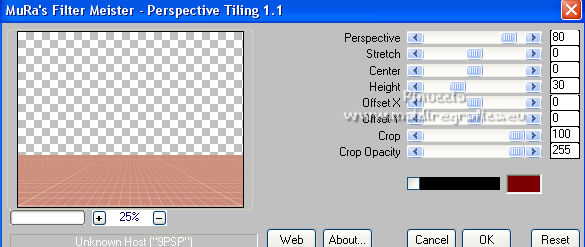
27. Effects>Plugins>Mura's Meister - Perspective Tiling.
28. Activate your Magic Wand Tool  , feather and tolerance 20 , feather and tolerance 20

and click on the transparent part to select it.
Press 3 fois CANC sur le clavier.
Selections>Select None.
29. Activate the layer Merged.
Layers>Duplicate, and close this layer for a moment.
Activate the layer below of the original.
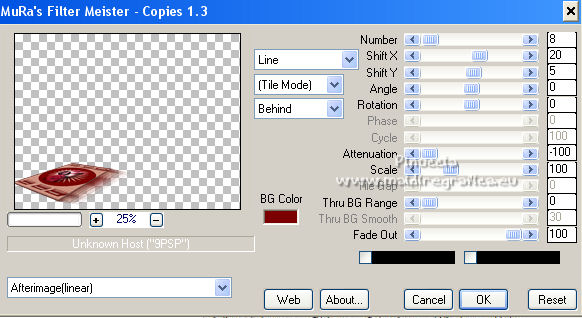
30. Effects>Plugins>Mura's Meister - Copies.
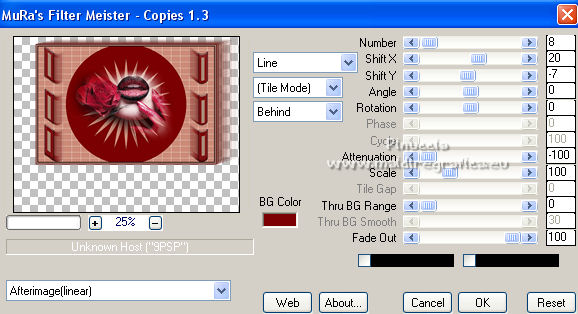
31. Again Effects>Plugins>Mura's Meister - Copies with these settings.

32. Open and activate the layer above.
Effects>Plugins>Andromeda - Perspective.
Click on Presets
Set the settings and click on the sign at the bottom right to apply.
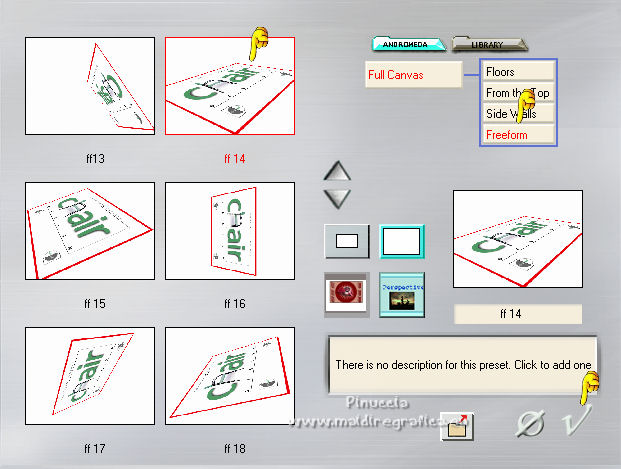
Again click on the sign at the bottom right to close.
33. Image>Resize, 2 times to 70%, resize all layers not checked.
Effects>Image Effects>Offset.

34. Effects>Plugins>Mura's Meister - Copies.
Adjust>Sharpness>Sharpen.
35. Layers>New Raster Layer.
Layers>Arrange>Send to Bottom.
Flood Fill the layer with your background color #7a0001.
36. Adjust>Add/Remove Noise>Add Noise.

37. Activate your top layer.
Open the tube Woman1075_by Clo and go to Edit>Copy.
Go back to your work and go to Edit>Paste as new layer.
Image>Resize, to 80%, resize all layers not checked.
Move  the tube to the right side, see my example. the tube to the right side, see my example.
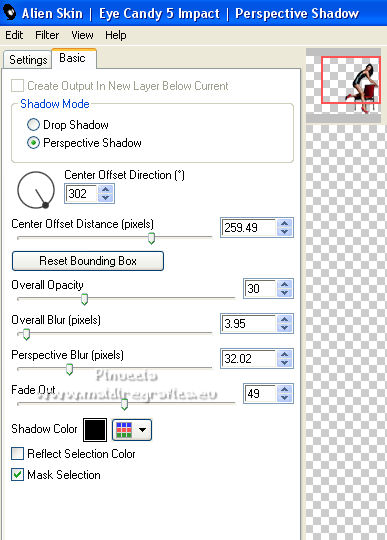
38. Effects>Plugins>Alien Skin Eye Candy 5 Impact - Perspective Shadow - couleur #000000.
39. Layers>Merge>Merge All.
40. Image>Add borders, 2 pixels, symmetric, background color #7a0001.
Image>Add borders, 5 pixels, symmetric, foreground color #cb8b78.
Image>Add borders, 30 pixels, symmetric, background color #7a0001.
41. Activate your Magic Wand Tool , tolerance and feather 0,
and click on the last border to select it.
42. Effects>Plugins>Alf's Border FX - Border Fade I.
Selections>Select None.
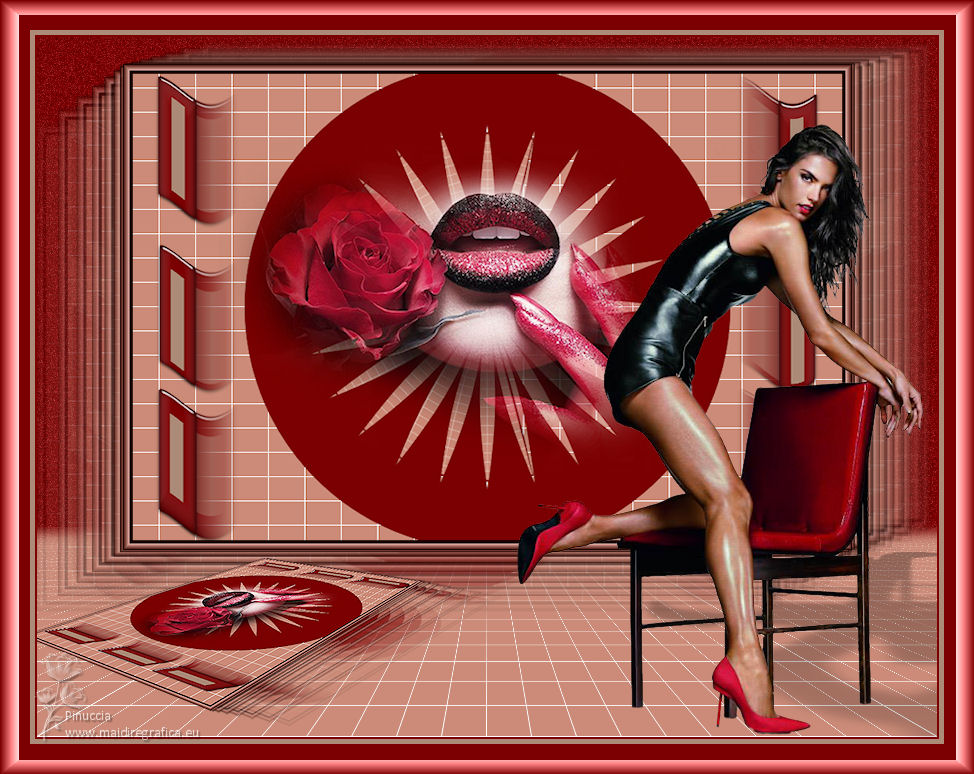
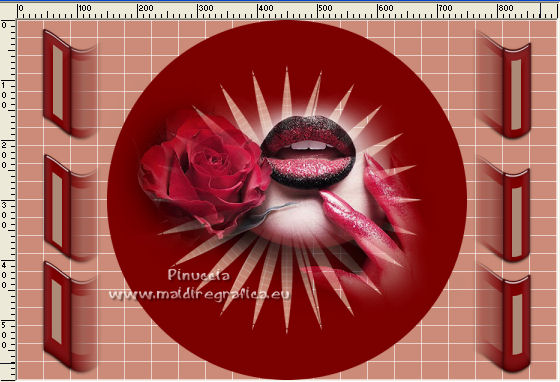
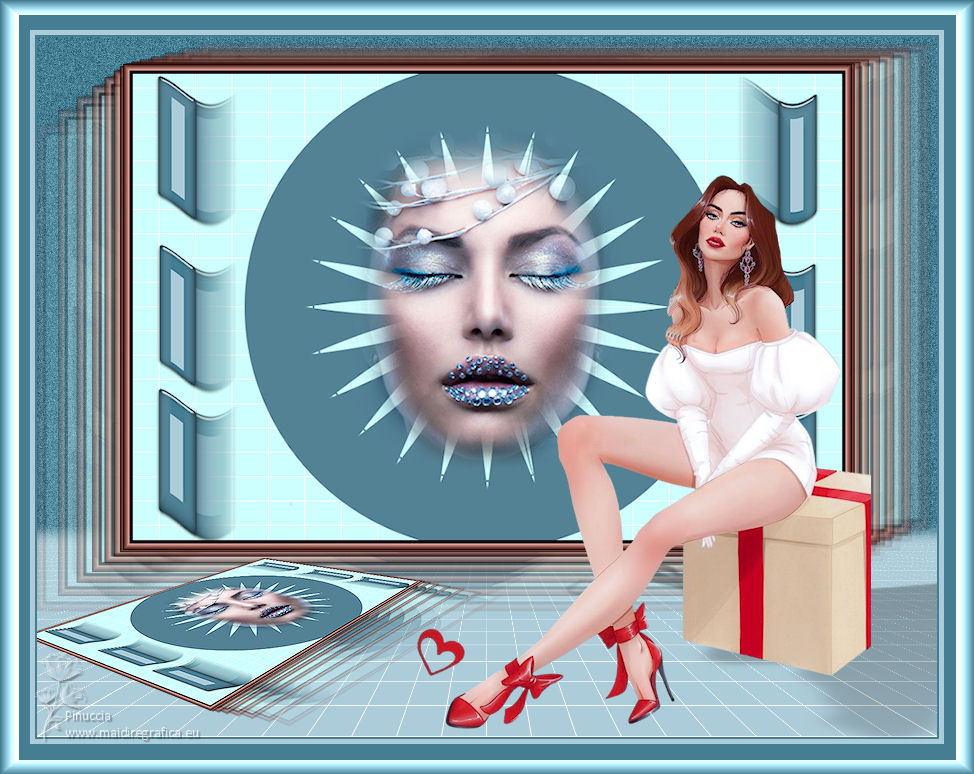
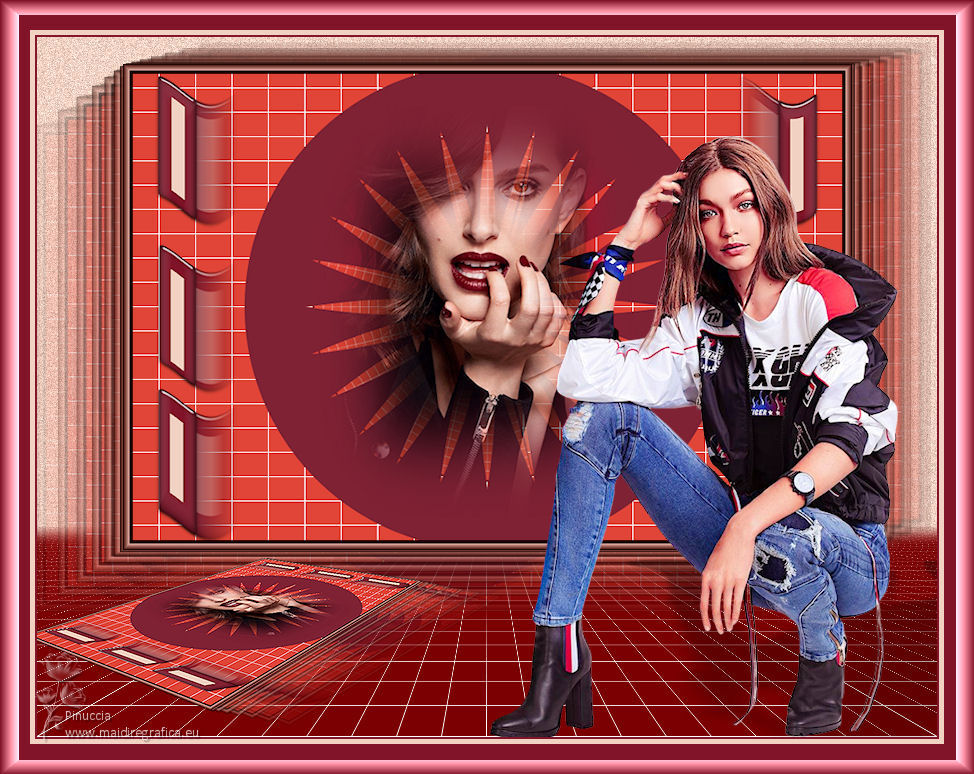
43. Sign your work and save as jpg.
For the tubes of this version thanks Suizabella and Coly
For the tube of this version thanks Suizabella (the misted is mine)
Your versions here

If you have problems or doubts, or you find a not worked link, or only for tell me that you enjoyed this tutorial, write to me.
16 May 2022

|


