|
TOP BRUJAS 2023


This tutorial was translated with PSPX7 but it can also be made using other versions of PSP.
Since version PSP X4, Image>Mirror was replaced with Image>Flip Horizontal,
and Image>Flip with Image>Flip Vertical, there are some variables.
In versions X5 and X6, the functions have been improved by making available the Objects menu.
In the latest version X7 command Image>Mirror and Image>Flip returned, but with new differences.
See my schedule here
 French translation here French translation here
 Your versions ici Your versions ici
For this tutorial, you will need:

For the tubes thanks Colybrix, Lady Valella, NaiseM, Criss.
(you find here the links to the material authors' sites)

consult, if necessary, my filter section here
Filters Unlimited 2.0 here
Alien Skin Eye Candy 5 Impact - Extrude here
Mura's Meister - Perspective Tiling here
Tramages - Pool Shadow here
Filters Tramages can be used alone or imported into Filters Unlimited.
(How do, you see here)
If a plugin supplied appears with this icon  it must necessarily be imported into Unlimited it must necessarily be imported into Unlimited

You can change Blend Modes according to your colors.
In the newest versions of PSP, you don't find the foreground/background gradient (Corel_06_029).
You can use the gradients of the older versions.
The Gradient of CorelX here

Copy the textures in the Textures Folder.
Copy the selections in the Selections Folder.
1. Open a new transparent image 950 x 650 pixels.
2. Set your foreground color to #d25af1,
and your background color to #531dad.

Set your foreground color to a Foreground/Background Gradient, style Sunburst.

Flood Fill  the transparent image with your gradient. the transparent image with your gradient.
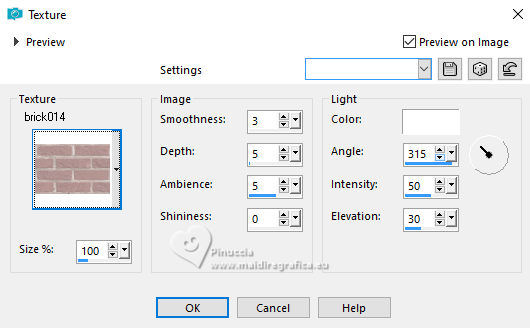
3. Effects>Texture Effects>Texture - select the texture brick014 - color #ffffff
4. Layers>Duplicate.
Close the original layer and stay on the layer of the copy.
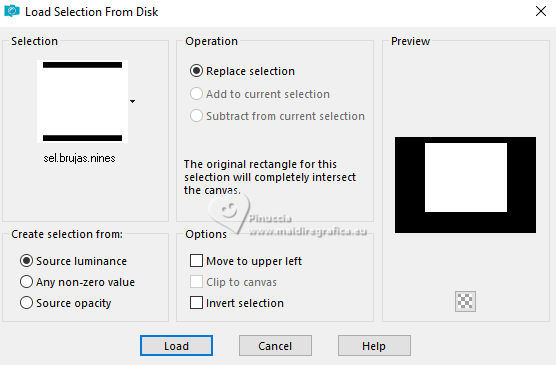
5. Selections>Load/Save Selection>Load Selection from Disk.
Look for and load the selection sel.brujas.nines
Press CANC on the keyboard 
Selections>Select None.
6. Effects>Plugins>Alien Skin Eye Candy 5 Impact - Extrude
Solid color: background color #531dad;
Highlight color: foreground color #d25af1.

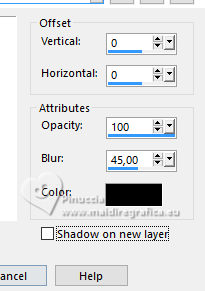
7. Effects>3D Effects>Drop Shadow, color #000000.
8. Activate your Magic Wand Tool 
and click on the transparent part to select it.
Click 2 times to select all

9. Layers>New Raster Layer.
Layers>Arrange>Move Down.
Flood Fill  the layer with your Gradient. the layer with your Gradient.
10. Effects>Texture Effects>Texture - select the texture Tuile color #ffffff.

Selections>Select None.
11. Open the misted LValellaMFa2023-1079 
Erase the watermark and go to Edit>Copy.
Go back to your work and go to Edit>Paste as new layer.
Place  the tube in the center of the window. the tube in the center of the window.
Change the Blend Mode of this layer to Soft Light.

12. Open and activate the closed layer.
Layers>Arrange>Bring to Top.
Effects>Plugins>Mura's Meister - Perspective Tiling.

13 Selections>Load/Save Selection>Load Selection from Disk.
Look for and load the selection sel.brujas1.nines

14. Layers>New Raster Layer.
Flood Fill  the layer with your Gradient. the layer with your Gradient.
15. Selections>Load/Save Selection>Load Selection from Disk.
Look for and load the selection sel.brujas2.nines

The new selection has replaced the previous one.

Press CANC on the keyboard.
Selections>Select None.
16. Effects>Plugins>Alien Skin Eye Candy 5 Impact - Extrude, same settings.

17. Effects>3D Effects>Drop Shadow, same settings.

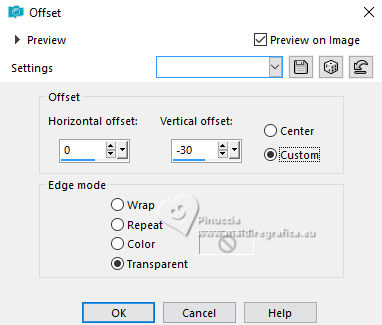
18. Effects>Image Effects>Offset.
19. Open pack_accesorios_banco_bruja 
(These elements are in the material separately, but for the work I put them together.
If you want to use them separately in your second version, you can do it).
Edit>Copy.
Go back to your work and go to Edit>Paste as new layer.
Place  the tube over the banquet. the tube over the banquet.

20. Open Halloween_Sheet_1_by_CherokeeRose 
Edit>Copy.
Go back to your work and go to Edit>Paste as new layer.
Move  the tube at the upper left. the tube at the upper left.

21. Open GolF_Desings_Jenny_Nightmare_Elements(52) 
Edit>Copy.
Go back to your work and go to Edit>Paste as new layer.
Move  the tube at the upper right. the tube at the upper right.
22. Open Halloween-naisem-58 
Edit>Copy.
Go back to your work and go to Edit>Paste as new layer.
Image>Resize, to 90%, resize all layers not checked.
Move  the tube at the bottom left. the tube at the bottom left.
23. Effects>3D Effects>Drop Shadow, color #000000.

24. Open Hallow54-coly 
Erase the watermark and go to Edit>Copy.
Go back to your work and go to Edit>Paste as new layer.
Image>Resize, 1 time to 50% and 1 time to 80%, resize all layers not checked.
Move  the tube at the bottom left. the tube at the bottom left.

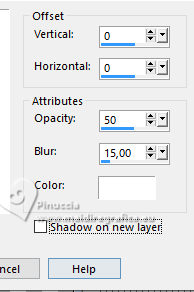
25. Effects>3D Effects>Drop Shadow, color #ffffff.
26. Open Hallow55-coly 
Erase the watermark and go to Edit>Copy.
Go back to your work and go to Edit>Paste as new layer.
Image>Resize, to 80%, resize all layers not checked.
Move  the tube at the bottom right. the tube at the bottom right.
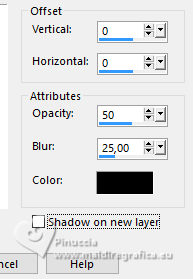
27. Effects>3D Effects>Drop Shadow, color #000000.
28. Open Criss etiqueta7 halloween 
Edit>Copy.
Go back to your work and go to Edit>Paste as new layer.
Place  the tube under the banquet. the tube under the banquet.

29. Layers>Merge>Merge All.
30. Image>Add borders, 2 pixels, symmetric, background color #531dad.
Image>Add borders, 5 pixels, symmetric, foreground color #d25af1.
Image>Add borders, 30 pixels, symétrique, color #ffffff.
Activate your Magic Wand Tool 
and click on the last border to select it.
Flood Fill  the selection with your Gradient. the selection with your Gradient.
31. Effects>Plugins>Tramages - Pool Shadow, default settings.

Selections>Invert.
32. Effects>3D Effects>Drop Shadow, same settings.

Edit>Repeat Drop Shadow.
Selections>Select None.
33. Open Marco_brujas_nines 
Edit>Copy.
Go back to your work and go to Edit>Paste as new layer.
34. Sign your work on a new layer.
Add the author and translator watermarks.
Layers>Merge>Merge All.
Image>Add borders, 2 pixels, symmetric, color #000000.
Save as jpg.
For the tubes of this version thanks Krys, Wieskes, Yvonne, Riet.

 Your versions here Your versions here

If you have problems or doubts, or you find a not worked link, or only for tell me that you enjoyed this tutorial, write to me.
15 October 2023

|


