|
TOP ARABICO


This tutorial was translated with PSPX7 but it can also be made using other versions of PSP.
Since version PSP X4, Image>Mirror was replaced with Image>Flip Horizontal,
and Image>Flip with Image>Flip Vertical, there are some variables.
In versions X5 and X6, the functions have been improved by making available the Objects menu.
In the latest version X7 command Image>Mirror and Image>Flip returned, but with new differences.
See my schedule here
 French translation here French translation here
 Your versions ici Your versions ici
For this tutorial, you will need:
Material
here
Tube AR-615 by Anna Ridzi
Tube DBK 0UTDOOR -BUILDING-005 by Katrina
(you find here the links to the material authors' sites)
Plugins
consult, if necessary, my filter section here
Mura's Meister - Perspective Tiling here
AAA Frames - Foto Frame here
Simple - Top Left Mirror here

You can change Blend Modes according to your colors.
In the newest versions of PSP, you don't find the foreground/background gradient (Corel_06_029).
You can use the gradients of the older versions.
The Gradient of CorelX here
Open the mask in PSP and minimize it with the rest of the material.
1. Open a new transparent image 1000 x 650 pixels.
2. Set your foreground color to #00344e,
and your background color to #7ec7e5.

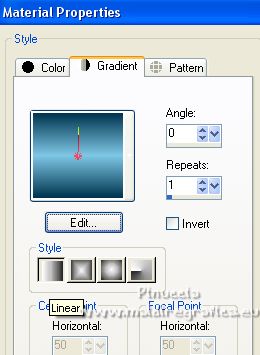
Set your foreground color to a Foreground/Background Gradient, style Linear.

Flood Fill  the transparent image with your Gradient. the transparent image with your Gradient.
3. Effects>Reflection Effects>Feedback.

Adjust>Sharpness>Sharpen More.
4. Effects>Distortion Effects>Polares Coordinates.

5. K key on the keyboard to activate your Pick Tool 
mode Scale 
pull the central bottom node up, until 250 pixels.

6. Effects>Distortion Effects>Polar Coordinates, same settings.

7. Effects>Reflection Effects>Feedback, same settings.

8. Effects>Plugins>Simple - Top Left Mirror.

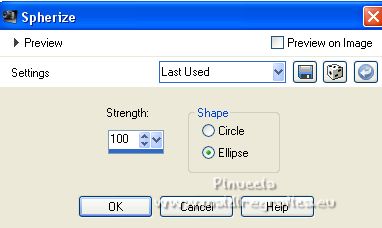
9. Effects>Geometric Effects>Spherize.

10. Effects>3D Effects>Drop Shadow, color black.

Repeat Drop Shadow, vertical and horizontal -5.
11. Layers>New Raster Layer.
Layers>Arrange>Send to Bottom.
Change the settings of your Gradient.

Flood Fill  the layer with your Gradient. the layer with your Gradient.
12. Selections>Select All.
Open the tube DBK 0UTDOOR-BUILDING-005 and go to Edit>Copy.
Go back to your work and go to Edit>Paste into Selection.
Selections>Select None.
13. Effects>Image Effects>Seamless Tiling, default settings.

14. Adjust>Blur>Radial Blur.

Effects>Edge Effects>Enhance More.
15. Layers>New Raster Layer.
Selections>Select All.
Edit>Paste into Selection (the tube DBK 0UTDOOR-BUILDING-005 is still in memory).
Selections>Select None.
16. Layers>Merge>Merge visible.
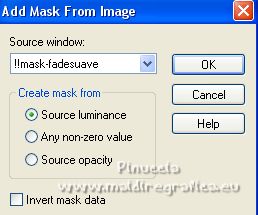
17. Layers>New Mask layer>From image
Open the menu under the source window and you'll see all the files open.
Select the mask !!mask-fadesuave.

Layers>Duplicate, to apply the mask 2 times.
Layers>Merge>Merge Group.
18. Layers>Duplicate.
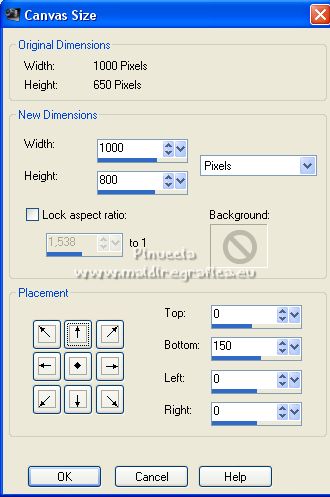
Image>Canvas Size - 1000 x 800 pixels.

19. Effects>Plugins>Mura's Meister - Perspective Tiling.

20. Activate your Magic Wand Tool 

Click on the transparent part to select it.
Press 5 fois CANC on the keyboard  . .
Selections>Select None.
21. Layers>New Raster Layer.
Layers>Arrange>Send to Bottom.
Set your foreground color to #002135.
Flood Fill  the layer with your foreground color #002135. the layer with your foreground color #002135.
22. Layers>Merge>Merge visible.
23. Effects>Plugins>AAA Frames - Foto Frame.

24. Open the tube AR-615 and go to Edit>Copy.
Go back to your work and go to Edit>Paste as new layer.
Image>Resize, 1 time to 80% and 1 time to 90%, resize all layers not checked.
Move  the tube down. the tube down.
25. Effects>3D Effects>Drop Shadow, color black.

Edit>Repeat Drop Shadow.
26. Sign your work.
Layers>Merge>Merge All and save as jpg.
For the tubes of this version thanks Luz Cristina

 Your versions here Your versions here

If you have problems or doubts, or you find a not worked link, or only for tell me that you enjoyed this tutorial, write to me.
15 July 2022

|


