|
TAG STROKES


This tutorial was translated with PSPX7 but it can also be made using other versions of PSP.
Since version PSP X4, Image>Mirror was replaced with Image>Flip Horizontal,
and Image>Flip with Image>Flip Vertical, there are some variables.
In versions X5 and X6, the functions have been improved by making available the Objects menu.
In the latest version X7 command Image>Mirror and Image>Flip returned, but with new differences.
See my schedule here
 French translation here French translation here
 Your versions ici Your versions ici
For this tutorial, you will need:
Material
here
Tube 2021-35-Nadege
KRUSMISTPaysagesEté-0015
Narah_mask_0642
Adorno_387_nines
(you find here the links to the material authors' sites)
Plugins
consult, if necessary, my filter section here
Filters Unlimited 2.0 here
Tramages - Pool Shadow here
Filters Tramages can be used alone or imported into Filters Unlimited.
(How do, you see here)
If a plugin supplied appears with this icon  it must necessarily be imported into Unlimited it must necessarily be imported into Unlimited

You can change Blend Modes according to your colors.
Open the mask in PSP and minimize it with the rest of the material.
1. Open a new transparent image 900 x 600 pixels.
2. Set your foreground color to #ae4d71,
and your background color to #daacb8.

Flood Fill  the transparent image with your foreground color #ae4d71. the transparent image with your foreground color #ae4d71.
3. Adjust>Add/Remove Noise>Add Noise.
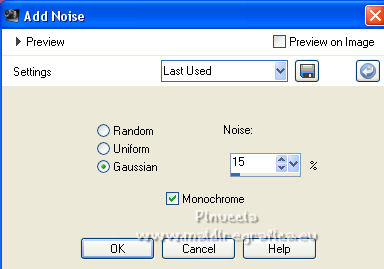
4. Layers>New Raster Layer.
Flood Fill  with your backgrund color #daacb8. with your backgrund color #daacb8.
5. Layers>New Mask layer>From image
Open the menu under the source window and you'll see all the files open.
Select the mask Narah_mask_0642.
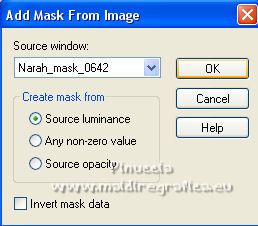
Layers>Merge>Merge Group.
6. Layers>Duplicate.
Effects>Image Effects>Seamless Tiling, default settings.

Effects>Edge Effects>Enhance More.
7. Layers>Arrange>Move Down.
8. Activate your top layer, Raster 1.
9. Selection Tool 
(no matter the type of selection, because with the custom selection your always get a rectangle)
clic on the Custom Selection 
and set the following settings.
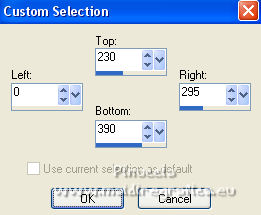
Selections>Promote Selection to Layer.
Layers>Arrange>Bring to Top.
10. Selections>Modify>Contract - 5 pixels.
Press CANC on the keyboard 
Selections>Select None.
11. Layers>Duplicate.
Image>Mirror.
Layers>Merge>Merge Down.
12. Effects>Image Effects>Seamless Tiling, same settings.

13. Custom Selection  , same settings , same settings

Selections>Modify>Contract - 5 pixels.
14. Open the tube KRYSMISTPAYSAGESETÉ-0015, erase the watermark and go to Edit>Copy.
Go back to your work and go to Edit>Paste as new layer.
Image>Resize, 2 times to 80%, resize all layers not checked.
Place  the tube over the selection. the tube over the selection.

Keep selected.
15. Adjust>Blur>Radial Blur.
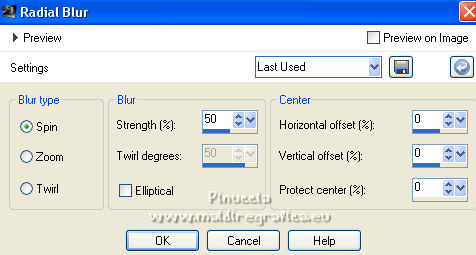
16. Selections>Invert.
Press CANC on the keyboard.
Selections>Select None.
17. Layers>Duplicate.
Image>Mirror.
Layers>Merge>Merge Down.
Change the Blend Mode of this layer to Luminance.
18. Layers>Duplicate.
Effects>Image Effects>Seamless Tiling, same settings.

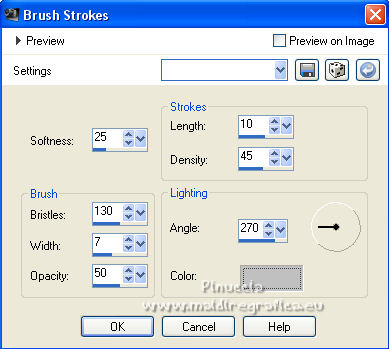
19. Effects>Art Media Effects>Brush Strokes - color #c0c0c0.
20. Activate the bottom layer, Raster 1.
21. Custom Selection 

Selections>Promote Selection to Layer.
Layers>Arrange>Bring to Top.
22. Selections>Modify>Contract - 5 pixels.
Press CANC on the keyboard.
Selections>Select None.
23. Open the tube 2021-35-Nadege, erase the watermark and go to Edit>Copy.
Go back to your work and go to Edit>Paste as new layer.
Don't move it.

24. Adjust>Blur>Radial Blur, same settings.

25. Selections>Invert.
Press CANC on the keyboard.
Keep selected.

26. Selections>Invert.
Edit>Paste as new layer (the tube by Nadège is still in memory).
Image>Resize, to 70%, resize all layers not checked.
Place  the tube over the selection. the tube over the selection.

27. Selections>Invert.
Press CANC on the keyboard.
Selections>Select None.
28. Layers>Merge>Merge All.
29. Image>Add borders, 2 pixels, symmetric, foreground color #ae4d71.
Image>Add borders, 5 pixels, symmetric, background color #daacb8.
Image>Add borders, 30 pixels, symmetric, foreground color #ae4d71.
30. Activate your Magic Wand Tool 
and click in the last border to select it.
31. Effects>Plugins>Tramages - Pool Shadow.

32. Selections>Invert.
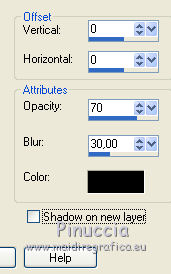
Effects>3D Effects>Drop Shadow, color #000000.
Selections>Select None.
33. Open the tube Adorno_387_nines and go to Edit>Copy.
Go back to your work and go to Edit>Paste as new layer.
34. Image>Add borders, 1 pixel, symmetric, foreground color #ae4d71.
Sign your work and save as jpg.
For the tubes of this version thanks Nena Silva

 Your versions here Your versions here

If you have problems or doubts, or you find a not worked link, or only for tell me that you enjoyed this tutorial, write to me.
2 November 2021

|


