|
TAG RABBIT 2022


This tutorial was translated with PSPX7 but it can also be made using other versions of PSP.
Since version PSP X4, Image>Mirror was replaced with Image>Flip Horizontal,
and Image>Flip with Image>Flip Vertical, there are some variables.
In versions X5 and X6, the functions have been improved by making available the Objects menu.
In the latest version X7 command Image>Mirror and Image>Flip returned, but with new differences.
See my schedule here
 French translation here French translation here
 Your versions ici Your versions ici
For this tutorial, you will need:
Material
here
Tube MR_Lollipop Bunny Girl Figurine
Tube MR_Modern Rabbit Ear Girl Vase Resin Ornaments
Renée-TUBES-Mars2022-30
Tube Lize-DP-JF-028
Tube Lize-DP-JF-031
KRYSMISTPAQUES-03-03-2017-004
Tube Happy-Easter-grass
GOFDesingd-The First Easter(16)
(you find here the links to the material authors' sites)
Plugins
consult, if necessary, my filter section here
Filters Unlimited 2.0 here
Alien Skin Eye Candy 5 Impact - Glass, Extrude here
Eye Candy 3.1. - Perspective Shadow here

You can change Blend Modes according to your colors.
In the newest versions of PSP, you don't find the foreground/background gradient (Corel_06_029).
You can use the gradients of the older versions.
The Gradient of CorelX here
1. Open a new transparent image 900 x 600 pixels.
2. Set your foreground color to #b3c8c3,
and your background color to #536c69.

Set your foreground color to a Foreground/Background Gradient, style Linear.

3. Selection Tool 
(no matter the type of selection, because with the custom selection your always get a rectangle)
clic on the Custom Selection 
and set the following settings.

Flood Fill  the selection with your Gradient. the selection with your Gradient.
4. Effects>Plugins>Filters Unlimited 2.0 - Paper Texture - Canvas Fine, default settings.

5. Open the tube MR_Lollipop Bunny Girl Figurine, erase the watermark and go to Edit>Copy.
Go back to your work and go to Edit>Paste as new layer.
Image>Resize, to 50%, resize all layers not checked.
Place  the tube on the selection the tube on the selection

6. Selections>Invert.
Press CANC on the keyboard 
Selections>Select None.
7. Layers>Merge>Merge Down.
8. Set your foreground color to #f3d1ca,
and your background color to #b0625f.

Set your foreground color to a Foreground/Background Gradient, style Linear.

9. Custom Selection 

Flood Fill  the selection with your Gradient. the selection with your Gradient.
10. Effects>Plugins>Filters Unlimited 2.0 - Paper Texture - Canvas Fine, same settings.

11. Open the tube MR_Modern Rabbit ear Girl Vase Resin Ornaments, erase the watermark and go to Edit>Copy.
Go back to your work and go to Edit>Paste as new layer.
Image>Resize, to 60%, resize all layers not checked.
Place  the tube on the selection the tube on the selection

12. Selections>Invert.
Press CANC on the keyboard 
Selections>Select None.
Result

13. Layers>Merge>Merge visible.
14. Effects>Plugins>Alien Skin Eye Candy 5 Impact - Glass.
Select the preset Clear and ok.

15. Effects>3D Effects>Ciselage, color #fffff.

16. Effects>3D Effects>Drop Shadow, color #ffffff.

17. Layers>New Raster Layer.
Layers>Arrange>Send to Bottom.
18. Set your foreground color to #438b3d,
and your background color to #4d5c31.

Set your foreground color to a Foreground/Background Gradient, style Linear.

Flood Fill  the layer with your Gradient. the layer with your Gradient.
19. Effects>Plugins>Filters Unlimited 2.0 - Paper Texture - Canvas Fine, same settings

20. Open the tube KRYSMISTPAQUES-03-03-2017-004 erase the watermark and go to Edit>Copy.
Go back to your work and go to Edit>Paste as new layer.
21. Effects>Image Effects>Offset.

22. Activate your background layer, Raster 1.
Custom Selection 

Selections>Promote Selection to Layer.
23. Effects>3D Effects>Inner Bevel.

Selections>Select None
24. Effets>Modules Externes>Alien Skin Eye Candy 5 Impact - Extrude,
Highlight Color: couleur d'avant plan #438b3d.

25. Effets>Effets 3D>Ombre portée, couleur noire.

26. Activate your top layer.
Open the tube Renee-TUBES-Mars2022-30 and go to Edit>Copy.
Go back to your work and go to Edit>Paste as new layer.
Image>Resize, 2 times to 80% and 1 time to 90%, resize all layers not checked.
Place  correctly the tube. correctly the tube.
27. Effects>3D Effects>Drop Shadow, color #000000.

28. Open the tube Lize-DP-JF-028 and go to Edit>Copy.
Go back to your work and go to Edit>Paste as new layer.
Image>Resize, to 50%, resize all layers not checked.
Move  the tube at the bottom left. the tube at the bottom left.
29. Effects>Plugins>Eye Candy 3.1 - Perspective Shadow, color #000000.

30. Open the tube Lize-DP-JF-031 and go to Edit>Copy.
Go back to your work and go to Edit>Paste as new layer.
Image>Resize, to 50%, resize all layers not checked.
Move  the tube at the bottom right. the tube at the bottom right.
31. Effects>Plugins>Eye Candy 3.1 - Perspective Shadow, color #000000.

32, Open the tube GOFDesings_The First Easter and go to Edit>Copy.
Go back to your work and go to Edit>Paste as new layer.
Move  the tube up. the tube up.
33 Effects>3D Effects>Drop Shadow, color #000000.
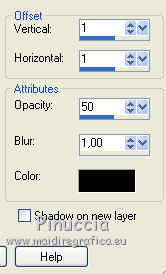
34. Open the tube Happy-Easter-grass and go to Edit>Copy.
Go back to your work and go to Edit>Paste as new layer.
Image>Resize, 2 times to 70% and 1 time to 80%, resize all layers not checked.
Move  the tube down. the tube down.
35. Effects>3D Effects>Drop Shadow, same settings.

36. Layers>Merge>Merge All.
37. Image>Add borders, 2 pixels symmetric, color #2d5815.
Image>Add borders, 4 pixels symmetric, color #d8df21.
Image>Add borders, 2 pixels symmetric, color #006cb3.
Image>Add borders, 20 pixels symmetric, color #c018a0.
Image>Add borders, 2 pixels symmetric, color #2d5815.
38. Sign your work and save as jpg.
For the tubes of this version thanks Wieske, Krys and Silvie

 Your versions here Your versions here

If you have problems or doubts, or you find a not worked link, or only for tell me that you enjoyed this tutorial, write to me.
2 April 2022

|

