|
TAG LICA CIDA


This tutorial was translated with PSPX7 but it can also be made using other versions of PSP.
Since version PSP X4, Image>Mirror was replaced with Image>Flip Horizontal,
and Image>Flip with Image>Flip Vertical, there are some variables.
In versions X5 and X6, the functions have been improved by making available the Objects menu.
In the latest version X7 command Image>Mirror and Image>Flip returned, but with new differences.
See my schedule here
 French translation here French translation here
 Your versions ici Your versions ici
For this tutorial, you will need:
Material
here
Tube Grisi_Misted_Sensual
Tube Tocha24076 by Tony Chavarria
Tube anna.br_1094 coquelicot
Mascara Narah_mask_0405
Adorno cuadritos_nines
Textura Fur
(you find here the links to the material authors' sites)
Plugins
consult, if necessary, my filter section here
Filters Unlimited 2.0 here
FM Tile Tools - Saturation Emboss here
Harry's Power Grads - Frame Gradient here
Simple - Top Left Mirror here
Mura's Meister - Perspective Tiling here
Mura's Meister - Cloud here
Filters Harry's and Simple can be used alone or imported into Filters Unlimited.
(How do, you see here)
If a plugin supplied appears with this icon  it must necessarily be imported into Unlimited it must necessarily be imported into Unlimited

You can change Blend Modes according to your colors.
In the newest versions of PSP, you don't find the foreground/background gradient (Corel_06_029).
You can use the gradients of the older versions.
The Gradient of CorelX here
The texture Fur ou Corel_15_039 is standard in PSP.
If you don't find it in your PSP, copy the supplied texture in the Textures Folder.
Copy the Emboss 3 in the Presets Folder.
Open the mask in PSP and minimize it with the reste of the material.
1. Open a new transparent image 850 x 650 pixels.
2. Set your foreground color to #e6e2d4,
and your background color to #938980.

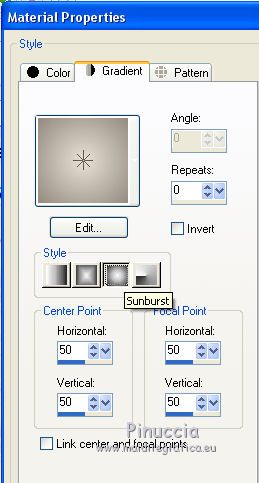
Set your foreground color to a Foreground/Background Gradient, style Sunburst.
3. Effects>Plugins>Mura's Meister - Cloud

Remember that this filter works with the colors of your material palette,
but it keeps in memory the first setting used after the the opening of Psp.
So, if you have already used the plugin, press Reset to be sure to have your colors.
The result of this effects is random, so it won't be the same as mine.
If you want to change the appearance of the clouds, click on the preview window,
until you'll see the result you like better.
4. Open the tube Grisi_Misted_Sensual and go to Edit>Copy.
Go back to your work and go to Edit>Paste as new layer.
5. Layers>Merge>Merge visible.
6. Effects>Plugins>Filters Unlimited 2.0 - Harry's Power Grads - Frame Gradients, default settings.

you can adapt the settings according to your colors
7. Image>Resize, to 80%, resize all layers not checked.
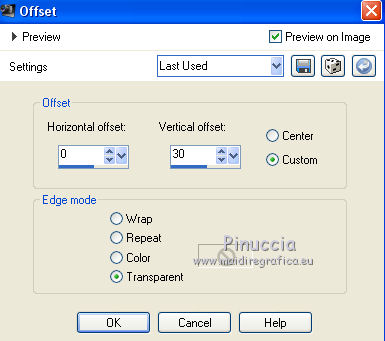
8. Effects>Image Effects>Offset.
9. Layers>Duplicate.
10. Effects>Plugins>Mura's Meister - Perspective Tiling.

11. Layers>New Raster Layer.
Layers>Arrange>Send to Bottom.
Flood Fill  the layer with your Gradient. the layer with your Gradient.
12. Selections>Select All.
13. Edit>Paste into Selection (the tube Grisi_Misted_sensual is still in memory).
Selections>Select None.
14. Effects>Image Effects>Seamless Tiling, default settings.

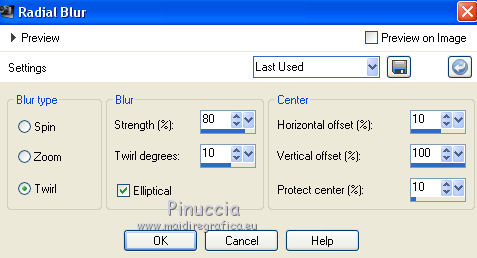
15. Adjust>Blur>Radial Blur.
16. Effects>User Defined Filter - select the preset Emboss 3 and ok.

17. Activate the top layer.
Set your foreground color to Color.
Layers>New Raster Layer.
Flood Fill  the layer with your foreground color #e6e2d4. the layer with your foreground color #e6e2d4.
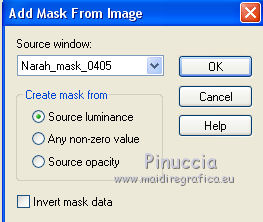
18. Calques>Nouveau calque de masque>A partir d'une image.
Ouvrir le menu deroulant sous la fenêtre d'origine et vous verrez la liste des images ouvertes.
Sélectionner le masque Narah_mask_0405.
Layers>Merge>Merge Group.
19. Effects>Plugins>FM Tile Tools - Saturation Emboss, default settings - 2 times.

20. Layers>Merge>Merge All.
21. Image>Add borders, 2 pixels, symmetric, color black.
Image>Add borders, 30 pixels, symmetric, foreground color #e6e2d4.
Image>Add borders, 2 pixels, symmetric, color black.
Image>Add borders, 30 pixels, symmetric, foreground color #e6e2d4.
22. Activate your Magic Wand Tool 
and click on the last border to select it.
23. Effects>Texture Effects>Texture - select the texture Fur or Corel_15_039.
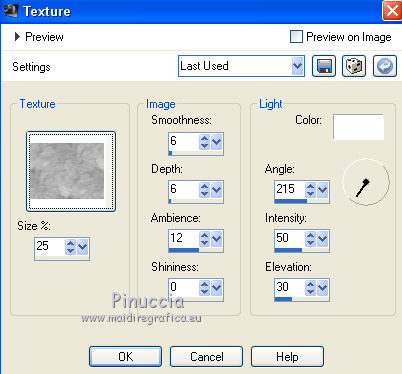
Selections>Select None.
24. Open the tube Adorno cuadraditos and go to Edit>Copy.
Go back to your work and go to Edit>Paste as new layer.
Move  the tube at the upper left. the tube at the upper left.

25. Effects>Plugins>Simple - Top Left Mirror.

26. Open the tube anna.br_1094 coquelicot and go to Edit>Copy.
Go back to your work and go to Edit>Paste as new layer.
Image>Resize, 2 times to 80%, resize all layers not checked.
Move  the tube to the right side. the tube to the right side.
27. Effects>3D Effects>Drop Shadow, color black.
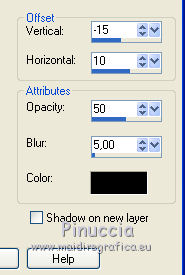
28. Open the tube Tocha24076 and go to Edit>Copy.
Go back to your work and go to Edit>Paste as new layer.
Image>Resize, 2 times to 80%, resize all layers not checked.
Move  the tube to the left side. the tube to the left side.
29. Effects>3D Effects>Drop Shadow, same settings.

30. Sign your work on a new layer.
31. Layers>Merge>Merge All.
32. Image>Add borders, 2 pixels, symmetric, color black.
Save as jpg.
Version with tubes by Beatriz and A PSP Devil.

 Your versions here Your versions here

If you have problems or doubts, or you find a not worked link, or only for tell me that you enjoyed this tutorial, write to me.
25 August 2021

|


