|
TAG FLORAL


This tutorial was translated with PSPX7 but it can also be made using other versions of PSP.
Since version PSP X4, Image>Mirror was replaced with Image>Flip Horizontal,
and Image>Flip with Image>Flip Vertical, there are some variables.
In versions X5 and X6, the functions have been improved by making available the Objects menu.
In the latest version X7 command Image>Mirror and Image>Flip returned, but with new differences.
See my schedule here
 French translation here French translation here
 Your versions ici Your versions ici
For this tutorial, you will need:
Material
here
Tube Grisi_Woman_993
Tube 241_Divers_p2_Animabelle
Tube vv-floral0023 by Nena Silva
lbdm-masque-222
Texto_Floral_nines
(you find here the links to the material authors' sites)
Plugins
consult, if necessary, my filter section here
Filters Unlimited 2.0 here
Tramages - Pool Shadow here
&Bkg Kaleidoscope> - 4 QFlip ZBottomR (to import in Unlimited) here
Alien Skin Eye Candy 5 Impact - Extrude here
Mura's Meister - Perspective Tiling here
Nik Software - Color Efex Pro here
Filters Tramages can be used alone or imported into Filters Unlimited.
(How do, you see here)
If a plugin supplied appears with this icon  it must necessarily be imported into Unlimited it must necessarily be imported into Unlimited

You can change Blend Modes according to your colors.
Open the mask in PSp and minimize it with the rest of the material.
1. Open a new transparent image 900 x 600 pixels.
2. Set your foreground color to #1f2124,
and your background color to #efd7b1.

Flood Fill  the transparent image with your foreground color #1f2124. the transparent image with your foreground color #1f2124.
3. Layers>New Raster Layer.
Flood Fill  the layer with your background color #efd7b1. the layer with your background color #efd7b1.
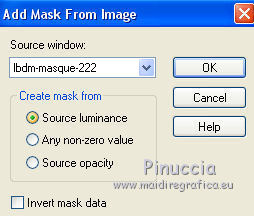
4. Layers>New Mask layer>From image
Open the menu under the source window and you'll see all the files open.
Select the mask Ibdm-masque-222.

Layers>Merge>Merge Group.
5. Layers>Duplicate.
Change the Blend Mode of this layer to Hard Light.
6. Activate the layer below of the original.
Layers>Merge>Merge Down (mask and background).
7. Layers>Duplicate.
Effects>Distortion Effects>Wave

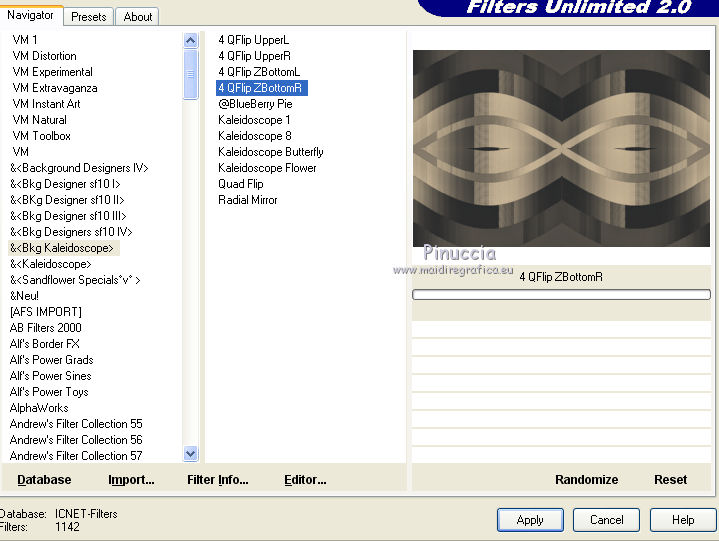
8. Effects>Plugins>Filters Unlimited 2.0 - &<Bkg Kaleidoscope> - 4 QFlip ZBottomR.

9. Image>Canvas Size - 900 x 700 pixels.

10. Effects>Plugins>Mura's Meister - Perspective Tiling.

11. Adjust>Sharpness>Sharpen More.
12. Activate your bottom layer, Merged.
Selection Tool 
(no matter the type of selection, because with the custom selection your always get a rectangle)
clic on the Custom Selection 
and set the following settings.

Selections>Promote Selection to Layer.
Layers>Arrange>Bring to Top.
Selections>Select None.
13. Effects>Plugins>Alien Skin Eye Candy 5 Impact - Extrude.

14. Effects>Image Effects.

15. Effects>3D Effects>Drop Shadow, background color #efd7b1

16. Effects>Plugins>Nik Software - Color Efex Pro - Bi-Color User Defined
upper color: foreground color #1f2124 - lower color: background color plan #efd7b1.

17. Layers>Duplicate.
Image>Mirror.
18. Open the tube vvs-floral0023 by Nena Silva and go to Edit>Copy.
Go back to your work and go to Edit>Paste as new layer.
Image>Resize, to 50%, resize all layers not checked.
Move  the tube to the right side. the tube to the right side.
19. Effects>3D Effects>Drop Shadow, color #000000.

20. Open the tube 241_Divers_p2_Animabelle and go to Edit>Copy.
Go back to your work and go to Edit>Paste as new layer.
Image>Resize, 2 times to 80%, resize all layers not checked.
Move  the tube to the left side. the tube to the left side.
Effects>3D Effects>Drop Shadow, same settings.
21. Open the tube Grisi_Wwoman_993 and go to Edit>Copy.
Go back to your work and go to Edit>Paste as new layer.
Image>Resize, 2 times to 80%, resize all layers not checked.
Move  the tube in the center. the tube in the center.
22. Effects>3D Effects>Drop Shadow, color #000000.

23. Layers>Merge>Merge All.
24. Image>Add borders, 2 pixels, symmetric, foreground color #1f2124.
Image>Add borders, 40 pixels, symmetric, background color #efd7b1.
25. Selections>Select All.
Selections>Select All.
Selections>Modify>Contract - 20 pixels.
Selections>Invert.
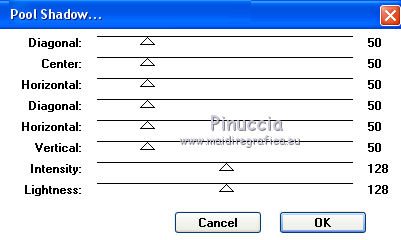
26. Effects>Plugins>Tramages - Pool Shadow, default settings.

27. Selections>Invert.
28. Effects>3D Effects>Drop Shadow, color #000000.

29. Selections>Modify>Contract - 10 pixels.
30. Effects>3D Effects>Drop Shadow, same settings.

Selections>Select None.
31. Open Texto_Floral_nines and go to Edit>Copy.
Go back to your work and go to Edit>Paste as new layer.
Move  the texte at the upper right. the texte at the upper right.
32. Layers>Merge>Merge All.
Image>Add borders, 2 pixels, symmetric, foreground color #1f2124
33. Save as jpg.
Version with tube by Luz Cristina, DBK Katrina and Nena Silva

 Your versions here Your versions here

If you have problems or doubts, or you find a not worked link, or only for tell me that you enjoyed this tutorial, write to me.
20 February 2021
|


