|
TAG FANTASIA


This tutorial was translated with PSPX7 but it can also be made using other versions of PSP.
Since version PSP X4, Image>Mirror was replaced with Image>Flip Horizontal,
and Image>Flip with Image>Flip Vertical, there are some variables.
In versions X5 and X6, the functions have been improved by making available the Objects menu.
In the latest version X7 command Image>Mirror and Image>Flip returned, but with new differences.
See my schedule here
 French translation here French translation here
 Your versions ici Your versions ici
For this tutorial, you will need:
Material
here
Tube by kikiron_874
Patron Arguld10
(you find here the links to the material authors' sites)
Plugins
consult, if necessary, my filter section here
FM Tile Tools - Saturation Emboss ici

You can change Blend Modes according to your colors.
In the newest versions of PSP, you don't find the foreground/background gradient (Corel_06_029).
You can use the gradients of the older versions.
The Gradient of CorelX here
Open the pattern Arguld10 in PSP and minimize it with your tube.
1. Open a new transparent image 887 x 601 pixels.
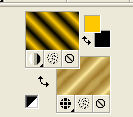
2. Set your foreground color to #ffc800,
and your background color to #000000.

Set your foreground color to a Foreground/Background Gradient, style Linear.

3. Set your background color to Pattern and select the pattern Arguld10.
 
4. Flood Fill  the transparent image with the background golden pattern. the transparent image with the background golden pattern.
5. Selections>Select All.
Open the tube kikiron874 and go to Edit>Copy.
Go back to your work and go to Edit>Paste into Selection.
Selections>Select None.
6. Effects>Image Effects>Seamless Tiling, default settings.

7. Adjust>Blur>Radial Blur.

8. Layers>Duplicate.
Image>Mirror.
9. Reduce the opacity of this layer to 50%.
10. Layers>Merge>Merge visible.
11. Effects>Plugins>FM Tile Tools - Saturation Emboss, default settings - 2 times.

12. Edit>Paste as new layer (the tube kikiron-874 is still in memory).
13. Effects>3D Effects>Drop Shadow, color black, shadow on a new layer checked.

14. Stay on the shadow's layer.
Effects>Texture Effects>Glass Mosaic.

15. Image>Canvas Size - 920 x 634 pixels.

16. Layers>New Raster Layer.
Flood Fill  the with with your background golden pattern. the with with your background golden pattern.
17. Selections>Select All.
Selections>Modify>Contract - 5 pixels.
Press CANC on the keyboard 
18. Flood Fill  the selection with your foreground gradient. the selection with your foreground gradient.
Selections>Modify>Contract - 25 pixels.
Press CANC on the keyboard.
19. Flood Fill  the selection with the background golden pattern. the selection with the background golden pattern.
Selections>Modify>Contract - 3 pixels.
Press CANC on the keyboard.
20. Set your background color to Color.
Flood Fill  the selection with your background color #000000. the selection with your background color #000000.
Selections>Modify>Contract - 1 pixel.
Press CANC on the keyboard.
21. Selections>Select None.
22. Sign your work on a new layer.
Layers>Merge>Merge All and save as jpg.
Versione con tube di Kikirou

 Your versions here Your versions here

If you have problems or doubts, or you find a not worked link, or only for tell me that you enjoyed this tutorial, write to me.
25 August 2021

|


