|
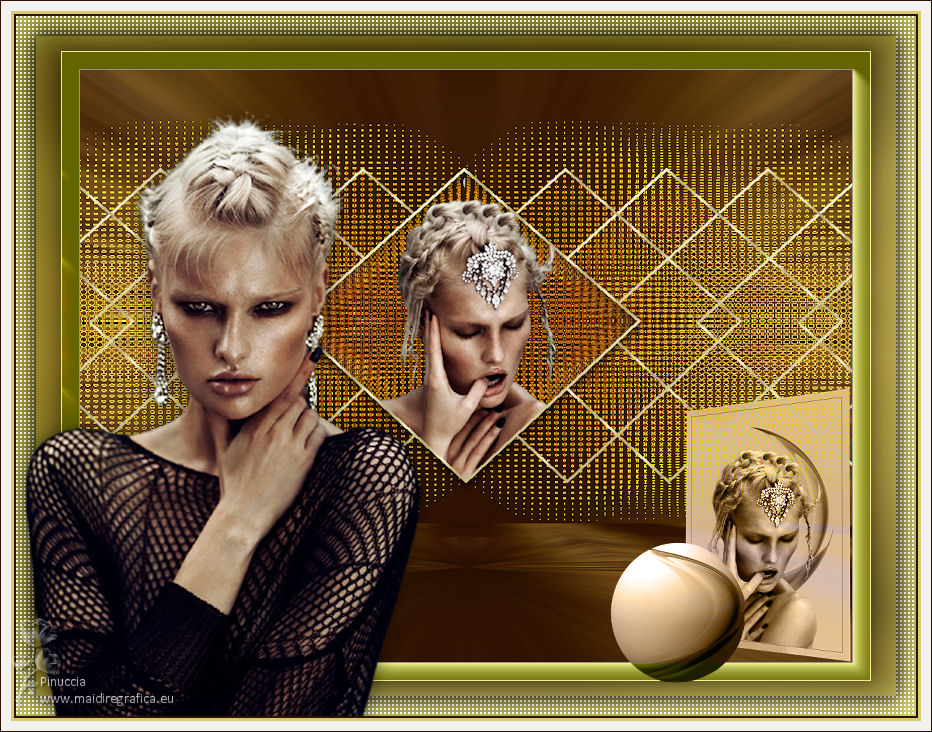
TAG EXTASIS


This tutorial was translated with PSPX7 but it can also be made using other versions of PSP.
Since version PSP X4, Image>Mirror was replaced with Image>Flip Horizontal,
and Image>Flip with Image>Flip Vertical, there are some variables.
In versions X5 and X6, the functions have been improved by making available the Objects menu.
In the latest version X7 command Image>Mirror and Image>Flip returned, but with new differences.
See my schedule here
 French translation here French translation here
 Your versions ici Your versions ici
For this tutorial, you will need:
Material
here
Tube 6213-luzcristina
Tube 6240-luzcristina
Tube nicol-deco6
(you find here the links to the material authors' sites)
Plugins
consult, if necessary, my filter section here
Filters Unlimited 2.0 here
Krusty's FX vol.II2 - Generator C-2 (Straws) here
Mura's Meister - Perspective Tiling here
Mura's Meister - Pole Transform here
Mura's Meister - Copies here
Alien Skin Eye Candy 5 Impact - Glass here
AAA Frames - Foto Frame here
AFS IMPORT - sqborder2 here
Filters Krusty and AFS IMPORT can be used alone or imported into Filters Unlimited.
(How do, you see here)
If a plugin supplied appears with this icon  it must necessarily be imported into Unlimited it must necessarily be imported into Unlimited

You can change Blend Modes according to your colors.
Copy the preset  in the folder of the plugin Alien Skin Eye Candy 5 Impact>Settings>Glass. in the folder of the plugin Alien Skin Eye Candy 5 Impact>Settings>Glass.
One or two clic on the file (it depends by your settings), automatically the preset will be copied in the right folder.
why one or two clic see here
Copy the selection in the Selections Folder
1. Open a new transparent image 900 x 600 pixels.
2. Set your foreground color to #9b9297.
Flood Fill  the transparent image with your foreground color #9b9297. the transparent image with your foreground color #9b9297.
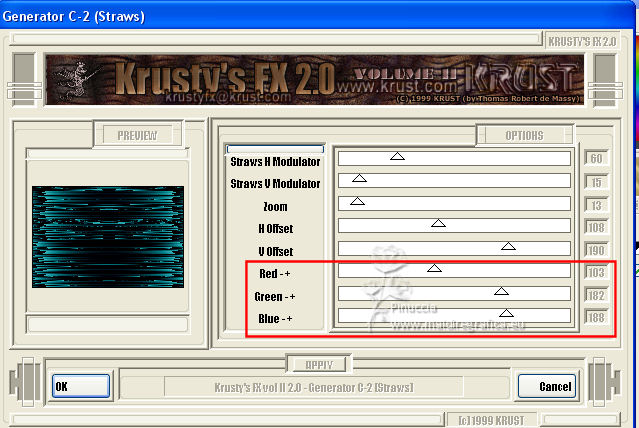
3. Effects>Plugins>Krusty's FX vol II 2.0 - Generator C-2 (Straws), default settings
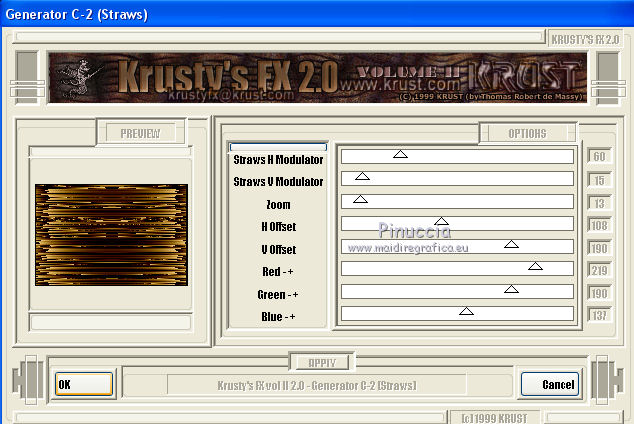
if you want to change the colors, play with Red, Green and Blue
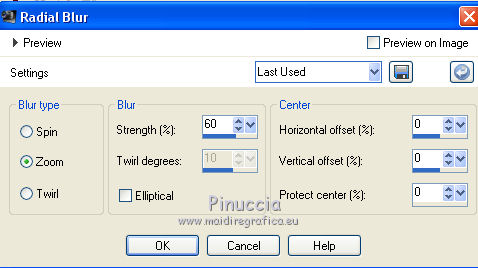
4. Adjust>Blur>Radial Blur.
5. Layers>Duplicate.
Effects>Plugins>Mura's Meister - Pole Transform.
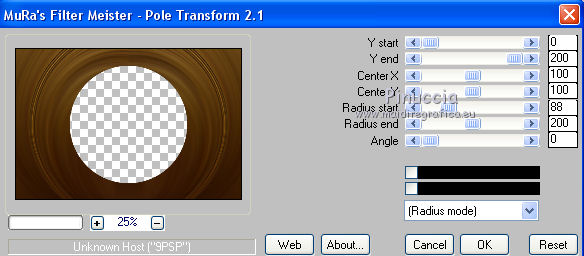
6. Effects>Distortion Effects>Polar Coordinates.

7. Effects>Distortion Effects>Wave.
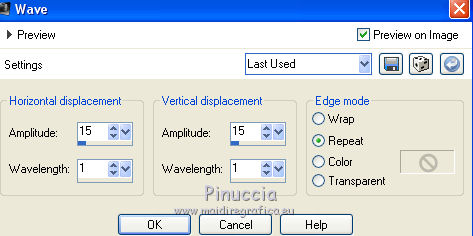
8. Effects>Edge Effects>Enhance More.
9. Image>Flip.
10. Effects>Image Effects>Offset.
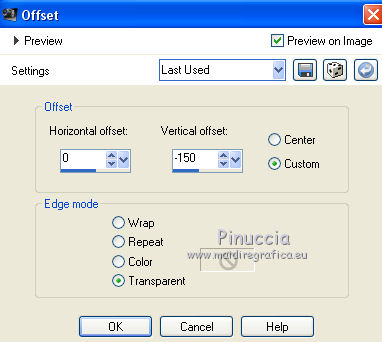
11. Selection Tool 
(no matter the type of selection, because with the custom selection your always get a rectangle)
clic on the Custom Selection 
and set the following settings.
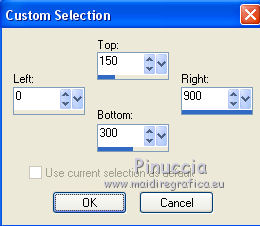
Press CANC on the keyboard 
Selections>Select None.
12. Layers>Duplicate.
Image>Flip.
Layers>Merge>Merge Down.
13. Selections>Load/Save Selection>Load Selection from Disk.
Look for and load the selection sel.383.nines.

Selections>Promote Selection to layer.
14. Effects>Plugins>Alien Skin Eye Candy 5 Impact - Glass.
Selectionner the preset preset.383.nines and ok.
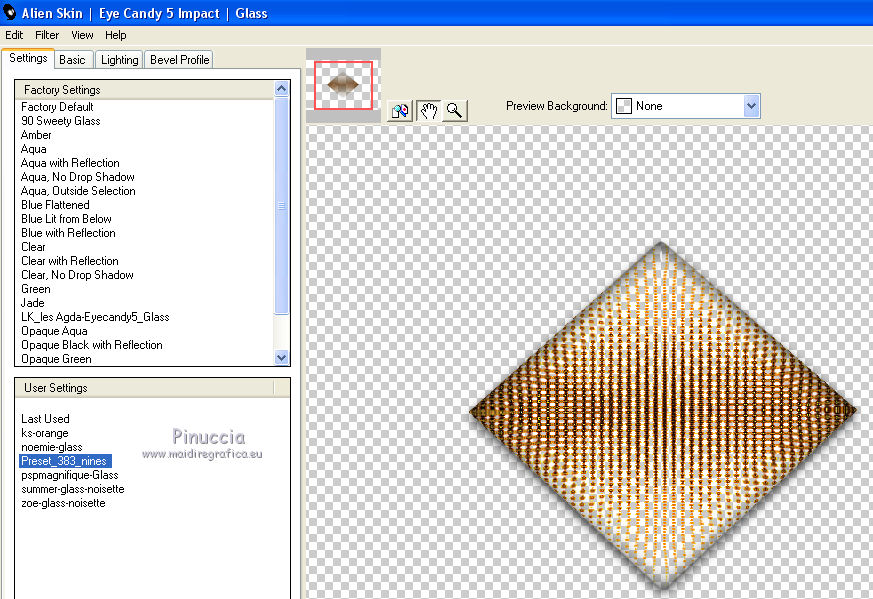
Keep selected.
15. Open the tube 6240-Luz Cristina and go to Edit>Copy.
Go back to your work and go to Edit>Paste as new layer.
Image>Resize, 1 time to 50% and 1 time to 80%, resize all layers not checked.
Place  the tube on the sélection. the tube on the sélection.
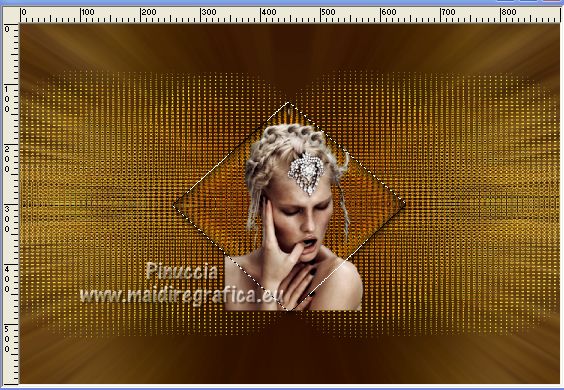
16. Selections>Invert.
Press CANC on the keyboard.
17. Selections>Invert.
Set your foreground color to Pattern and choose a golder pattern; for me
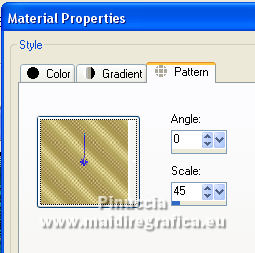
Layers>New Raster Layer.
Flood Fill  the selection with your golden pattern. the selection with your golden pattern.
18. Selections>Modify>Contract - 3 pixels.
Press CANC on the keyboard.
Selections>Select None.
19. Layers>Duplicate.
Effects>Plugins>Mura's Meister - Copies.
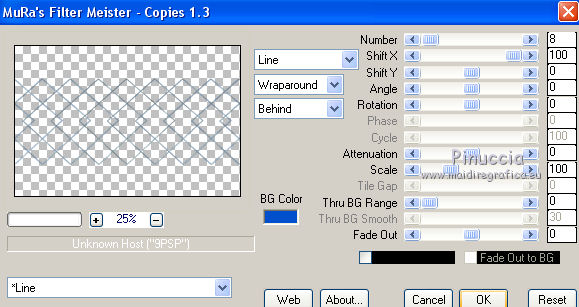
20. Selections>Load/Save Selection>Load Selection from Disk.
Load again the selection sel.383.nines.

Press CANC on the keyboard.
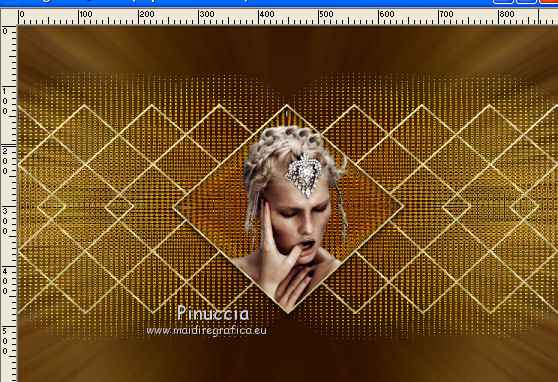
21. Activate the bottom layer, Raster 1.
Layers>Duplicate.
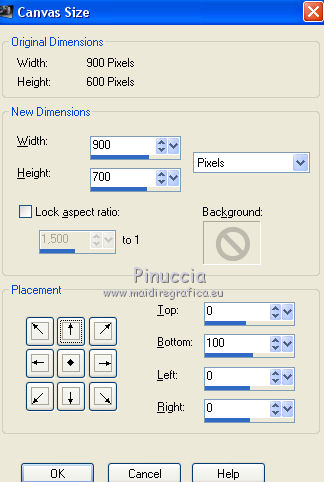
22. Image>Canvas Size - 900 x 700 pixels.
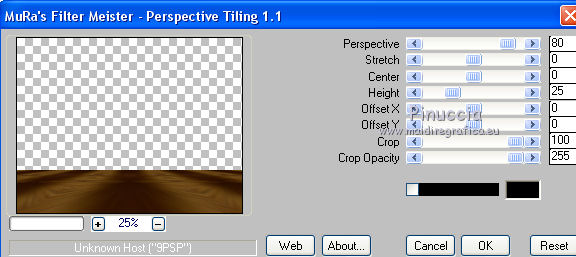
23. Effects>Plugins>Mura's Meister - Perspective Tiling.
24. Layers>Merge>Merge visible.
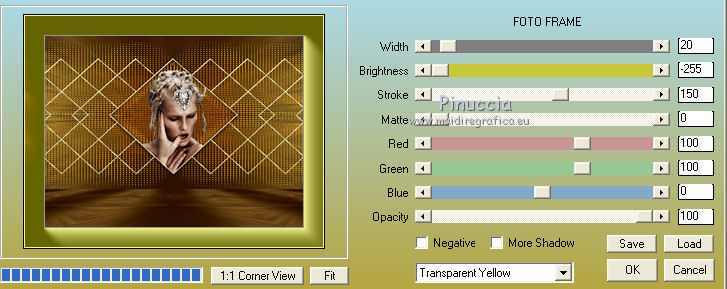
25. Effects>Plugins>AAA Frames - Foto Frame.
Select Transparent Yellow and change width with 20.
26. Edit>Copy.
27. Image>Resize, to 90%, resize all layers not checked.
28. Activate your Magic Wand Tool 
and click on the transparent part to select it.
Edit>Paste into Selection.
29. Adjust>Blur>Gaussian Blur - radius 20.

30. Selections>Invert.
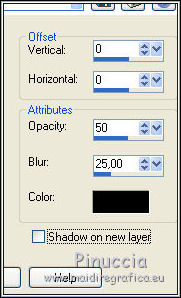
Effects>3D Effects>Drop Shadow, color #000000.
31. Selections>Invert.
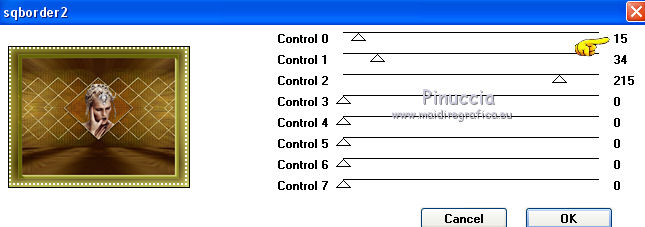
Effects>Plugins>AFS IMPORT - sqborder2
Selections>Select None.
32. Selections>Select All.
Selections>Modify>Contract - 20 pixels.
33. Effects>3D Effects>Drop Shadow, color #000000.

Edit>Repeat Drop Shadow.
Selections>Select None.
34. Open the tube 6213-luz cristina, erase the watermark and go to Edit>Copy.
Go back to your work and go to Edit>Paste as new layer.
Image>Resize, to 80%, resize all layers not checked.
Move  the tube to the left side. the tube to the left side.
35. Open the tube nicol-deco6, erase the watermark and go to Edit>Copy.
Go back to your work and go to Edit>Paste as new layer.
Move  the tube to the right side. the tube to the right side.
Change the Blend Mode of this layer to Luminance (legacy).
36. Layers>Merge>Merge All.
37. Image>Add borders, 2 pixels, symetric, color #2f1302.
Image>Add borders, 3 pixels, symmetric, color #dacc6b.
Image>Add borders, 10 pixels, symmetric, color #f3f2ee.
Image>Add borders, 1 pixel, symmetric, color #2f1302.
38. Sign your work on a new layer.
Layers>Merge>Merge All and save as jpg.
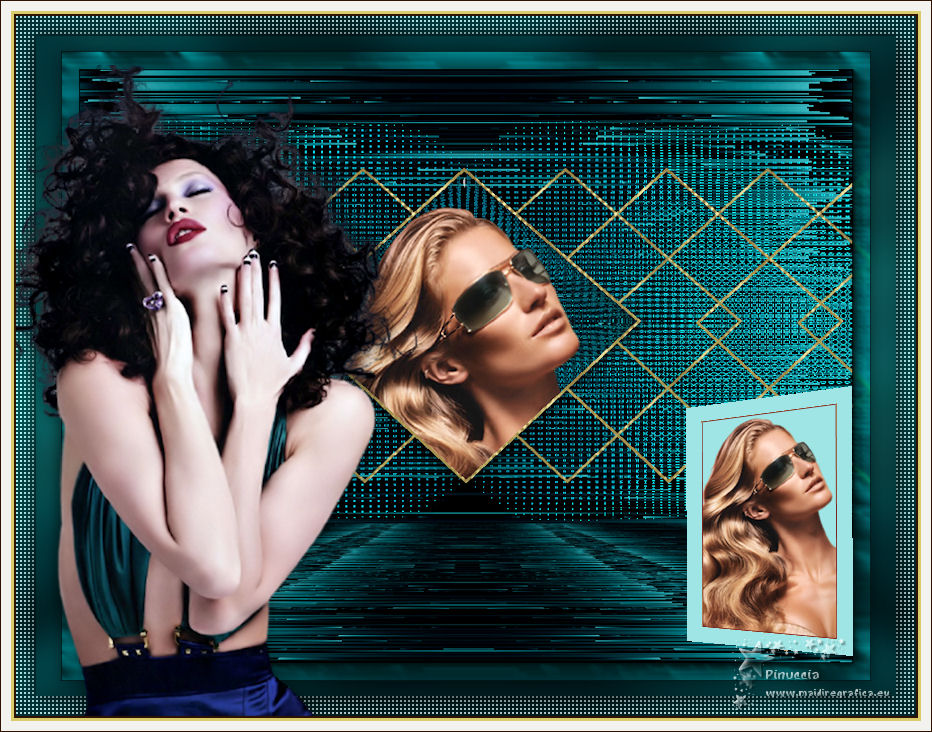
Version with tubes by Luz Cristina
 Your versions here Your versions here

If you have problems or doubts, or you find a not worked link, or only for tell me that you enjoyed this tutorial, write to me.
30 August 2021

|

