|
TAG DOMINI


This tutorial was translated with PSPX7 but it can also be made using other versions of PSP.
Since version PSP X4, Image>Mirror was replaced with Image>Flip Horizontal,
and Image>Flip with Image>Flip Vertical, there are some variables.
In versions X5 and X6, the functions have been improved by making available the Objects menu.
In the latest version X7 command Image>Mirror and Image>Flip returned, but with new differences.
See my schedule here
 French translation here French translation here
 Your versions ici Your versions ici
For this tutorial, you will need:
Material
here
Tube MMC-057_20910
Tube Domini by Andre
Tube Flower-886833 by Sara
Maskanyway-camerontag
Work-forever-ac
(you find here the links to the material authors' sites)
Plugins
consult, if necessary, my filter section here
Filters Unlimited 2.0 here
VM Experimental - Needles and Pins here
Transparency - Eliminate Black here
Dragonfly - Sinedots II - Half-Hearted here
Filters VM Experimental and Transparency can be used alone or imported into Filters Unlimited.
(How do, you see here)
If a plugin supplied appears with this icon  it must necessarily be imported into Unlimited it must necessarily be imported into Unlimited

You can change Blend Modes according to your colors.
In the newest versions of PSP, you don't find the foreground/background gradient (Corel_06_029).
You can use the gradients of the older versions.
The Gradient of CorelX here
Copy the preset Emboss 3 dans le dossier Presets
Open the mask in PSP and minimize it with the rest of the material.
1. Open a new transparent image 850 x 650 pixels.
2. Set your foreground color to black #000000,
and your background color to #790005.

Flood Fill  the transparent image with color black. the transparent image with color black.
3. Layers>New Raster Layer.
Flood Fill  the layer with your background color #790005. the layer with your background color #790005.
Layers>New Mask layer>From image
Open the menu under the source window and you'll see all the files open.
Select the mask maskanyway-camerontag.

Layers>Merge>Merge Group.
4. Effects>User Defined Filter - select the preset Emboss 3 and ok.

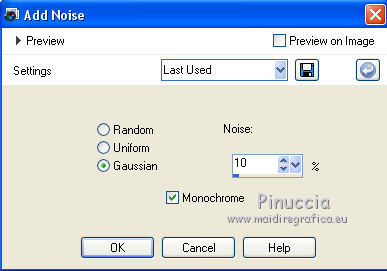
5. Adjust>Add/Remove Noise>Add Noise.

6. Selection Tool 
(no matter the type of selection, because with the custom selection your always get a rectangle)
clic on the Custom Selection 
and set the following settings.

7. Layers>New Raster Layer.
Flood Fill  the layer with your background color #790005. the layer with your background color #790005.
8. Selections>Modify>Contract - 50 pixels.
Press CANC on the keyboard 
Selections>Select None.
9. Open the tube Domini and go to Edit>Copy.
Go back to your work and go to Edit>Paste as new layer.
Image>Resize, to 80%, resize all layers not checked.
Move  the tube to the left. the tube to the left.
Layers>Arrange>Move Down (under the custom selection's layer).

10. Layers>New Raster Layer.
Effects>Plugins>Dragonfly - Sinedots II
Click on Open, select the preset half-hearted and change the color with your background color #790005.

if you don't find the preset in your list, click on Open
and look for the presets in the folder where you copied the material of this tutorial
Result

11. Effects>Plugins>Transparency - Eliminate Black.
Result

12. Adjust>Sharpness>Sharpen.
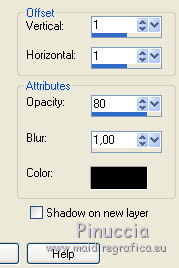
13. Effects>3D Effects>Drop Shadow, color black.

Layers>Arrange>Bring to Top

14. Open the tube MMC-057 and go to Edit>Copy.
Go back to your work and go to Edit>Paste as new layer.
Image>Resize, to 90%, resize al layers not checked.
Move  the tube to the right side. the tube to the right side.

15. Effects>3D Effects>Drop Shadow, color black.

16. Layers>Merge>Merge All.
17. Set your foreground color to #150d0a,
keep your background color to #790005.

Set your foreground color to a Foreground/Background Gradient, style Radial.

18. Image>Add borders, 2 pixels, symmetric, background color #790005.
Image>Add borders, 40 pixels, symmetric, color white #ffffff.
19. Activate your Magic Wand Tool 
and click on the last border to select it.
Flood Fill  the selection with your gradient. the selection with your gradient.
20. Effects>Plugins>VM Experimental - Needles and Pins.

if you are using other colors, play with the settings,
or click on Randomize until you see the result you prefer
Selections>Select None.
21. Open the tube flower-886833 and go to Edit>Copy.
Go back to your work and go to Edit>Paste as new layer.
Image>Resize, 1 time to 50% and 2 times to 80%, resize all layers not checked.
Flood Fill  the tube in the corner at the bottom left. the tube in the corner at the bottom left.

22. Effects>3D Effects>Drop Shadow, color black.

23. Open the wordart work-forever and go to Edit>Copy.
Go back to your work and go to Edit>Paste as new layer.
Move  the tube at the bottom left, see my example. the tube at the bottom left, see my example.
24. Sign your work on a new layer.
25. Layer>Merge>Merge All.
26. Image>Add borders, 2 pixels, symmetric, color black.
Save as jpg.
Version with tubes by Maryse and A PSP Devil

 Your versions here Your versions here

If you have problems or doubts, or you find a not worked link, or only for tell me that you enjoyed this tutorial, write to me.
7 June 2021
|


