|
TAG BUTTERFLY


This tutorial was translated with PSPX7 but it can also be made using other versions of PSP.
Since version PSP X4, Image>Mirror was replaced with Image>Flip Horizontal,
and Image>Flip with Image>Flip Vertical, there are some variables.
In versions X5 and X6, the functions have been improved by making available the Objects menu.
In the latest version X7 command Image>Mirror and Image>Flip returned, but with new differences.
See my schedule here
 French translation here French translation here
 Your versions ici Your versions ici
For this tutorial, you will need:
Material
here
1 Tube femme by Corinne Vicaire
1 Tube fleurs by Corinne Vicaire
1 Tube butterfly work1
(you find here the links to the material authors' sites)
Plugins
consult, if necessary, my filter section here
Filters Unlimited 2.0 here
Filter Factory Gallery E - Flower II here
Filters Factory Gallery can be used alone or imported into Filters Unlimited.
(How do, you see here)
If a plugin supplied appears with this icon  it must necessarily be imported into Unlimited it must necessarily be imported into Unlimited

You can change Blend Modes according to your colors.
In the newest versions of PSP, you don't find the foreground/background gradient (Corel_06_029).
You can use the gradients of the older versions.
The Gradient of CorelX here
1. Open a new transparent image 850 x 600 pixels.
2. Set your foreground color to #ea967a,
and your background color to #a31015.

Set your foreground color to a Foreground/Background Gradient, style Linear.

3. Adjust>Blur>Gaussian Blur - radius 30.

4. Effects>Plugins>Filters Unlimited 2.0 - Filter Factory Gallery E - Flower II.

if you are using other colors, you can ply with the settings Red,Green,Blue
5. Effects>Edge Effects>Enhance More.
6. Open the tube flower and go to Edit>Copy.
Go back to your work and go to Edit>Paste as new layer.
Move  the tube to the left side. the tube to the left side.

7. Open the woman tube and go to Edit>Copy.
Go back to your work and go to Edit>Paste as new layer.
Image>Resize, to 80%, resize all layers not checked.
Move  the tube to the right side. the tube to the right side.

8. Effects>3D Effects>Drop Shadow, color black.

9. Layers>Merge>Merge All.
10. Image>Add borders, 1 pixel, symmetric, color #15ae28.
11. Edit>Copy
(if you want, for caution: Edit>Paste as new image, and minimize(.
12. Go back to your work.
Layers>Promote Background Layer.
13. Image>Canvas Size - 900 x 650 pixels.

14. Selections>Select All.
Layers>New Raster Layer.
Layers>Arrange>Send to Bottom.
15. Edit>Paste into Selection (the minimized work is in memory).
16. Adjust>Blur>Gaussian Blur - radius 30.

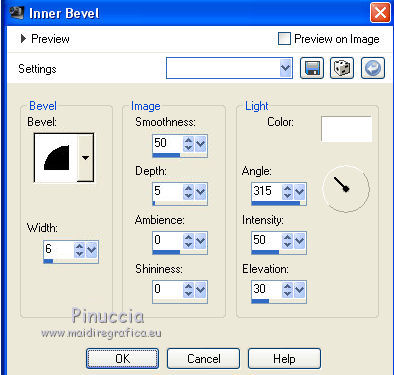
17. Effects>3D Effects>Inner Bevel.

Selections>Select None.
18. Image>Add borders, 2 pixels, symmetric, color #15ae28.
19. Open the wordart work1 butterfly and go to Edit>Copy.
Go back to your work and go to Edit>Paste as new layer.
Move  the tube at the upper left. the tube at the upper left.
20. Sign your work on a new layer.
Layers>Merge>Merge All and save as jpg.
Version with tube by Devilinside

 Your versions here Your versions here

If you have problems or doubts, or you find a not worked link, or only for tell me that you enjoyed this tutorial, write to me.
7 June 2021
|


