|
TAG BELLO ROSTRO
 BEAUTIFUL FACE BEAUTIFUL FACE


This tutorial was translated with PSPX7 but it can also be made using other versions of PSP.
Since version PSP X4, Image>Mirror was replaced with Image>Flip Horizontal,
and Image>Flip with Image>Flip Vertical, there are some variables.
In versions X5 and X6, the functions have been improved by making available the Objects menu.
In the latest version X7 command Image>Mirror and Image>Flip returned, but with new differences.
See my schedule here
 French translation here French translation here
 Your versions ici Your versions ici
For this tutorial, you will need:
Material
here
ube 6284-Luz Cristina
Kw mask 14.3.21.9
Kw mask 14.3.21.18
Wordart - Laurette 6
(you find here the links to the material authors' sites)
Plugins
consult, if necessary, my filter section here
Filters Unlimited 2.0 here
Penta.com - Dot and Cross here
Mura's Meister - Copies here
Tramages - Tow the Line - here
FM Tile Tools - Saturation Emboss here
Filters Penta.com and Tramages can be used alone or imported into Filters Unlimited.
(How do, you see here)
If a plugin supplied appears with this icon  it must necessarily be imported into Unlimited it must necessarily be imported into Unlimited

You can change Blend Modes according to your colors.
Copy the selections in the Selections Folder.
Open the masks in PSP and minimize them with the rest of the material.
1. Open a new transparent image 950 x 700 pixels.
Set your foreground color to #0b0914,
and your background color to #ccc5cf.

Flood Fill  the transparent image with your foreground color #0b0914. the transparent image with your foreground color #0b0914.
3. Effects>Plugins>Penta.com - Dot and Cross.

4. Effects>Plugins>FM Tile Tools - Saturation Emboss, default settings.

5. Open the tube 6284-Luz Cristina and go to Edit>Copy.
Go back to your work and go to Edit>Paste as new layer.
Image>Resize, to 80%, resize all layers not checked.
Image>Mirror.
Move  the tube to the right side. the tube to the right side.
6. Change the Blend Mode of this layer to Luminance (legacy)
and reduce the opacity to 40%.
7. Layers>New Raster Layer.
Flood Fill  the layer with your background color #ccc5cf. the layer with your background color #ccc5cf.
8. Layers>New Mask layer>From image
Open the menu under the source window and you'll see all the files open.
Select the mask kw mask 14 3 2021 9.

Layers>Merge>Merge Group.
Effects>Edge Effects>Enhance More.
9. Edit>Paste as new layer (the tube 6284-Luz Cristina is still in memory).
Image>Resize, 2 times to 80%, resize all layers not checked.
Placer  the tube as below the tube as below

10. Selections>Load/Save Selection>Load Selection from Disk.
Look for and load the selection sel.385.1.nines

11. Selections>Invert.
Press CANC on the keyboard 
Selections>Select None.
12. Move this layer under the mask's layer.

13. Activate the layer of the mask.
Selections>Load/Save Selection>Load Selection from Disk.
Look for and load the selection sel.385.nines

Selections>Promote Selection to layer.
Selections>Select None.
14. Effects>Plugins>Mura's Meister - Copies.

15. Layers>New Raster Layer.
Flood Fill  the layer with your background color #ccc5cf. the layer with your background color #ccc5cf.
16. Layers>New Mask layer>From image
Open the menu under the source window
and select the mask kw mask 14.3.21.18.

Layers>Merge>Merge Group.
Image>Mirror.
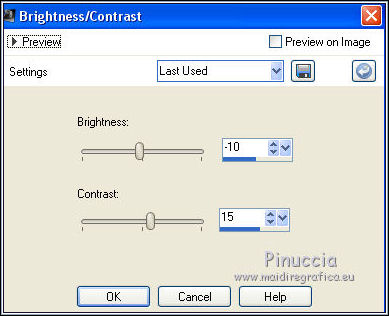
17. Adjust>Brightness and Contrast>Brightness and Contrast.

if necessary, activate the layer of the right tube
and place  it better. it better.

18. Layers>Merge>Merge All.
19. Image>Add borders, 2 pixels, symmetric foreground color #0b0914.
Image>Add borders, 2 pixels, symmetric, background color #ccc5cf.
20. Image>Resize, to 90%, resize all layers checked.
21. Edit>Copy.
22. Image>Add borders, 30 pixels, symmetric, foreground color #0b0914.
23. Activate your Magic Wand Tool 
and click on this border to select it.
24. Edit>Paste into Selection.
25. Adjust>Blur>Gaussian Blur - radius 25.

26. Effects>Plugins>Tramages - Tow the line.

27. Selections>Invert.
Effects>3D Effects>Buttonize, background color #ccc5cf.

28. Effects>3D Effects>Drop Shadow, color #000000.

29. Selections>Select None.
30. Image>Add borders, 2 pixels, symmetric, foreground color #0b0914.
32. Open the tube Wordart-Laurette 6 and go to Edit>Copy.
Go back to your work and go to Edit>Paste as new layer.
33. Sign your work on a new layer.
Layers>Merge>Merge All and save as jpg.
Version with tube by Wieske
(in the material, I joined my wordart,
for my version I did: Image>Negative Image)

 Your versions here Your versions here

If you have problems or doubts, or you find a not worked link, or only for tell me that you enjoyed this tutorial, write to me.
13 October 2021

|
 BEAUTIFUL FACE
