This tutorial was translated with PSPX3 but it can also be made using other versions of PSP.
Since version PSP X4, Image>Mirror was replaced with Image>Flip Horizontal,
and Image>Flip with Image>Flip Vertical, there are some variables.
In versions X5 and X6, the functions have been improved by making available the Objects menu.
In the latest version X7 command Image>Mirror and Image>Flip returned, but with new differences.
See my schedule here
French translation here
Your versions here
For this tutorial, you will need:
Material here
Tube Criss 2156 by Linda Gatita
Tube calguisdecoR31102014 by Guismo
Misted halloween_205_beas_misted
Tube black scaredy cats-kk
Tube Zona-Alice26-08-17
Tube psp6724-SCGadd-WitchAndBroomSilhoutteII.2
Tube barra_halloween_nines
Plugins
consult, if necessary, my filter section here
Mura's Meister - Perspective Tiling here
Mura's Meister - Cloud here

You can change Blend Modes according to your colors.
In the newest versions of PSP, you don't find the foreground/background gradient (Corel_06_029).
You can use the gradients of the older versions.
The Gradient of CorelX here
Copy the texture in the Textures Folder.
1. Open a new transparent image 900 x 600 pixels.
Set your foreground color to #090d13.
Flood Fill  the transparent image with your foreground color.
2. Set your foreground color to #293042,
and your background color to #4a5961.

Set your foreground color to a Foreground/Background Gradient, style Linear.
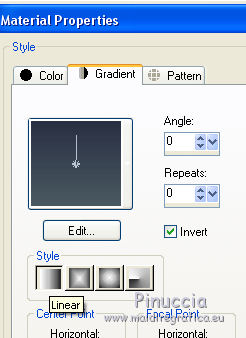
3. Layers>New Raster Layer.
Flood Fill  the layer with your Gradient.
4. Selection Tool 
(no matter the type of selection, because with the custom selection your always get a rectangle)
clic on the Custom Selection 
and set the following settings.
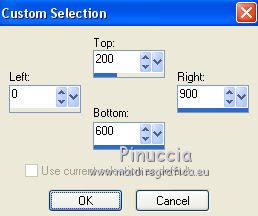
5. Effects>Texture Effects>Texture - select the texture brick002, color #2c3345.
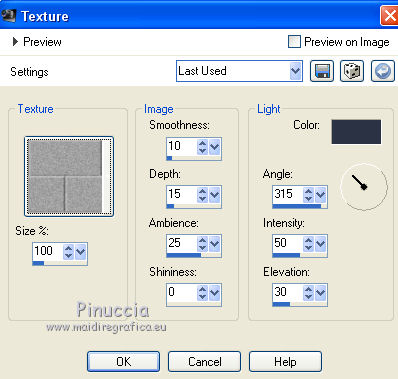
6. Selections>Invert.
Effects>Plugins>Mura's Meister - Cloud.

remember that this plugin works with the colors of your Materials,
but keeps in memory the first settings used after the opening of PSP.
So, if you have already used the plugin, press Reset to be sure to have your colors.
The result is random, for that your result will be always different).
Selections>Select None.
7. Custom Selection 
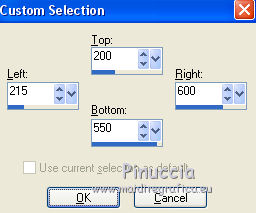
Press CANC on the keyboard 
Selections>Select none.
8. Open halloween_205_beas_misted - Edit>Copy.
Go back to your work and go to Edit>Paste as new layer.
9. Effects>Image Effects>Offset.
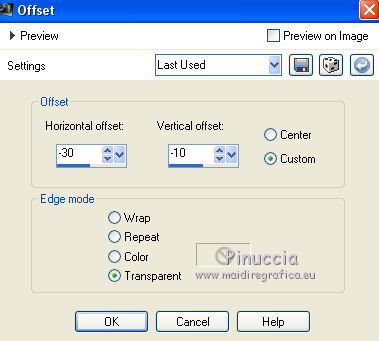
Change the Blend Mode of this layer to Luminance (legacy).
10. Layers>Duplicate.
Layers>Merge>Merge down.
11. Open the tube barra_halloween_nines - Edit>Copy.
Go back to your work and go to Edit>Paste as new layer.
12. Effects>Image Effects>Offset.
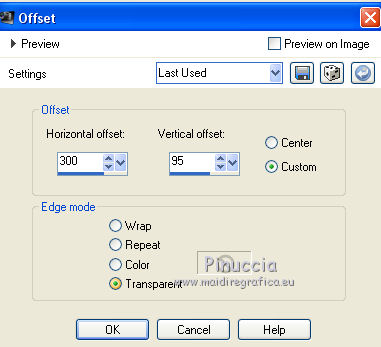
13. Layers>Duplicate.
Image>Mirror.
Effects>Image Effects>Offset.
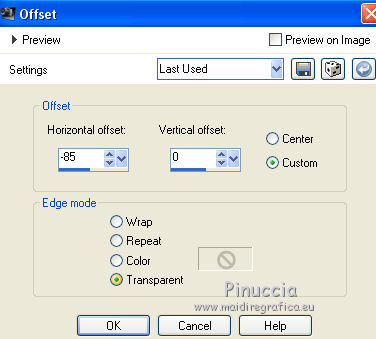
14. Open the tube calguisdecoR31102014 - Edit>Copy.
Go back to your work and go to Edit>Paste as new layer.
Place  rightly the tube.

15. Effects>3D Effects>Drop Shadow, color black.

16. Open black scared cats-kk - Edit>Copy.
Go back to your work and go to Edit>Paste as new layer.
Image>Mirror.
Move  the tube in the upper right.
17. Effects>3D Effects>Drop Shadow, color white.
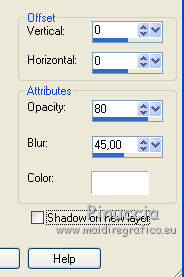
18. Open Tube_Zona-Alice26-08-17 - Edit>Copy.
Go back to your work and go to Edit>Paste as new layer.
Move  the tube in the lower right.
Effects>3D Effects>Drop Shadow, same settings.
19. Open psp6724-SCGadd-WitchAndBroomSilhouette - Edit>Copy.
Go back to your work and go to Edit>Paste as new layer.
Image>Resize, to 50%, resize all layers not checked.
Move  the tube in the upper right.
Effects>3D Effects>Drop Shadow, same settings.

20. Layers>Merge>Merge visible.
21. Layers>New Raster Layer.
Flood Fill  the layer with your Gradient.
22. Selections>Select All.
Selections>Modify>Contracter - 20 pixels.
Press CANC on the keyboard.
Selections>Invert.
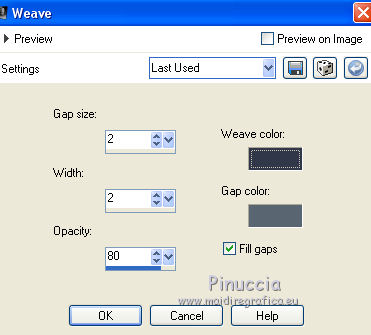
23. Effects>Texture Effects>Weave
weave color #2f3848, gap color #5a6572.
24. Selections>Invert.
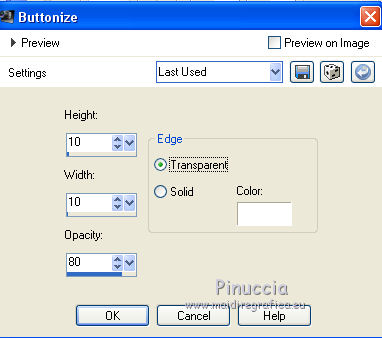
Effects>3D Effects>Buttonize, color white.
Selections>Select None.
25. Layers>Duplicate.
Image>Canvas Size - 900 x 700 pixels.

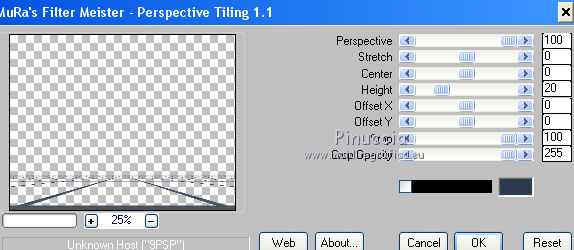
26. Effects>Plugins>Mura's Meister - Perspective Tiling.
27. Layers>Duplicate.
Image>Resize, 90%, resize all layers not checked.
28. Again Layers>Duplicate.
Image>Resize, 90%, resize all layers not checked.
29. Layers>Merge>Merge down - 2 times.
Layers>Arrange>Send to Bottom
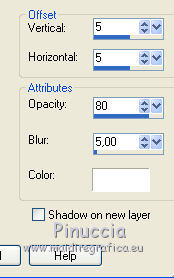
30. Effects>3D Effects>Drop Shadow, color white.

31. Activate the top layer.
Open SC-HalloweenWA1-9-2-09 - Edit>Copy.
Go back to your work and go to Edit>Paste as new layer.
Move  the tube in the lower left.
32. Layers>New Raster Layer.
Layers>Arrange>Send to Bottom.
Set your foreground to Color.
Flood Fill  the layer with your foreground color #293042.
33. Layers>Merge>Merge All.
34. Image>Add borders, 2 pixels, symmetric, foreground color #293042.
Image>Add borders, 20 pixels, symmetric, color white.
35. Open the tube Criss2156 - Edit>Copy.
Go back to your work and go to Edit>Paste as new layer.
Image>Resize, to 80%, resize all layers not checked.
Move  the tube in the lower right.
Activate the Eraser Tool 
and erase the left bord of the tube.


36. Layers>Merge>Merge All.
37. Image>Add borders, 2 pixels, symmetric, foreground color #293042.
38. Sign your work and save as jpg.

If you have problems or doubts, or you find a not worked link, or only for tell me that you enjoyed this tutorial, write to me.
16 October 2017

