Here you find the original of this tutorial:

This tutorial was created with PSP X2 but it can also be made using other versions of PSP.
Since version PSP X4, Image>Mirror was replaced with Image>Flip Horizontal,
and Image>Flip with Image>Flip Vertical, there are some variables.
In versions X5 and X6, the functions have been improved by making available the Objects menu.
In the latest version X7 command Image>Mirror and Image>Flip returned, but with new differences.
See my schedule here
French translation of december 2014 here
Your versions here
For this tutorial, you will need:
Material here
For the tubes thanks Guismo, Gabry and Nines
For the tube of my 2020 version thanks SussuLuz
Effects>Plugins
consult, if necessary, my filter section here
Filters Unlimited 2.0 here
Alien Skin Eye Candy 5 Impact - Extrude here
VM Toolbox - Grid here
Filters VM Toolbox can be used alone or imported into Filters Unlimited.
(How do, you see here)
If a plugin supplied appears with this icon  it must necessarily be imported into Unlimited
Animation Shop here

You can change Blend Modes according to your colors.
In the newest versions of PSP, you don't find the foreground/background gradient (Corel_06_029).
You can use the gradients of the older versions.
The Gradient of CorelX here
Open the mask in PSP and minimize it with the rest of the material.
1. Set your foreground color to #060d53,
and your background color to #88b3ff.

Set your foreground color to a Foreground/Background Gradient, style Rectangular.

Open a new transparent image 1000 x 600 pixels.
Flood Fill  the transparent image with your Gradient.
2. Adjust>Add/Remove Noise>JPEG Artifact Removal.

3. Selections>Select All.
Selections>Modify>Contract - 50 pixels.

Press CANC on the keyboard 
Selections>Select None.
4. Effects>Plugins>Alien Skin Eye Candy 5 Impact - Extrude.
Solid color and Highlight color: background color #88b3ff.

5. Effects>3D Effects>Drop Shadow, color black.
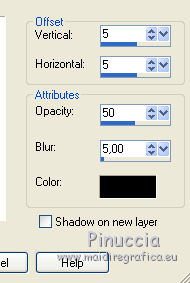
Repeat Drop Shadow, but vertical and horizontal -5.
6. Change the style of your gradient to Linear.

Layers>New Raster Layer.
Layers>Arrange>Send to Bottom.
Flood Fill the layer with your gradient.
7. Adjust>Add/Remove Noise/JPEG Artifact Removal, same settings.
8. Effects>Plugins>Filters Unlimited 2.0 - VM Toolbox - Grid.

9. Open the tube calguisSanDiegomisted29022012 and go to Edit>Copy.
Go back to your work and go to Edit>Paste as new layer.
Move  the tube down, see my example.
10. Open the tube Accents-Fireworks, composed by 4 layers.
Copy/Paste as new layer all the 4 layers.
Image>Resize, to 80%, resize all layers not checked.
Place the fires up,
and rename the layers with their colors: blue, red, purple and jellow.

11. Open the tube Gabry-varie 99 and go to Edit>Copy.
Go back to your work and go to Edit>Paste as new layer.
Move the tube up.
I updated this tube for year 2020; I joined it in the material
12. Edit>Copy Special>Copy Merged.
Edit>Paste as new layer.
13. Adjust>Blur>Gaussian Blur - radius 25.

14. Layers>New Mask layer>From image
Open the menu under the source window and you'll see all the files open.
Select the mask carrelage1-byhelenem.

Layers>Merge>Merge Group.
Don't move.
15. Image>Canvas Size - 1000 x 800 pixels.

16. Effects>3D Effects>Drop Shadow, color black.
17. Effects>Image Effects>Offset.

Layers>Arrage>Send to Bottom.
18. Layers>New Raster Layer.
Layers>Arrange>Send to Bottom.
Flood Fill the layer with your Linear Gradient.
19. Layers>Duplicate.
Change the Blend Mode of this layer to Overlay.

20. Activate the top layer.
Open the tube calguisAlinaXmas05122014 and go to Edit>Copy.
Go back to your work and go to Edit>Paste as new layer.
Image>Resize, 1 time to 90% and 1 time to 95%, resize all layers not checked.
Move the tube to the right side.
21. Effects>3D Effects>Drop Shadow, color black.

22. Open the tube Texto Happy New Year_nines and go to Edit>Copy.
Go back to your work and go to Edit>Paste as new layer.
Move the text at the bottom left.
the french text here
23. Open the tube ele37 and go to Edit>Copy.
Go back to your work and go to Edit>Paste as new layer.
Move the tube at the upper left.
24. Layers>Duplicate.
Image>Mirror.
25. Layers>New Raster Layer.
Set your foreground color to Color.
Flood Fill the layer with your foreground color #060D53.
Selections>Select All.
Selections>Modify>Contract - 5 pixels.
Press CANC on the keyboard.
Selections>Select None.
Animation.
1. Edit>Copy Special>Copy Merged.
Open Animation Shop and Edit>Paste>Paste as new animation.
2. Go back to PSP.
Close the layer of the purple fire.
Edit>Copy Special>Copy Merged.
Go back to Animation Shop and Edit>Paste>Paste after the current frame.
3. Again go back to PSP.
Open the layer of the purple fire and close the yellow layer.
Edit>Copy Special>Copy Merged.
Go back to Animation Shop and Edit>Paste>Paste after the current frame.
4. On PSP.
Open the yellow layers and close the blue layer.
Edit>Copy Special>Copy Merged.
On Animation Shop Edit>Paste>Paste after the current frame.
5. Again to PSP.
Open the blue layer and close the layer red and purple.
Edit>Copy Special>Copy Merged.
On Animation Shop Edit>Paste>Paste after the current frame.
6. Selections>Select All.
Animation>Frame Properties and set to 45

Click on the first frame to select it.
Animation>Frame Properties and set to 75.
Check your result clicking on View  and save as gif.

If you have problems or doubt, or you find a not worked link, or only for tell me that you enjoyed this tutorial, write to me.
24 December 2019

 english version