This tutorial was translated with PSP X2 but it can also be made using other versions of PSP.
Since version PSP X4, Image>Mirror was replaced with Image>Flip Horizontal,
and Image>Flip with Image>Flip Vertical, there are some variables.
In versions X5 and X6, the functions have been improved by making available the Objects menu.
In the latest version X7 command Image>Mirror and Image>Flip returned, but with new differences.
See my schedule here
French translation here
Your versions here
For this tutorial, you will need:
Material here
Tube Mina@.biancaneve.20.10.15
Tube 191_divers_p2_animabelle
Plugins:
consult, if necessary, my filter section here
Filters Unlimited 2.0 here
Mehdi - Wavy Lab here
Alf's Power Toys - Mirror Offset here
Tramages - Tow the line here
AAA Frames - Foto Frame here
Filters Alf's Power Toys and Tramages can be used alone or imported into Filters Unlimited.
(How do, you see here)
If a plugin supplied appears with this icon  it must necessarily be imported into Unlimited

You can change Blend Modes according to your colors.
Copy the preset Emboss 3 in the Presets Folder.
Copy the selection in the Selections Folder.
1. Open a new transparent image 1000 x 700 pixels.
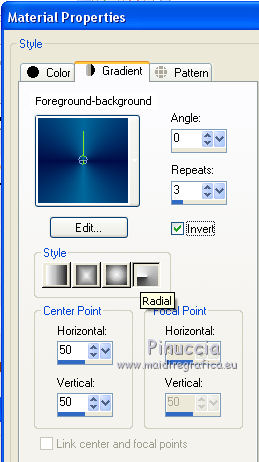
2. Set your foreground color to #000e49,
and your background color to #01689cf.

Set your foreground color to a Foreground/Background Gradient, style Radial.

Flood Fill  the transparent image with your Gradient.
3. Effects>Plugins>Mehdi - Wavy Lab

4. Layers>Duplicate.
Effects>Plugins>Filters Unlimited 2.0 - Alf's Power Toys - Mirror Offset.

5. Selections>Load/Save a Selections>Load Selection from Disk.
Look for and load the selection sel_blancanieves_nines.

6. Adjust>Blur>Gaussian Blur - radius 10.

7. Selections>Invert.
Press CANC on the keyboard 
8. Selections>Invert.
Effects>Plugins>Tramages - Tow the Line.

9. Effects>3D Effects>Drop Shadow, color black.

10. Effets>User Defined Filter - select the preset Emboss 3 and ok.

11. Open the tube 191_divers_p2_animabelle.
Activate the Freehand Selection tool 
and select one by one the three images.
Edit>Copy.
Go back to your work and go to Edit>Paste as New Layer.
Image>Resize, 2 times to 80%, resize all layers not checked.
12. Place  the three image as below.

13. Activate the calque of the image at the top right.
Layers>Duplicate.
Image>Mirror.
14. On the four calques:
Effects>3D Effects>Drop Shadow, color black.

15. Layers>Merge>Merge visible.
16. Edit>Copy.
17. Image>Resize, to 90%, resize all layers not checked.
19. Activate the Magic Wand tool 
and clic on the transparente space to select it.
20. Edit>Paste into Selection.
21. Adjust>Blur>Gaussian Blur - radius 10.

22. Selections>Invert.
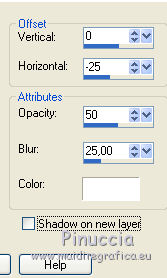
Effects>3D Effects>Drop Shadow, color white.

Repeat Drop shadow, but vertical and horizontal 0/-25.

Selections>Select None.
23. Effects>Plugins>AAA Frames - Foto Frame.

24. Open the tube Min@biancaneve.20.10.15 - Edit>Copy.
Go back to your work and go to Edit>Paste as New Layer.
Image>Resize, 1 time to 80% and 1 time to 90%, resize all layers not checked.
25. Effects>3D Effects>Drop Shadow, color black.

26. Sign your work.
27. Layers>Merge>Merge All.
Image>Add borders, 3 pixels, symmetric, color white.
Save as jpg.


If you have problems or doubt, or you find a not worked link, or only for tell me that you enjoyed this tutorial, write to me.
7 Novembre 2015

