|
TAG TREE FACE
english version

Here you find the original of this tutorial:

This tutorial was translated with PSPX17 but it can also be made using other versions of PSP.
Since version PSP X4, Image>Mirror was replaced with Image>Flip Horizontal,
and Image>Flip with Image>Flip Vertical, there are some variables.
In versions X5 and X6, the functions have been improved by making available the Objects menu.
In the latest version X7 command Image>Mirror and Image>Flip returned, but with new differences.
See my schedule here
French translation here
Your versions here
For this tutorial, you will need:
Material here
Karine_dream_Tre_Face_3547_Septembre_2016
Tube Enfant-77-Azalee
Mist 1153355_orig
75_animabelle_tubes_animaux
Tube adorno hojas nines
Tube autumleaves
Plugins
consult, if necessary, my filter section here
Filters Unlimited 2.0 here
Tramages - Gradient/Spoke Radio Maker, Pool Shadow here
Filters Tramages can be used alone or imported into Filters Unlimited.
(How do, you see here)
If a plugin supplied appears with this icon  it must necessarily be imported into Unlimited it must necessarily be imported into Unlimited

You can change Blend Modes according to your colors.
In the newest versions of PSP, you don't find the foreground/background gradient (Corel_06_029).
You can use the gradients of the older versions.
The Gradient of CorelX here
1. Open a new transparent image 900 x 600 pixels.
2. Set your Foreground color to #4f2201,
and your Background color to #a05d4a.

Set your Foreground Color to a Foreground/Background Gradient, style Rectangulaire.
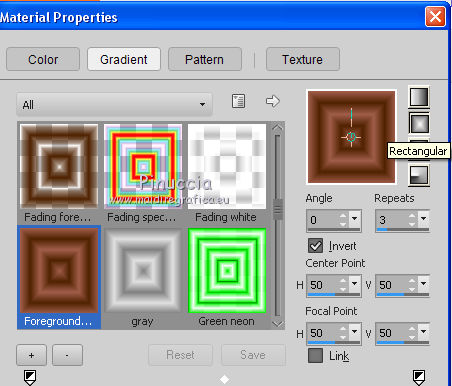
Flood Fill  the transparent image with your Gradient. the transparent image with your Gradient.
3. Effects>Plugins>Filters Unlimited 2.0 - Tramages - Gradient/Spokes Radio Maker.

4. Layers>Duplicate.
Image>Resize, to 90%, resize all layers not checked.
Change the Blend mode of this layer to Overlay.
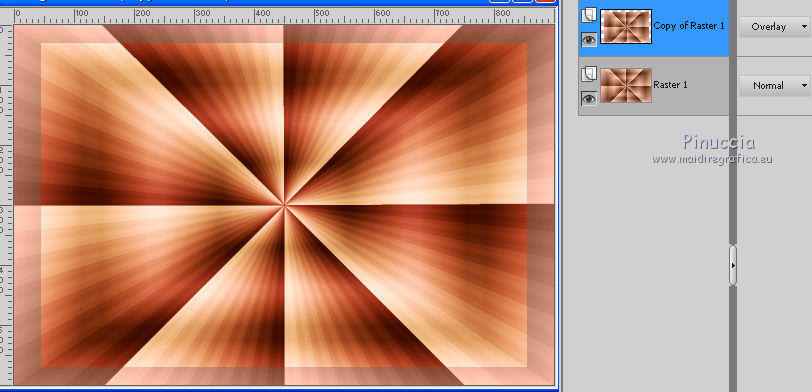
5. Selections>Select All.
Selections>Float.
Selections>Modify>Select Selection Borders.
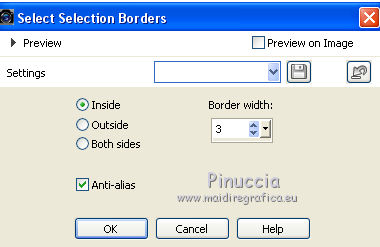
6. Layers>New Raster Layer.
Set your Foreground color to Color.
Flood Fill  the selection with your foreground color #4f2201. the selection with your foreground color #4f2201.
Selections>Select None.
7. Selection Tool 
(no matter the type of selection, because with the custom selection your always get a rectangle)
clic on the Custom Selection 
and set the following settings.
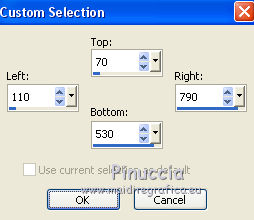
8. Layers>New Raster Layer.
Flood Fill  the selection with your foreground color #4f2201. the selection with your foreground color #4f2201.
9. Selections>Modify>Contract - 2 pixels.
Press CANC on the keyboard 
10. Set your foreground color to Gradient.
flood fill  the selection with your gradient. the selection with your gradient.
11. Adjust>Blur>Radial Blur.
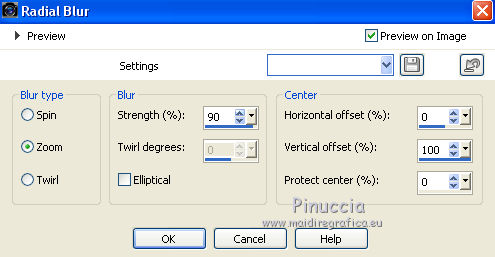
Keet selected.
12. Layers>New Raster Layer.
Open the mist 1153355_orig - Edit>Copy.
Go back to your work and go to Edit>Paste into Selection.
Change the Blend Mode of this layer to Luminance.
Selections>Select None.
13. Open the tube Karine_dream_Tre_Face_3547_Septembre_2016 - Edit>Copy.
Go back to your work and go to Edit>Paste as new layer.
Image>Resize, 2 times to 80%, resize all layers not checked.
Placer  rightly the tube, see my example. rightly the tube, see my example.
14. Layers>Merge>Merge visible.
15. Image>Resize, to 90%, resize all layers not checked.
16. Selections>Select All.
Selections>Float.
Selections>Modify>Select Selection Borders, same settings.

17. Layers>New Raster Layer.
Again set your foreground color to Color.
Flood Fill  the selection with your foreground color #4f2201. the selection with your foreground color #4f2201.
Selections>Select None.
18. Layers>Merge>Merge down.
19. Effects>3D Effects>Drop Shadow, color black.
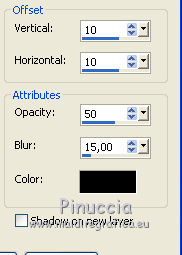
Repeat Drop Shadow, but vertical and horizontal -10.
20. Again set your foreground color to your Gradient.
Layers>New Raster Layer.
Layers>Arrange>Send to Bottom.
Flood Fill  the layer with your Gradient. the layer with your Gradient.
21. Effects>Plugins>Filters Unlimited 2.0 - Tramages - Pool Shadow, default settings.

22. Open the tube Enfant-77-Azalee - Edit>Copy.
Go back to your work and go to Edit>Paste as new layer.
Image>Resize, 3 times to 80%, resize all layers not checked.
Image>Mirror.
Move  the tube at the bottom left. the tube at the bottom left.
23. Effects>3D Effects>Drop Shadow, color black.
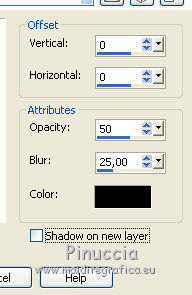
24. Open the deco hojas nines - Edit>Copy.
Go back to your work and go to Edit>Paste as new layer.
Place  the tube as below. the tube as below.

25. Open the tube autumleaves - Edit>Copy.
Go back to your work and go to Edit>Paste as new layer.
Place  rightly the tube, see my example. rightly the tube, see my example.
26. Open the tube 75_animabelle_tubes_animaux - Edit>Copy.
Go back to your work and go to Edit>Paste as new layer.
Image>Resize, 3 times to 80%, resize all layers not checked.
Move  the tube at the bottom right. the tube at the bottom right.
27. Effects>3D Effects>Drop Shadow, same settings.

28. Sign your work.
Layers>Merge>Merge All.
29. Image>Add borders, 2 pixels, symmetric, color #4f2201.
Image>Add borders, 10 pixels, symmetric, color #8b9d0d.
Image>Add borders, 20 pixels, symmetric, color #ee9713.
30. Save as jpg.

If you have problems or doubts, or you find a not worked link, or only for tell me that you enjoyed this tutorial, write to me.
3 November 2016
|

