|
TAG SWEETY
 ENGLISH VERSION ENGLISH VERSION

Here you find the original of this tutorial:

This tutorial was translated with PSPX7 but it can also be made using other versions of PSP.
Since version PSP X4, Image>Mirror was replaced with Image>Flip Horizontal,
and Image>Flip with Image>Flip Vertical, there are some variables.
In versions X5 and X6, the functions have been improved by making available the Objects menu.
In the latest version X7 command Image>Mirror and Image>Flip returned, but with new differences.
See my schedule here
French translation here
your versions ici
For this tutorial, you will need:
Material here
KamilTubes-502
Zona-Children114-06-17
171_divers_p2_animabelle
escalera_naranja_nines
cuadro Picasso de la red
Hat Biker d/a
Adrimar-912
barbderksen_50sred d/a
10845-TUBES SUELYDAM
mascara carrelage5-by-helenem
(you find here the links to the material authors' sites)
Plugins
consult, if necessary, my filter section here
Mura's Meister - Tone here
AAA Frames - Foto Frame here
Eye Candy 3.1 - Perspective Shadow here

You can change Blend Modes according to your colors.
Open the mask in PSP and minimize it with the rest of the material.
1. Open a new transparent image 1000 x 700 pixels.
2. Set your foreground color to #f6f4f0,
Set your background color to #a39c8b.

Flood Fill  the transparent image with your foreground color #f6f4f0. the transparent image with your foreground color #f6f4f0.
3. Adjust>Add/Remove Noise>Add Noise.

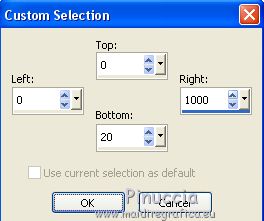
4. Selection Tool 
(no matter the type of selection, because with the custom selection your always get a rectangle)
clic on the Custom Selection 
and set the following settings.

5. Set your foreground color to a Foreground/Background Gradient, style Linear.

Layers>New Raster Layer.
Flood Fill  the layer with your Gradient. the layer with your Gradient.
Selections>Select None.
6. Effects>Plugins>Mura's Meister - Tone.

7. Custom Selection 

8. Layers>New Raster Layer.
Flood Fill  with your background color #a39c8b. with your background color #a39c8b.
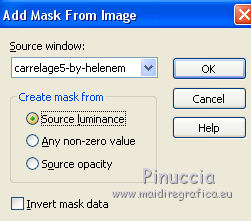
9. Layers>New Mask layer>From image
Open the menu under the source window and you'll see all the files open.
Select the mask carrelage5-by-helenem.

Layers>Merge>Merge Group.
Selections>Select None.
10. Custom Selection 

11. Layers>New Raster Layer.
Flood Fill  the layer with your Gradient. the layer with your Gradient.
Selections>Select None.
12. Open the tube escalera_naranja_nines - Edit>Copy.
Go back to your work and go to Edit>Paste as new layer.
Move  the tube to the left side, see my example. the tube to the left side, see my example.
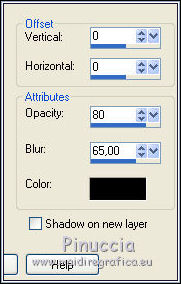
13. Effects>3D Effects>Drop Shadow, color black.

14. Open the tube 171_divers_p2_animabelle.
Select  the little picture - Edit>Copy. the little picture - Edit>Copy.
Go back to your work and go to Edit>Paste as new layer.
Place  the tube on the wall, see my example. the tube on the wall, see my example.
Activate again the tube and select  the big picture. the big picture.
Edit>Copy.
Go back to your work and go to Edit>Paste as new layer.
Place  the picture on the wall, see my example. the picture on the wall, see my example.

15. Open the picture cadre Picasso de la red - Edit>Copy.
Go back to your work and go to Edit>Paste as new layer.
Place  the tube on the wall, see mon example. the tube on the wall, see mon example.
16. Open the tube BagAndShoeGreen_tubebyCandy-11-06 - Edit>Copy.
Go back to your work and go to Edit>Paste as new layer.
Image>Resize, to 50%, resize all layers not checked.
Move  on the stairs, see my example. on the stairs, see my example.
17. Effects>3D Effects>Drop Shadow, same settings.
18. Open the tube Hat Biker - Edit>Copy.
Go back to your work and go to Edit>Paste as new layer.
Place  the tube on the stairs, see my example. the tube on the stairs, see my example.
Effects>3D Effects>Drop Shadow, same settings.
19. Open the tube barbderksen_50sred - Edit>Copy.
Go back to your work and go to Edit>Paste as new layer.
Image>Resize, 1 time to 50% and 1 time to 80%, resize all layers not checked.
Place  the tube on the stairs, see my example. the tube on the stairs, see my example.

20. Open the tube 10845-TUBES SUELYDAM - Edit>Copy.
Go back to your work and go to Edit>Paste as new layer.
Erase the watermark.
Move  the tube near the stairs, see my example. the tube near the stairs, see my example.

21. Effects>Plugins>Eye Candy 3.1. - Perspective Shadow, color black.

22. Open the tube KamilTubes-502 - Edit>Copy.
Go back to your work and go to Edit>Paste as new layer.
Image>Resize, 2 times to 80% and 1 time to 90%, resize all layers not checked.
Move  the tube to the right side. the tube to the right side.
23. Effects>Plugins>Eye Candy 3.1. - Perspective Shadow, same settings.

24. Effects>3D Effects>Drop Shadow, color black.

25. Open the tube Zona-Children114-06-17 - Edit>Copy.
Go back to your work and go to Edit>Paste as new layer.
Image>Resize, 1 time to 50% and 1 time to 80%, resize all layers not checked.
Erase the watermark.
Place  the tube on the stairs, see my example. the tube on the stairs, see my example.
26. Effects>3D Effects>Drop Shadow, color black.

27. Layers>Merge>Merge visible.
28. Effects>Plugins>AAA Frames - Foto Frame.

29. Open the tube Adrimar-912 - Edit>Copy.
Go back to your work and go to Edit>Paste as new layer.
Image>Resize, to 90%, resize all layers not checked.
Move  the tube at the bottom left. the tube at the bottom left.

Effects>3D Effects>Drop Shadow, same settings.
30. Layers>Merge>Merge All.
Image>Add borders, 2 pixels, symmetric, color #f1724f.
Sign your work and save as jpg.
Your versions here

If you have problems or doubts, or you find a not worked link, or only for tell me that you enjoyed this tutorial, write to me.
9 Juin 2018
|
 ENGLISH VERSION
