This tutorial was translated with PSPX3 but it can also be made using other versions of PSP.
Since version PSP X4, Image>Mirror was replaced with Image>Flip Horizontal,
and Image>Flip with Image>Flip Vertical, there are some variables.
In versions X5 and X6, the functions have been improved by making available the Objects menu.
In the latest version X7 command Image>Mirror and Image>Flip returned, but with new differences.
See my schedule here
For this tutorial, you will need:
Material here
Belscrap_To School_Doll 10
Belscrap_To School_Doll 8b
Belsracp_To School_El 40
Belscrap_To School.El 45c
Belscrap_To School_El 5s
Belscrap_To Scholl_El 50s
Belsracp_To School_El 54s
Belscrap_To School_El 36s
Texture Bakstenen muur
Plugins consult, if necessary, my filter section here
Filters Unlimited 2 here
Alien Skin Eye Candy 5 Impact - Extrude here
You can change Blend Modes according to your colors.
In the newest versions of PSP, you don't find the foreground/background gradient (Corel_06_029).
You can use the gradients of the older versions.
The Gradient of CorelX here
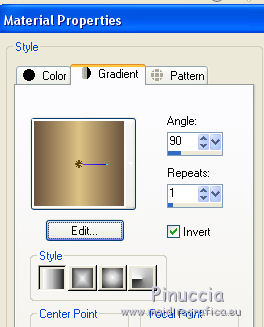
1. Set your foreground color to #dec284,
Set your Background color to #6b543e.
Set your foreground color to a Foreground/Background Gradient, style Linear.
2. Open a new transparent image 900 x 650 pixels.
Flood Fill the transparent image with your Gradient.
3. Adjust>Add/Remove Noise>Add Noise.
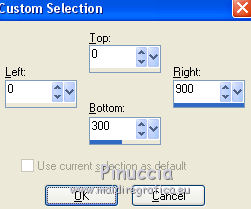
4. Selection Tool
(no matter the type of selection, because with the custom selection your always get a rectangle)
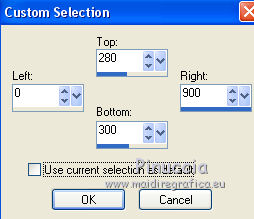
clic on the Custom Selection
and set the following settings.
5. Layers>New Raster Layer.
Flood Fill the layer with your gradient.
6. Effects>Texture Effects>Texture - select the texture Backstenen muur,
foreground color #dec284
7. Adjust>Sharpness>Sharpen More.
Selections>Select None.
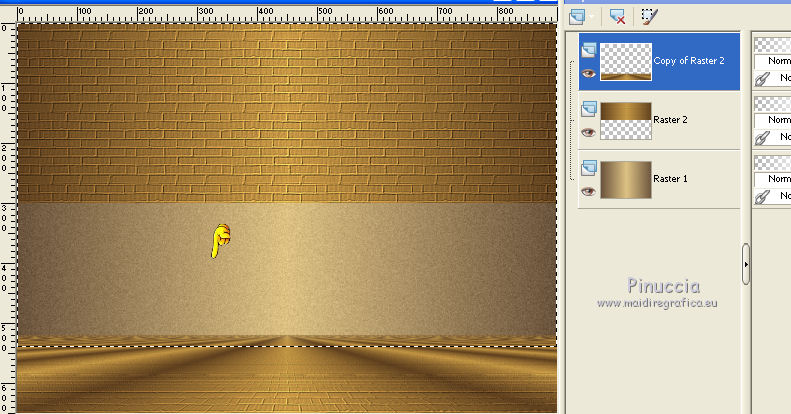
8. Layers>Duplicate.
9. Effects>Plugins>Mura's Meister - Perspective Tiling.
10. Activate the Magic Wand tool with these settings.
Click on the transparent image to select it.
Press 2 times CANC on the keyboard
Selections>Select None.
11. Custom Selection
12. Layers>New Raster Layer.
Flood Fill the layer with your background color #6b543e.
13. Effects>3D Effects>Inner Bevel, color white.
Selections>Select None.
14. Effects>Plugins>Alien Skin Eye Candy 5 Impact - Extrude
select the preset Small Offset 30 Degrees and ok.
15. Open Belscrap_To School_El 40 - Edit>Copy.
Go back to your work and go to Edit>Paste as new layer.
Place the tube on the wall, in the middle; see my example.
16. Open Belscrap_To School.El 45c - Edit>Copy.
Go back to your work and go to Edit>Paste as new layer.
Place the text on blackboard
17. Open Belscrap_To School_Doll 10 - Edit>Copy.
Go back to your work and go to Edit>Paste as new layer.
Move at the bottom left, see my example.
18. Effects>3D Effects>Drop Shadow, colore black.
19. Open Belscrap_To Scholl_El 50s - Edit>Copy.
Go back to your work and go to Edit>Paste as new layer.
Move the tube to the left side, see my example.
20. Open Belsracp_To School_El 54s - Edit>Copy.
Go back to your work and go to Edit>Paste as new layer.
Move the tube in the middle, see my example.
21. Open Belscrap_To School_El 36s - Edit>Copy.
Go back to your work and go to Edit>Paste as new layer.
Move the tube at the bottom right.
22. Open Belscrap_To School_Doll 8b - Edit>Copy.
Go back to your work and go to Edit>Paste as new layer.
Place the tube on the books.
Effects>3D Effects>Drop Shadow, same settings.
23. Open Belscrap_To School_El 5s - Edit>Copy.
Go back to your work and go to Edit>Paste as new layer.
Move the tube at the upper left.
Effects>3D Effects>Drop Shadow, same settings.
24. Activate the top layer.
Layers>New Raster Layer.
Flood Fill with your background color #6b543e.
25. Selections>Select All.
Selections>Modify>Contract - 3 pixels.
Press CANC on the keyboard.
Selections>Select None.
26. Layers>Merge>Merge All.
27. Image>Add borders, 30 pixels, symmetric, color #f6ffff.
Image>Add borders, 2 pixels, symmetric, color d'arrière plan #6b543e.

 ENGLISH VERSION


 the transparent image with your Gradient.
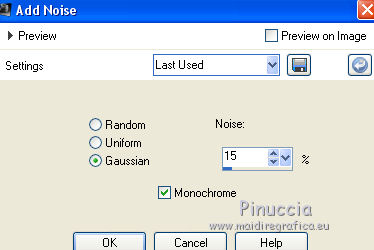


 with these settings.


 the tube on the wall, in the middle; see my example.


