This tutorial was translated with PSPX7 but it can also be made using other versions of PSP.
Since version PSP X4, Image>Mirror was replaced with Image>Flip Horizontal,
and Image>Flip with Image>Flip Vertical, there are some variables.
In versions X5 and X6, the functions have been improved by making available the Objects menu.
In the latest version X7 command Image>Mirror and Image>Flip returned, but with new differences.
See my schedule here
For this tutorial, you will need:
Material here
Tube Criss 488 by Linda Gatita
Mina@.4977 MIST RITRATTO 0UMO 11.17
SvB Schip 7 misted
Tube Lighthouse-1-Azalee
Tube Humo_Grisi
Narak_Mask_1122
Marco_uomo_nines
(your find here the links to the material authors' sites)
Plugins consult, if necessary, my filter section here
Mura's Meister - Cloud here
Mura's Meister - Perspective Tiling here
Mehdi - Sorting Tiles here
AP 01 [Innovations] - Lines SilverLining here
AAA Frames - Foto Frame here
You can change Blend Modes according to your colors.
Copy the preset Emboss 3 in the Presets Folder.
Open the mask in PSP and minimize it with the rest of the material.
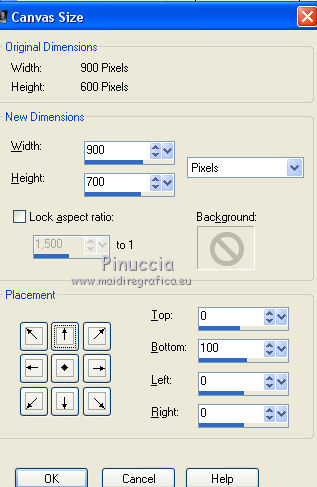
1. Open a new transparent image 900 x 600 pixels.
2. Set your foreground color to #63829f,
and your background color to #0a4467.
3. Effects>Plugins>Mura's Meister - Cloud
4. Open the tube SvB Schip 7 misted - Edit>Copy.
Go back to your work and go to Edit>Paste as new layer.
5. Layers>New Raster Layer.
Set your foreground color to white #ffffff.
Flood Fill the layer with color white.
6. Layers>New Mask layer>From image
Open the menu under the source window and you'll see all the files open.
Select the mask Narah_Mask_1122.
Layers>Merge>Merge Group.
7. Layers>Duplicate.
Activate the layer below of the original.
Change the Blend Mode of this layer to Hard Light.
If you have problems or doubts, or you find a not worked link, or only for tell me that you enjoyed this tutorial, write to me.
My mail is in the menu on the top of the page.

 ENGLISH VERSION


 the layer with color white.


 the tube to the left side.