|
TAG PLATEADO
 ENGLISH VERSION ENGLISH VERSION

Here you find the original of this tutorial:

This tutorial was translated with PSPX7 but it can also be made using other versions of PSP.
Since version PSP X4, Image>Mirror was replaced with Image>Flip Horizontal,
and Image>Flip with Image>Flip Vertical, there are some variables.
In versions X5 and X6, the functions have been improved by making available the Objects menu.
In the latest version X7 command Image>Mirror and Image>Flip returned, but with new differences.
See my schedule here
French translation here
your versions ici
For this tutorial, you will need:
Material here
Tube Femme 494 by Lily
Adorno_nines(created with material by nls_bicorenda_borboletinhas-brancas)
Patron_Plata
(you find here the links to the material authors' sites)
Plugins
consult, if necessary, my filter section here
Filters Unlimited 2.0 ici
Mehdi - Sorting Tiles ici
Simple - Pizza Slice Mirror ici
Mura's Meister - Copies ici
Filters Simple can be used alone or imported into Filters Unlimited.
(How do, you see here)
If a plugin supplied appears with this icon  it must necessarily be imported into Unlimited it must necessarily be imported into Unlimited

You can change Blend Modes according to your colors.
In the newest versions of PSP, you don't find the foreground/background gradient (Corel_06_029).
You can use the gradients of the older versions.
The Gradient of CorelX here
Open the pattern Patron_Plata in PSP and minimize it with the rest of the material.
1. Open a new transparent image 900 x 650 pixels.
2. Set your foreground color to Pattern and select the pattern Patron Plata.

Flood Fill  the transparent image with your pattern. the transparent image with your pattern.
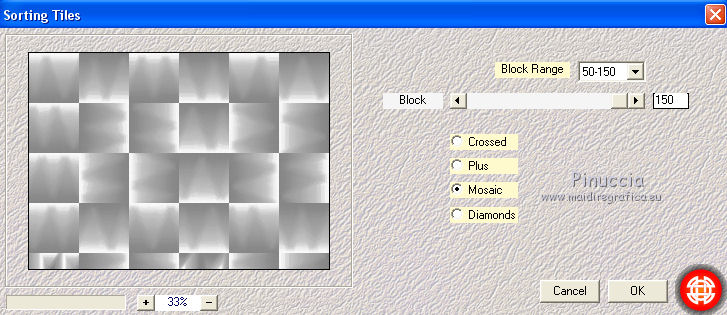
3. Effects>Plugins>Mehdi - Sorting Tiles.

4. Effects>Plugins>Filters Unlimited 2.0 - Simple - Pizza Slice Mirror - 2 times.

5. Set your foreground color to #e3ebfd
and your foreground color to #3278aa.

Set your foreground color to a Foreground/Background Gradient, style Linear.

Layers>New Raster Layer.
Flood Fill  the layer with your Gradient. the layer with your Gradient.
6. Effects>Plugins>Filters Unlimited 2.0 - Simple - Pizza Slice Mirror.

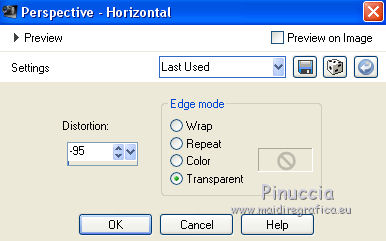
7. Effects>Geometric Effects>Perspective Horizontal.

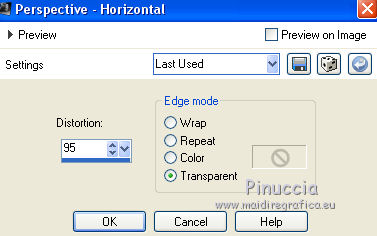
8. Repeat Effects>Geometric Effects>Perspective Horizonta, Distortion 95.

Result

9. Effects>Distortion Effects>Wave.

10. Image>Resize, 2 times to 50%, resize all layers not checked.
11. Effects>Plugins>Mura's Meister - Copies.

12. Image>Resize, to 50%, resize all layers not checked.
13. Effects>3D Effects>Drop Shadow, color black.

14. Move  the image to the right side in the middle. the image to the right side in the middle.

15. Layers>Duplicate.
Image>Mirror.
16. Open the tube Adorno_nines (created with material by nls_bicorenda_borboletinhas-brancas).
Edit>Copy.
Go back to your work and go to Edit>Paste as new layer.
Move  the tube a little higher. the tube a little higher.

17. Layers>Duplicate.
Image>Flip.
18. Open the tube Femme 494 by Lily - Edit>Copy.
Go back to your work and go to Edit>Paste as new layer.
Image>Resize, to 90%, resize all layers not checked.
Place  rightly the tube. rightly the tube.
19. Effects>3D Effects>Drop Shadow, same settings.

20. Layers>Merge>Merge All.
21. Image>Add borders, 2 pixels, symmetric, background color #3278aa.
Image>Add borders, 30 pixels, symétrique, foreground color #e3ebfd.
22. Activate the Magic Wand Tool 
and click on the 30 pixels bord to select it.
Set your foreground color to Pattern.

Flood Fill  the selection with your pattern. the selection with your pattern.
Selections>Select None.
23. Image>Add borders, 2 pixels, symmetric, background color #3278aa.
24. Sign your work and save as jpg.
The tube of this version is by Alies

Your versions here

If you have problems or doubts, or you find a not worked link, or only for tell me that you enjoyed this tutorial, write to me.
18 Juin 2018
|
 ENGLISH VERSION
