This tutorial was translated with PSPX3 but it can also be made using other versions of PSP.
Since version PSP X4, Image>Mirror was replaced with Image>Flip Horizontal,
and Image>Flip with Image>Flip Vertical, there are some variables.
In versions X5 and X6, the functions have been improved by making available the Objects menu.
In the latest version X7 command Image>Mirror and Image>Flip returned, but with new differences.
See my schedule here
French translation here
Your versions here
For this tutorial, you will need:
Material here
Imagen kit1 by_Mago74
Tube 125865109_5948199_Kiki201502
Tube BS16-Arbol
Paysage hiver misted jewel 013
Tube Winter Games at the Nort Pole 12
Animation Shop ici

You can change Blend Modes according to your colors.
1. Open a new transparent image 900 x 650 pixels.
2. Selections>Select All.
3. Open the image kit1 by_Mago74 - Edit>Copy.
Go back to your work and go to Edit>Paste into Selection.
Selections>Select None.
4. Open the winter landscape de Jewel - Edit>Copy.
Go back to your work and go to Edit>Paste as new layer.
Image>Resize, to 80%, resize all layers not checked.
5. Open the tube BS16-Arbol - Edit>Copy.
Go back to your work and go to Edit>Paste as new layer.
Image>Resize, 2 times to 80%, resize all layers not checked.
Move  the tube to the right side.
6. Open the tube 125865109_5948199_Kiki201502 - Edit>Copy.
Go back to your work and go to Edit>Paste as new layer.
Image>Resize, to 90%, resize all layers not checked.
Place the tube as below.
7. Open the tube Winter Games at the Nort Pole 12 - Edit>Copy.
Go back to your work and go to Edit>Paste as new layer.
Image>Resize, 2 times to 80%, resize all layers not checked.
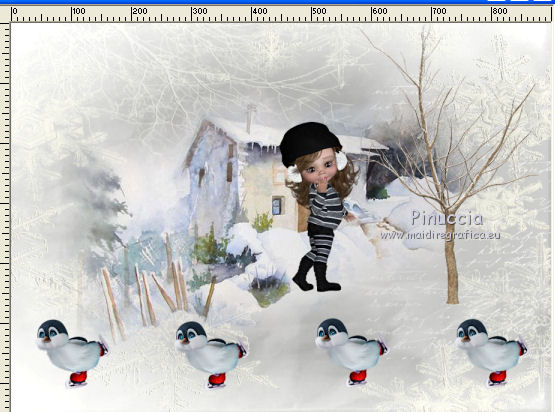
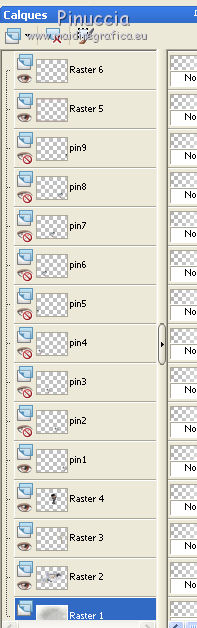
8. Layers>Duplicate - 3 times.
9. Rename these layers pin1, pin2, pin3, pin4.
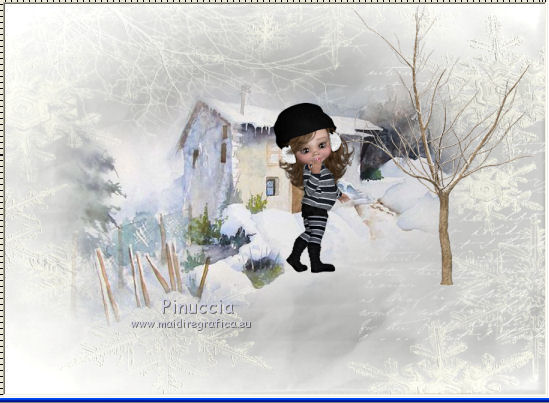
10. Place the tube as below.
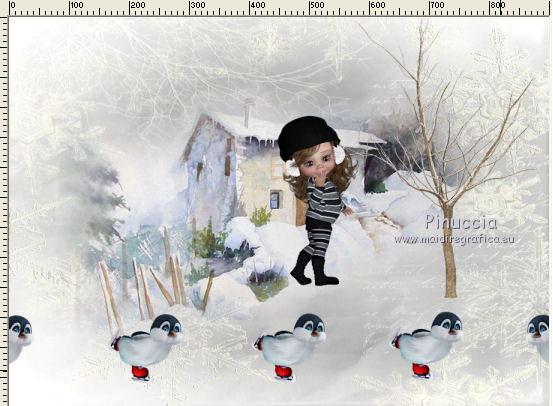
11. Activate the calque pin4.
Layers>Duplicate.
Image>Mirror.
Again Calques>Duplicate - 4 times
and rename the layers pin5, pin6, pin7, pin8 et pin9.
Placer the tubes as below.
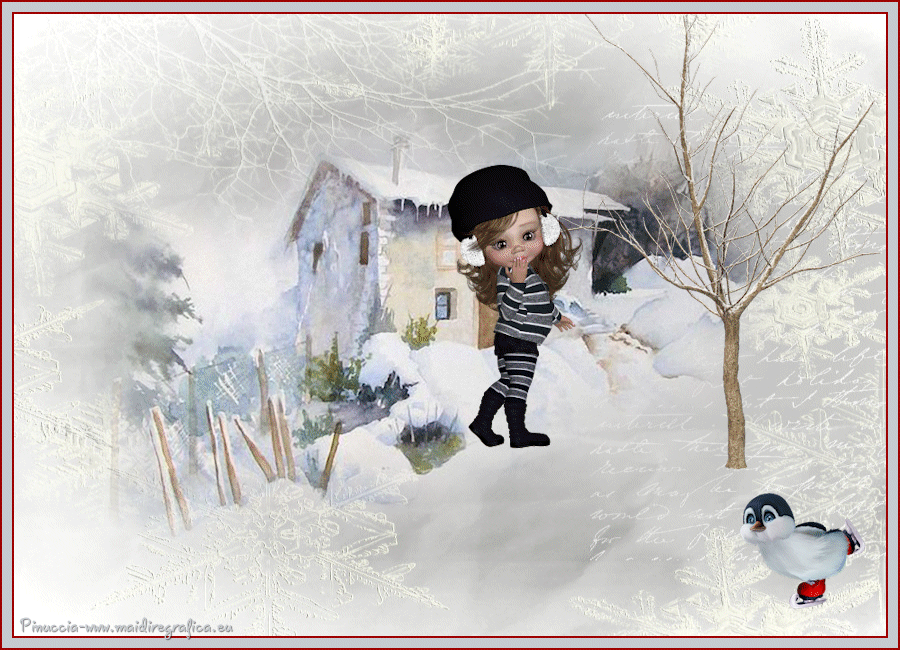
With all the layers opened, you should have this

12. Sign your work on a new layer.
Activate the top layer.
13. Set your foreground color to #9f0304
and your background color to #c6cbd1.
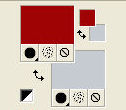
Layers>New Raster Layer.
Flood Fill  the layer with your foreground color #9f0304.
14. Selections>Select All.
Selections>Modify>Contract - 2 pixels.
Press CANC on the keyboard 
15. Flood Fill with your background color #c6cbd1.
Selections>Modify>Contract - 10 pixels.
Press CANC on the keyboard.
17. Flood Fill the selection with your foreground color #9f0304.
Selections>Modify>Contrac - 2 pixels.
Press CANC on the keyboard.
Selections>Select None.
Animation
1. Close the layers pin2/pin9 and keep visible the layer pin1.
Activate the bottom layer
(it is not necessary activate the layer to open or to close it).
2. Edit>Copy Special>Copy Merged.
Open Animation Shop and Edit>Paste>Paste as new animation.
3. Go back to PSP.
Close the layer pin1 and open the layer pin2.
Edit>Copy Special>Copy Merged.
Go back to Animation shop and Edit>Paste>Paste after the active image.
4. On PSP.
Close the layer pin2 and open the layer pin3.
Edit>Copy Special>Copy Merged.
On Animation Shop: Edit>Paste>Paste after the image active.
5. On PSP.
Close the layer pin3 and open the layer pin4.
Edit>Copy Special>Copy Merged.
On Animation Shop: Edit>Paste>Paste after the image active.
6. On PSP.
Close the layer pin4 and open the layer pin5.
Edit>Copy Special>Copy Merged.
On Animation Shop: Edit>Paste>Paste after the image active.
7. On PSP.
Close the layer pin5 and open the layer pin6.
Edit>Copy Special>Copy Merged.
On Animation Shop: Edit>Paste>Paste after the image active.
8. On PSP.
Close the layer pin6 and open the layer pin7.
Edit>Copy Special>Copy Merged.
On Animation Shop: Edit>Paste>Paste after the image active.
9. On PSP.
Close the layer pin7 and open the layer pin8.
Edit>Copy Special>Copy Merged.
On Animation Shop: Edit>Paste>Paste after the image active.
10. On PSP.
Close the layer pin8 and open the layer pin9.
Edit>Copy Special>Copy Merged.
On Animation Shop: Edit>Paste>Paste after the image active.
11. Edit>Select All.
Animation> Édition>Sélectionner tout.
Animation>Frame Properties - to 70.
12. View Animation

to check the result and save as gif.
If you have problems or doubt, or you find a not worked link, or only for tell me that you enjoyed this tutorial, write to me.
25 November 2016