This tutorial was translated with PSPX3 but it can also be made using other versions of PSP.
Since version PSP X4, Image>Mirror was replaced with Image>Flip Horizontal,
and Image>Flip with Image>Flip Vertical, there are some variables.
In versions X5 and X6, the functions have been improved by making available the Objects menu.
In the latest version X7 command Image>Mirror and Image>Flip returned, but with new differences.
See my schedule here
French translation here
Your versions here
For this tutorial, you will need:
Material here
Tube smArt_847
Mina.4541.mist.finetra.03.17
Vase-194-Azalee
smArt_maszk_54
Texto_chino_love_ac
Plugins
consult, if necessary, my filter section here
Filters Unlimited 2.0 here
Tramages - Tow the line here
Filters Tramages can be used alone or imported into Filters Unlimited.
(How do, you see here)
If a plugin supplied appears with this icon  it must necessarily be imported into Unlimited

You can change Blend Modes according to your colors.
In the newest versions of PSP, you don't find the foreground/background gradient (Corel_06_029).
You can use the gradients of the older versions.
The Gradient of CorelX here
The texture Asfalto01 is the standard texture Asphalt, Corel_15_030 in the new versions.
If you don't find it in your PSP, copy the texture supplied in the Textures Folder.
Open the mask in PSP and minimize it with the rest of the material.
1. Open a new transparent image 950 x 600 pixels.
2. Set your foreground color to #c8a88f,
and your background color to #efe1d8.

Flood Fill  the transparent image with your foreground color #c8a88f.
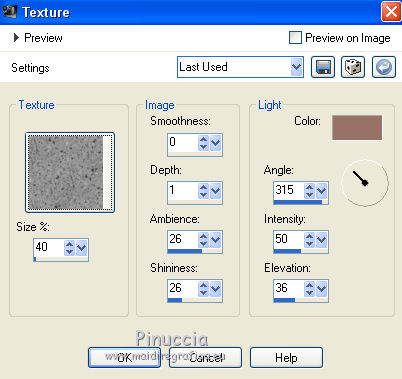
3. Effects>Texture Effects>Texture - select the texture Asphalt ou Corel_15_030
color #987266.
4. Layers>New Raster Layer.
Flood Fill  with your background color #efe1d8.
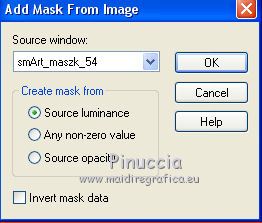
5. Layers>New Mask layer>From image.
Open the menu under the source window and you'll see all the files open.
Select the mask smArt_maszk_54.
Layers>Merge>Merge Group.
6. Adjust>Sharpness>Sharpen More.
7. Layers>Duplicate.
Activate the layer below of the original.
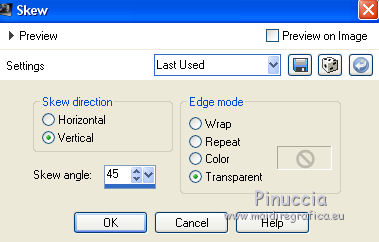
8. Effects>Geometric Effects>Skew.
9. Layers>Duplicate.
Image>Mirror.
10. Activate the top layer.
Open the tube Adorno_vintage_nines - Edit>Copy.
Go back to your work and go to Edit>Paste as new layer.
Move  the tube to the right side.
11. Layers>Duplicate.
Image>Mirror.

12. Selection Tool 
(no matter the type of selection, because with the custom selection your always get a rectangle)
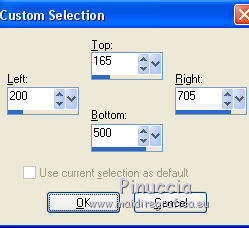
clic on the Custom Selection 
and set the following settings.
13. Layers>New Raster Layer.
Open the tube Mina.4541.mist.finetra.03.17 - Edit>Copy.
Go back to your work and go to Edit>Paste into Selection.
Selections>Select None.
14. Open the tube smArt_847 - Edit>Copy.
Go back to your work and go to Edit>Paste as new layer.
Move  the tube at the bottom left.
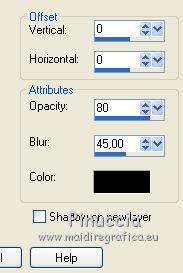
Effects>3D Effects>Drop Shadow, color black.
15. Layers>Merge>Merge All.
16. Image>Add borders, 2 pixels, symmetric, color #b37055.
Image>Add borders, 30 pixels, symmetric, color white.
17. Activate the Magic Wand Tool 
and click on the white bord to select it.
18. Set your foreground color to #ecdfd5
and your background color to #ab6b51.
Set your foreground color to a Foreground/Background Gradient, style Linear.
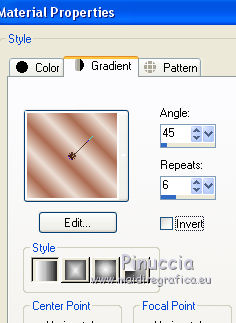
Flood Fill  the selection with your Gradient.
19. Effects>Plugins>Tramages - Tow the line

20. Selections>Invert.
Effects>3D Effects>Drop Shadow, color black.
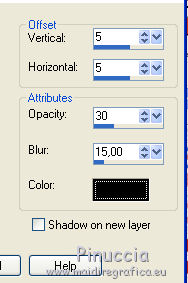
Repeat Drop Shadow, but vertical and horizontal -5.
Selections>Select None.
21. Open the tube Vase-194-Azalee - Edit>Copy.
Go back to your work and go to Edit>Paste as new layer.
Image>Resize, to 80%, resize all layers not checked.
Move  the tube at the bottom right.
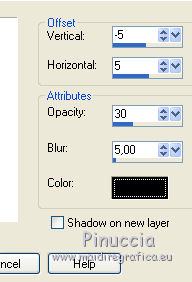
22. Effects>3D Effects>Drop Shadow, color black.
23. Open Texto_chino_love_ac - Edit>Copy.
Go back to your work and go to Edit>Paste as new layer.
Move  the text at the top.
24. Layers>Merge>Merge All.
Image>Add borders, 2 pixels, symmetric, #a2674d.
Image>Add borders, 10 pixels, symmetric, #ecdfd5.
Image>Add borders, 1 pixel, symmetric, #a2674d.
25. Sign your work and save as jpg.

If you have problems or doubt, or you find a not worked link, or only for tell me that you enjoyed this tutorial, write to me.
20 June 2017

