|
TAG NANETTE
 ENGLISH VERSION ENGLISH VERSION

Here you find the original of this tutorial:

This tutorial was translated with PSPX7 but it can also be made using other versions of PSP.
Since version PSP X4, Image>Mirror was replaced with Image>Flip Horizontal,
and Image>Flip with Image>Flip Vertical, there are some variables.
In versions X5 and X6, the functions have been improved by making available the Objects menu.
In the latest version X7 command Image>Mirror and Image>Flip returned, but with new differences.
See my schedule here
French translation here
Your versions ici
For this tutorial, you will need:
Material here
Tube N@nette_24_180209
mentali-misted1999
Tube 5122017esHond1 by Ellys
Narah_Mask_1303
(you find here the links to the material authors' sites)
Plugins
consult, if necessary, my filter section here
Tramages - Pool Shadow here
Filters Unlimited 2.0 here
AAA Frames - Foto Frame here
VanDerLee - Snowflakes here
Filters Tramages can be used alone or imported into Filters Unlimited.
(How do, you see here)
If a plugin supplied appears with this icon  it must necessarily be imported into Unlimited it must necessarily be imported into Unlimited
Animation Shop here

You can change Blend Modes according to your colors.
In the newest versions of PSP, you don't find the foreground/background gradient (Corel_06_029).
You can use the gradients of the older versions.
The Gradient of CorelX here
Open the mask in PSP and minimize it with the rest of the material.
1. Open a new transparent image 900 x 600 pixels.
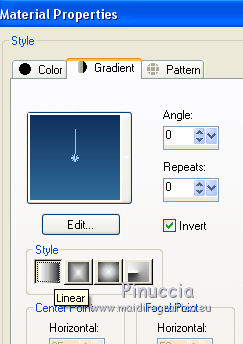
2. Set your foreground color to #11305c,
and your background color to #2f6c99.

Set your foreground color to a Foreground/Background gradient, style Linear.

Flood Fill  the transparent image with your Gradient. the transparent image with your Gradient.
3. Effects>Plugins>Tramages - Tow the line, default settings

4. Selections>Select All.
Selections>Modify>Contract - 40 pixels.
5. Layer>New Raster Layer.
Flood Fill  the layer with your background color. the layer with your background color.
6. Effects>Texture Effects>Weave
weave color: foreground color #11305c
gap color: background color #2f6c99.

7. Selections>Modify>Contract - 10 pixels.
Press CANC on the keyboard 
Keep selected.
8. Layer>New Raster Layer.
Invert the colors of your Palette

and set your foreground color to Gradient, same settings.

Flood Fill  the layer with your gradient. the layer with your gradient.
9. Effects>Plugins>Tramages - Pool Shadow.

Keep always selected.
10. Layer>New Raster Layer.
Set again initial colors and gradient
 
Flood Fill  the layer with the Gradient. the layer with the Gradient.
11. Layers>New Mask layer>From image
Open the menu under the source window and you'll see all the files open.
Select the mask Narah_Mask_1303.

Layers>Merge>Merge Group.
12. Effects>Edge Effects>Enhance More.
Selections>Select None.
13. Selection Tool 
(no matter the type of selection, because with the custom selection your always get a rectangle)
clic on the Custom Selection 
and set the following settings.

14. Layer>New Raster Layer.
Open the tube mentali-misted1999 and go to Edit>Copy.
Go back to your work and go to Edit>Paste into Selection.
Selections>Select None.
15. Layers>Merge>Merge All.
16. Image>Add borders, 2 pixels, symmetric, foreground color #11305c.
Image>Add borders, 40 pixels, symmetric, color white.
17. Activate your Magic Wand Tool 
and clic on the white border to select it.
Flood Fill  the selection with your gradient. the selection with your gradient.
18. Effects>Plugins>Tramages - Pool Shadow.

Selections>Select None.
19. Effects>Plugins>AAA Frames - Foto Frame.

20. Image>Add borders, 20 pixels, symmetric, color white.
Image>Add borders, 1 pixel, symmetric, foreground color #11305c.
21. Custom Selection 

22. Layers>Duplicate - 2 times.
Rename the layer from the bottom landscape 1, landscape 2, landscape 3.

23. Activate the layer landscape 1.
Effects>Plugins>VDL Adrenaline - Snowflakes
if you are using the new version of this plugin (the result doesn't change)
Effects>Plugins>VanDerLee - Snowflakes

24. Activate the layer landscape 2.
Repeat Effects>Plugins>VDL Adrenaline - Snowflakes, Random Seed 20 and ok.

Close this layer and activate the layer landscape 3.
25. Repeat Effects>Plugins>VDL Adrenaline - Snowflakes, Random Seed 25 and ok.

Close this layer.
Selections>Select None.
26. Open the tube N@nette_24_180209, erase the watermark and go to Edit>Copy.
Go back to your work and go to Edit>Paste as new layer.
Move  the tube to the right side. the tube to the right side.
27. Effects>3D Effects>Drop Shadow, color black.

28. Open the tube 5122017esHond1 by Ellys, erase the watermark and go to Edit>Copy.
Go back to your work and go to Edit>Paste as new layer.
Image>Resize, 2 times to 80%, resize all layers not checked.
Move  the tube at the bottom left. the tube at the bottom left.
29. Layer>New Raster Layer.
Set your foreground color to Color.
Flood Fill  the layer with your foreground color #11305c. the layer with your foreground color #11305c.
Selections>Select All.
Selections>Modify>Contract - 2 pixels.
Press CANC on the keyboard.
Selections>Select None.
30. Sign your work on a new layer.
ANIMATION
1. You layers: of landscape layers is visible only the layer landscape 1.

Edit>Copy Special>Copy Merged.
Open Animation Shop and Edit>Paste>Paste as new animation.
2. Go back to PSP.
Close the layer landscape 1 and open the layer landscape 2.
Edit>Copy Special>Copy Merged.
Go back to Animation Shop and Edit>Paste>Paste after the current frame.
3. Again go back to PSP.
Close the layer landscape 2 and open the layer landscape 3.
Edit>Copy Special>Copy Merged.
On Animation Shop: Edit>Paste>Paste after the current frame.
3. Animation>Resize animation, to à 95%.
Check the result clicking on View animation 
and save as gif.
Your versions here

If you have problems or doubts, or you find a not worked link, or only for tell me that you enjoyed this tutorial, write to me.
27 November 2018
|
 ENGLISH VERSION
