|
TAG MY PLANET
 ENGLISH VERSION ENGLISH VERSION

Here you find the original of this tutorial:

This tutorial was translated with PSPX7 but it can also be made using other versions of PSP.
Since version PSP X4, Image>Mirror was replaced with Image>Flip Horizontal,
and Image>Flip with Image>Flip Vertical, there are some variables.
In versions X5 and X6, the functions have been improved by making available the Objects menu.
In the latest version X7 command Image>Mirror and Image>Flip returned, but with new differences.
See my schedule here
French translation here
your versions ici
For this tutorial, you will need:
Material here
Tube calguismyplanetloveyou by Guismo
Misted calguismisted09062015 by Guismo
Narah_Mask_1197
Seleccion sel.264.nines
(you find here the links to the material authors' sites)
Plugins
consult, if necessary, my filter section here
Filters Unlimited 2.0 here
&<Bkg Kaleidoscope> - Kaleidoscope 3 (to import in Unlimited) here
Nik Software - Color Efex Pro here
Mura's Meister - Perspective Tiling here
Tramages - Pool Shadow here
Filters Tramages can be used alone or imported into Filters Unlimited.
(How do, you see here)
If a plugin supplied appears with this icon  it must necessarily be imported into Unlimited it must necessarily be imported into Unlimited

You can change Blend Modes according to your colors.
In the newest versions of PSP, you don't find the foreground/background gradient (Corel_06_029).
You can use the gradients of the older versions.
The Gradient of CorelX here
Copy the Selection in the Selection Folder.
Open the mask in PSP and minimize it with the rest of the material.
1. Open a new transparent image 900 x 650 pixels.
2. Set your foreground color to #1b3640,
Set your background color to #778183.

Set your foreground color to a Foreground/Background Gradient, style Rectangular.

Flood Fill  the transparent image with your Gradient. the transparent image with your Gradient.
3. Effects>Plugins>Filters Unlimited 2.0 - &<Bkg Kaleidoscope> - Kaleidoscope 3.

4. Selections>Load/Save Selection>Load Selection from Disk.
Look for and load the selection sel.264.nines.

Selections>Promote Selection to Layer.
5. Effects>Texture Effects>Blinds, color white.

Selections>Select None.
6. Layers>Duplicate.
Effects>Reflection Effects>Feedback.

7. Effects>3D Effects>Drop Shadow, color black.

8. Activate the bottom layer.
Effects>Geometric Effects>Perspective Vertical

9. Effects>3D Effects>Drop Shadow, same settings.
10. Keep the bottom layer selected.
Open the tube calguismisted09062015 - Edit>Copy.
Go back to your work and go to Edit>Paste as new layer.
11. Layers>Merge>Merge visible.
12. Layers>Duplicate.
13. Effects>Image Effects>Seamless Tiling, default settings.

14. Image>Canvas Size - 900 x 700 pixels.

15. Effects>Plugins>Mura's Meister - Perspective Tiling.

16. Activate the Magic Wand Tool  , Feather 20 , Feather 20
et cliquer sur la partie transparente pour la sélectionner.

Press 5 times CANC on the keyboard 
Selections>Select None.
17. Effects>Plugins>Nik Software - Color Efex Pro
Bi-Color Filter - to the right: Color set Violet/pink4.

18. Activate the bottom layer, Merged.
Repeat the plugin Nik Software, same settings.

19. Set your foreground color to white #ffffff.
Layers>New Raster Layer.
Flood Fill  the layer with white foreground color #ffffff. the layer with white foreground color #ffffff.
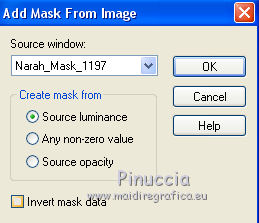
20. Layers>New Mask layer>From image
Open the menu under the source window and you'll see all the files open.
Select the mask Narah_Mask_1197

Layers>Merge>Merge group.
Adjust>Sharpness>Sharpen More.
21. Activate the top layer.
Open the tube calguismyplanetloveyou - Edit>Copy.
Go back to your work and go to Edit>Paste as new layer.
Image>Resize, 2 times to 80%, resize all layers not checked.
Move  the tube at the bottom left. the tube at the bottom left.
22. Effects>3D Effects>Drop Shadow, same settings.

23. Set your foreground color to #68304e.
Layers>New Raster Layer.
Flood Fill  the layer with the foreground color #68304e. the layer with the foreground color #68304e.
24. Selections>Select All.
Selection>Modify>Contract - 5 pixels.
Press CANC on the keyboard.
Selections>Select None.
25. Layers>Merge>Merge All.
26. Image>Add borders, 30 pixels, symmetric, color #ca9aa4.
27. Select this border with your Magic Wand Tool 
(don't forget to set again the Feather to 0)
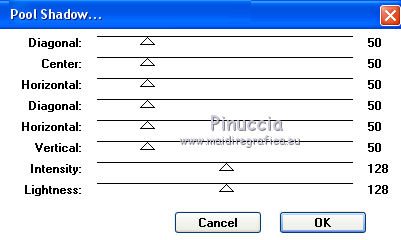
28. Effects>Plugins>Tramages - Pool Shadow, default settings.

29. Selections>Invert.
Effects>3D Effects>Drop Shadow, same settings.

Selections>Select None.
30. Image>Add borders, 2 pixels, symmetric, color #68304e.
31. Sign your work and save as jpg.
Le vostre versioni here

If you have problems or doubts, or you find a not worked link, or only for tell me that you enjoyed this tutorial, write to me.
21 Mars 2018
|
 ENGLISH VERSION
