Here you find the original of this tutorial:

This tutorial was created with PSPX3 but it can also be made using other versions of PSP.
Since version PSP X4, Image>Mirror was replaced with Image>Flip Horizontal,
and Image>Flip with Image>Flip Vertical, there are some variables.
In versions X5 and X6, the functions have been improved by making available the Objects menu.
In the latest version X7 command Image>Mirror and Image>Flip returned, but with new differences.
See my schedule here
French translation here
Your versions here
For this tutorial, you will need:
Material here
Tube DBK AA CelMale-292 by Katrina
Mist DBK WATER 0UTDOORS-011 by Katrina
Tube Michael_Clarke_Ducan_ac (found in Internet)
Tube Michael_clarke_Ducan_ac2 (found in Internet)
Plugins
consult, if necessary, my filter section here
Filters Unlimited 2.0 here
VM Toolbox - Grid here
Filters VM Toolbox can be used alone or imported into Filters Unlimited.
(How do, you see here)
If a plugin supplied appears with this icon  it must necessarily be imported into Unlimited

Copy the preset Emboss 3 in the Presets Folder.
1. Set your Foreground color to #455e80.
2. Open a new transparent image 600 x 400,
Flood Fill  with your foreground color #455e80.
3. Layers>New Raster Layer.
Selections>Select All.
4. Open the tube DBK WATER OUTDOORS - Edit>Copy.
Go back to your work and go to Edit>Paste into Selection.
Selections>Select None.
5. Effects>Image Effects>Seamless Tiling - default settings.

6. Adjust>Blur>Radial blur.

7. Effects>User Defined Filter - select Emboss 3 and ok.

8. Adjust>Sharpness>Sharpen more.
9. Change the blend mode of this layer to Luminance (Legacy).
10. Layers>New Raster Layer.
Selections>Select All.
Edit>Paste into Selection (the paysage is still in memory).
Change the blend mode of this layer to Luminance (Legacy).
11. Open the tube Michael_Clarke_Ducan_ac - Edit>Copy.
Go back to your work and go to Edit>Paste as new layer.
Move  the tube in the upper left.
Change the blend mode of this layer to Luminance (Legacy).
12. Open the tube Michael_Clarke_ducan_ac2 - Edit>Copy.
Go back to your work and go to Edit>Paste as new layer.
Move  the tube in the bottom right.
Change the blend mode of this layer to Luminance (Legacy).
13. Layers>New Raster Layer.
14. Effects>Plugins>Filters Unlimited 2.0 - VM Toolbox - Grid.

15. Layers>Merge>Merge All.
16. Image>Add borders, 2 pixels, symmetric, color #455e80.
Image>Add borders, symmetric not checked, color white.

17. Activate the Magic Wand tool 
and clic on the white bord to select it.
18. Selections>Invert.
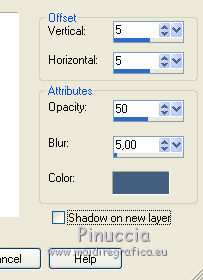
Effects>3D Effects>Drop Shadow, color #1d3658.

Selections>Select None.
19. Open the tube Adorno_marije10 - Edit>Copy.
Go back to your work and go to Edit>Paste as new layer.
Move  the tube in the upper left.
20. Layers>Duplicate.
Image>Flip.
21. Open Texto_Milla_de_0ro - Edit>Copy.
Go back to your work and go to Edit>Paste as new layer.
Move  the text to the left side.

22. Layers>Merge>Merge All.
23. Image>Add borders, 2 pixels, symmetric, color #455e80.
Image>Add borders, 30 pixels, symmetric, color white.
Select this bord with your Magic wand tool 
Selections>Invert.
24. Effects>3D Effects>Drop Shadow, color #455e80.

Repeat Drop Shadow, but vertical and horizontal -5.
Selections>Select None.
25. Open the DBK AA CelMale-292 - Edit>Copy.
Go back to your work and go to Edit>Paste as new layer.
Image>Resize, 3 times to 80%, resize all layers not checked.
Move  the tube on the bottom left.
26. Effects>3D Effects>Drop Shadow, color black.

27. Layers>Merge>Merge All.
Image>Add borders, 2 pixels, symmetric, color #455e80.
32. Sign your work and save as jpg.

If you have problems or doubt, or you find a not worked link, or only for tell me that you enjoyed this tutorial, write to me.
1 August 2015

