Here you find the original of this tutorial:

This tutorial was created with PSP X2 but it can also be made using other versions of PSP.
Since version PSP X4, Image>Mirror was replaced with Image>Flip Horizontal,
and Image>Flip with Image>Flip Vertical, there are some variables.
In versions X5 and X6, the functions have been improved by making available the Objects menu.
In the latest version X7 command Image>Mirror and Image>Flip returned, but with new differences.
See my schedule here
French translation here
Your versions here
For this tutorial, you will need:
Material here
The tubes are by Mara Pontes et Animabelle.
The mask is by Animabelle.
Plugins
consult, if necessary, my filter section here
Filters Unlimited 2.0 here
AAA Frames - Texture Frame here
VM Toolbox - Grid here
Mura's Meister - Perspective Tiling here
Filters VM Toolbox can be used alone or imported into Filters Unlimited.
(How do, you see here)
If a plugin supplied appears with this icon  it must necessarily be imported into Unlimited

You can change Blend Modes according your color.
Copy the selection in the Selections Folder.
Open the mask in PSP and minimize it with your material.
1. Set the Foreground color to #a37fb9,
and the Background color to #c6c2cf.

2. Open a new transparent image 900 x 650 pixels.
Flood Fill  with the foreground color #a37fb9.
3. Layers>New Raster Layer.
Flood Fill  with the background color #c6c2cf.
4. Layers>New Mask layer>From image.
Open the menu under the source window and you'll see all the files open.
Select the mask 043_animabelle_masques.

Layers>Merge>Merge group.
5. Adjust>Sharpness>Sharpen.
Set the blend mode to Hard light.
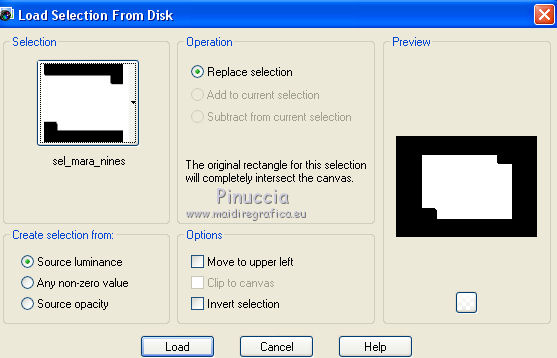
6. Sélections>Load/Save Selection>Load Selection from Disk.
Look for and load selection sel_mara_nines.

7. Layers>New Raster Layer.
8. Open the tube 196_paysage_p3_animabelle - Edit>Copy.
Back to your work and go to Edit>Paste into Selection.
Selection>Select None.
9. Open the tube 1656_mulher_mara_pontes - Edit>Copy.
Back to your work and go to Edit>Paste as new layer.
Image>Resize, 80%, resize all layers not checked.
Move  the tube to the left side.
Set the Blend mode to Soft Light.

10. Layers>Duplicate.
Image>Mirror.
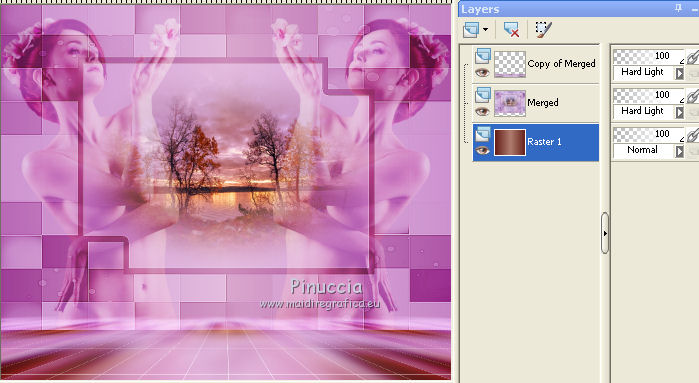
11. Layers>Merge>Merge visible.
12. Layers>Duplicate.
13. Effects>Image Effets>Seamless Tiling, standard.

14. Adjust>Blur>Gaussian blur - radius 25.

15. Effects>Plugins>VM Toolbox - Grid.

16. Image>Canvas Size - 900 x 750 pixels.

17. Effects>Modules Externes>Mura's Meister - Perspective Tiling.

18. Set the Blend mode to Hard Light.
19. Activate the Magic Wand Tool  , Tolerance and Feather 20,
clic on the transparent space to select it.

Press 3 time CANC on the keyboard 
Selections>Select None.
20. Set the Blend mode to Hard Light.
21. Layers>New Raster Layer.
Layers>Arrange>Send to Bottom.
22. Set the foreground color to #af7d6f
and the background color to #621b16.

Set the foreground color to Foreground/Background gradient, style Linear.

Flood Fill  the layer with the gradient.

Layers>Merge>Merge visible.
23. Effects>Plugins>AAA Frame - Texture Frame - 2 time with this settings.

24. Adjust>Brightness and Contrast>Brightness/Contrast.

25. Open the tube 1643_mulher_mara_pontes - Edit>Copy.
Back to your work and go to Edit>Paste as new layer.
Move  the tube to the bottom.
26. Effects>3D Effects>Drop Shadow, color #621b16.

27. Repeat Adjust>Brightness and Contrast>Brightness/Contrast.

28. Layers>Merge>Merge All.
Sign your work and save as jpg.
Tubes of this version are by Tocha and Guismo.


If you have problems or doubt, or you find a not worked link, or only for tell me that you enjoyed this tutorial, write to me.
21 April 2014

