|
TAG HOMME
 ENGLISH VERSION ENGLISH VERSION
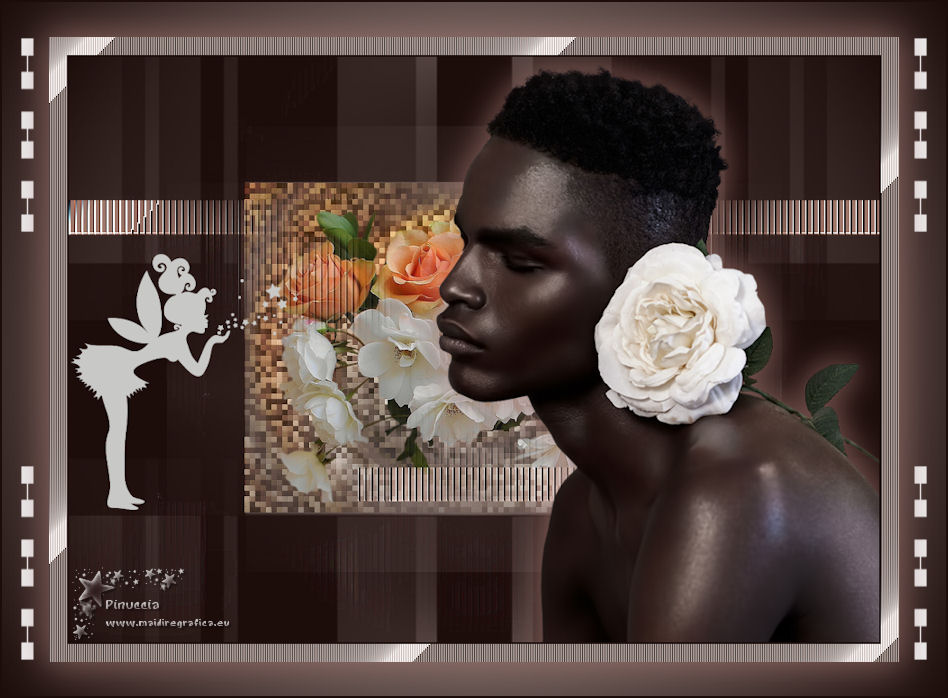
Here you find the original of this tutorial:

This tutorial was translated with PSPX2 but it can also be made using other versions of PSP.
Since version PSP X4, Image>Mirror was replaced with Image>Flip Horizontal,
and Image>Flip with Image>Flip Vertical, there are some variables.
In versions X5 and X6, the functions have been improved by making available the Objects menu.
In the latest version X7 command Image>Mirror and Image>Flip returned, but with new differences.
See my schedule here
French translation here
your versions ici
For this tutorial, you will need:
Material here
Tube 111_fleurs_animabelle_page3
Narah_Mask_1276
Narah_Mask_1259
Adorno hada_nines
Adorno Short_nines
(you find here the links to the material authors' sites)
Plugins
consult, if necessary, my filter section here
Filters Unlimited 2.0 here
Tramages - Tow the line here
Xero - Fritillary here
Filters Tramages can be used alone or imported into Filters Unlimited.
(How do, you see here)
If a plugin supplied appears with this icon  it must necessarily be imported into Unlimited it must necessarily be imported into Unlimited

You can change Blend Modes according to your colors.
In the newest versions of PSP, you don't find the foreground/background gradient (Corel_06_029).
You can use the gradients of the older versions.
The Gradient of CorelX here
Copy the preset Emboss 3 in the Presets Folder.
Open the masks in PSP and minimize them with the reste of the material.
1. Open a new transparent image 900 x 650 pixels.
2. Set your foreground color to #1c0d0b,
and your background color to #c3b0aa.

Set your foreground color to a Foreground/Background Gradient, style Sunburst.

Flood Fill  the transparent image with your gradient. the transparent image with your gradient.
3. Layers>New Mask layer>From image
Open the menu under the source window and you'll see all the files open.
Select the mask Narah_Mask_1276.
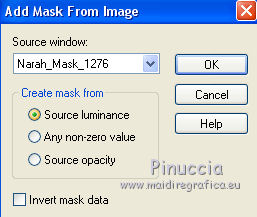
Layers>Merge>Merge Group.
4. Selection Tool 
(no matter the type of selection, because with the custom selection your always get a rectangle)
clic on the Custom Selection 
and set the following settings.

5. Layers>New Raster Layer.
Open the tube 111_fleurs_animabelle_page3 -Edit>Copy.
Go back to your work and go to Edit>Paste into Selection.
6. Adjust>Blur>Radial Blur.
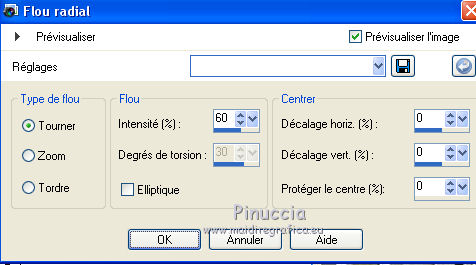
7. Effects>Plugins>Xero - Fritillary.
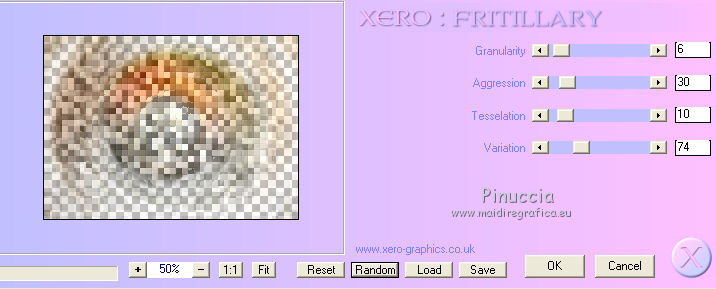
Change the Blend Mode of this layer to Hard Light.
Selections>Select None.
8. Edit>Paste as new layer (the tube 111_fleurs_animabelle_page3 is still in memory).
Go back to your work and go to Edit>Paste as new layer.
9. Layers>New Raster Layer.
Layers>Arrange>Send to Bottom.
Set your foreground to Color.
Flood Fill  with your foreground color #1c0d0b. with your foreground color #1c0d0b.
10. Layers>New Raster Layer.
Layers>Arrange>Bring to Top.
Flood Fill  with your background color #c3b0aa. with your background color #c3b0aa.
11. Layers>New Mask layer>From image
Open the menu under the source window and select the mask Narah_Mask_1259.

Layers>Merge>Merge Group.
12. Effects>Plugins>Tramages- Tow The Line.
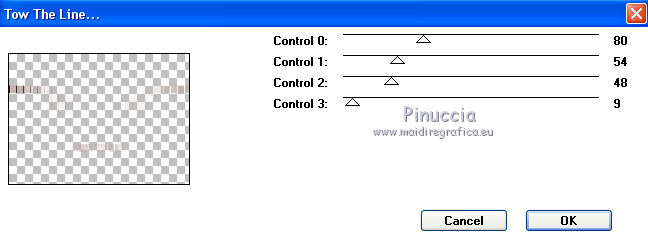
13. Effects>User Defined Effects - select the preset Emboss 3 and ok.

14. Change the Blend Mode of this layer to Hard Light.
15. Open the tube 77_homme_animabelle -Edit>Copy.
Go back to your work and go to Edit>Paste as new layer.
Image>Resize, to 80%, resize all layers not checked.
16. Effects>3D Effects>Drop Shadow, color #a37670.

Edit>Repeat Drop Shadow.
Move  the tube at the bottom right. the tube at the bottom right.
17. Layers>Merge>Merge All.
18. Image>Add borders, 2 pixels, symmetric, foreground color #1c0d0b.
Image>Add borders, 20 pixels, symmetric, background color #c3b0aa.
19. Activate the Magic Wand Tool 
and click on the 20 pixels border to select it.
20. Effects>Plugins>Tramages - Tow The Line.
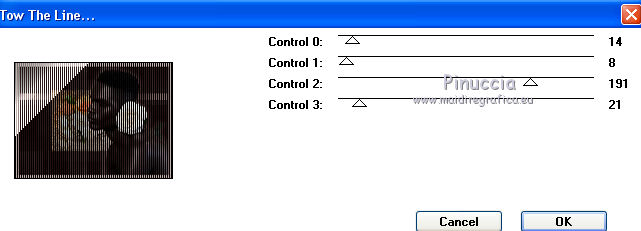
Selections>Select None.
21. Open the tube Adorno hada_nines, erase the watermark and go to Edit>Copy.
Go back to your work and go to Edit>Paste as new layer.
Move  the tube to the left side. the tube to the left side.
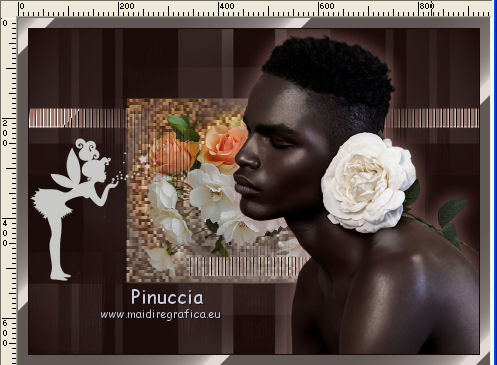
22. Layers>Merge>Merge visible.
23. Image>Resize, to 90%, resize all layers not checked.
24. Effects>3D Effects>Drop Shadow, color #a37670.

Edit>Repeat Drop Shadow.
25. Layers>New Raster Layer.
Layers>Arrange>Send to Bottom.
Flood Fill  the layer with your Gradient. the layer with your Gradient.
26. Activate the top layer.
Open the tube Adorno Short_nines, erase the watermark and go to Edit>Copy.
Go back to your work and go to Edit>Paste as new layer.
27. Layers>Merge>Merge All.
28. Image>Add borders, 2 pixels, symmetric, foreground color #1c0d0b.
29. Sign your work and save as jpg.
Your versions here

If you have problems or doubts, or you find a not worked link, or only for tell me that you enjoyed this tutorial, write to me.
1 Septembert 2018
|
 ENGLISH VERSION
